One of the best features of iOS devices is their syncing capabilities. You can sync your iPhone, iPad and iPod Touch to iTunes to listen to music, watch movies, and view photos on your iDevice. However, if you notice that some songs or videos aren't transferring over as they should, it's likely that you're syncing files using the wrong media sync options. Here's how to change media sync options on your iPhone.
You might have received a popup dialogue while upgrading your iOS version to the latest one, saying you need to change the media sync options to free up some storage. This dialogue can be very frustrating, and many iPhone users get confused about what this message means.
This dialogue pops up when there is a storage shortage on your iPhone for updating the iOS version or whenever you are trying to backup files using iTunes. It's a good thing to keep a minimum of 10 % of your iPhone storage always free if you face some issues. Synced media can steal a considerable amount from your iPhone storage, so it's a good thing to control the media sync.
I'll explain how you can change the media sync options so that some storage becomes accessible for the iOS update.
Changing the Media Sync Options
We all want to enjoy the latest features on our iPhones by updating the iOS version. If there's a storage shortage, you can edit the iOS version, and changing the media sync options is needed to free up some space.
iTunes app is used to control many iOS devices, including how and which media content to sync on your iPhone. You can change the media sync options using iTunes easily, and here's how
- Plug your iPhone using the charging cable into a PC.
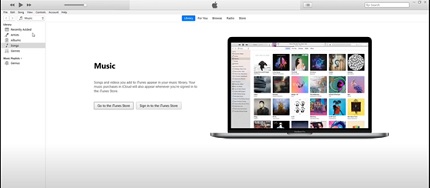
- Open the latest version of iTunes on your PC, although it should start automatically.
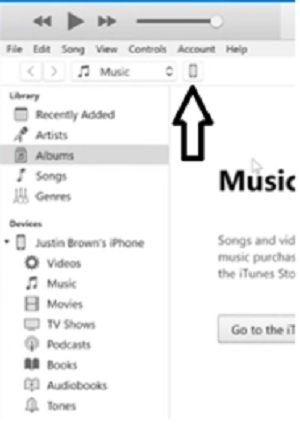
- Click on the icon looking like a mobile device at the upper right section of the screen. This icon shows up on iTunes whenever an iPhone is connected to that PC.
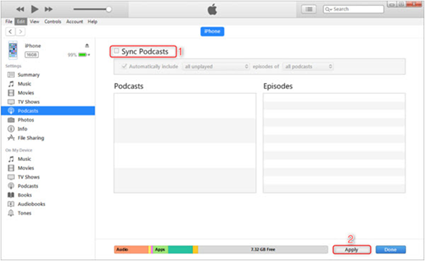
- Under the "Settings" menu, there are some options such as movies, music, etc. Click on any of those contents and uncheck the button for syncing. Lastly, click on "Apply" to stop the syncing completely.
If you want to start the syncing again, check the box for syncing, and it will restart the syncing process.
Using iCloud to Change the Media Sync Options
iCloud is utilized to sync your iPhone so that it can be used as a backup later. You can store your files on this and get access from any device. If you ever face any situation where you need to change the media sync options, you can use iCloud alongside iTunes. To change the media options using iCloud
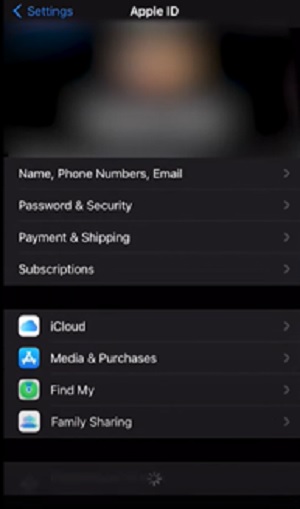
- Open the "Settings" and press your name or the Apple ID located at the top.
- Hit the "iCloud" option.
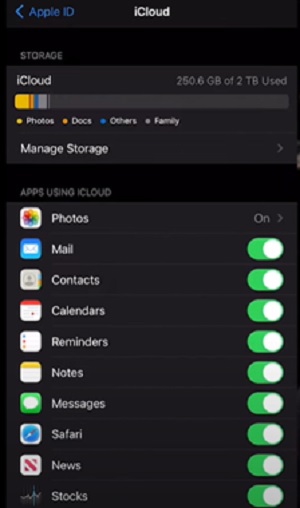
- From the list of applications, you can press and turn off the switch for any option. It will stop the syncing process with iCloud, and you can control your storage situation more precisely.
How Can I Manage the Storage Situation on iPhone?
Managing storage on iPhone can be done quickly. To address the storage
- Open the "Settings".
- Navigate to "General" and press on "Phone Storage".
- Now, select any app that you don't need and delete it.
Also, you can change the media sync options following the above methods to manage your iPhone storage. It's a good idea to save at least 10% of the storage space.
Summary: Change Media Sync Options on iPhone
- How to change what syncs with iTunes.
- Connect your iPhone to your computer using the original cable that came with it.
- When iTunes launches, click on the Device icon at the top of the window.
- How to sync iPhone content using iCloud.
- Open the Settings app on your iPhone and go to iCloud > Photos.
- Tap on “My Photo Stream” and toggle on “Share My Photo Stream” if you want other people to be able to view your streams in their shared tab — and also make sure “Upload to My Photo Stream” is enabled so that photos you take on other devices automatically get downloaded into your photo stream too.
