Finding the hardware details about your computer can sometimes be tricky, because so much of it is invisible. One piece of hardware which you may find hard to inspect without opening up your computer is the RAM. You might have 8GB or 16GB of memory on your computer – but do you really know exactly what type it is? Windows 7 and other operating systems offer details about your system’s RAM and how much there is, but they don’t show the type of RAM you have installed. Here’s how to find out what kind of RAM is installed in your Windows 7 computer:
RAM, or Random Access Memory, plays an important role regarding your computer’s performance. It is responsible for the short-term memory of your computer in order to smoothen its functions as they start to pile up. Generally, the more RAM your computer has, the better its performance will be.
However, many people didn’t know that although RAM can be expandable, there is a certain limit. Physically, most motherboards have 2 to 4 slots for RAM modules, and technically, there is also a limit to the RAM capacity your computer can handle. If you want to conduct changes on your computer starting from your own unit, you want to first consider the amount of RAM you have.
Whatever it is indicated, its details will be the deciding factors if the RAM module you are using is functional, will need some technical solutions, or need a replacement with a greater capacity.
Here are the following methods that you can apply in order to check the current RAM and its details.
Checking RAM Through the Use Of Search Bar
- Click on the Start button.
- On the search bar, type in RAM.
- Among the search results, click on the “Show how much RAM is on this computer” or the “View RAM Info” option.
- A dialog box will appear indicating system information. Here, you will see the details regarding your RAM.
Checking RAM Through My Computer
- Click on the Start button.
- Locate the Computer menu and right-click on it. Next, select the “Properties” option.
- From there, you can view the details regarding your installed RAM.
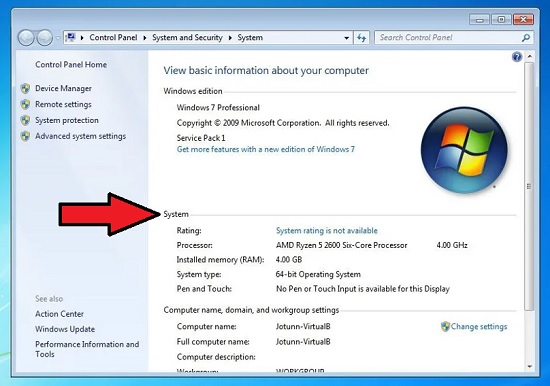
Checking RAM Through Control Panel
- Click on the ‘Start’ button.
- Select Control Panel.
- Navigate the page until you have located the “System” option. Click on it.
- A page will appear indicating the details of the installed RAM.
Checking RAM Through Task Manager
- Press Ctrl + Alt + Delete on your keyboard at the same time to access Task Manager.
- Select the Start Task Manager option.
- On the Task Manager window, click on the “Performance” tab.
- In the “Physical Memory” section, you can see the RAM details including free memory, cached memory, and available memory.
Checking RAM Through the Windows Command Prompt
- Click on the Start button.
- On the search bar, type in “cmd”.
- Among the search results, click on the exact match. The command prompt will appear.
- To view the details about your computer’s RAM, type wmic MEMORYCHIP get BankLabel, DeviceLocator, Capacity, Speed in the command prompt.
- Press ‘Enter’ on your keyboard. This will display the details, separated into 4 columns, regarding the RAM’s bank label (number of slots occupied by the RAM modules), device location (where the RAM module is placed), current capacity in bytes, and its speed in Megahertz.
- If you want to get all of the details about your computer’s RAM, type wmic MEMORYCHIP get /format:list in the command prompt.
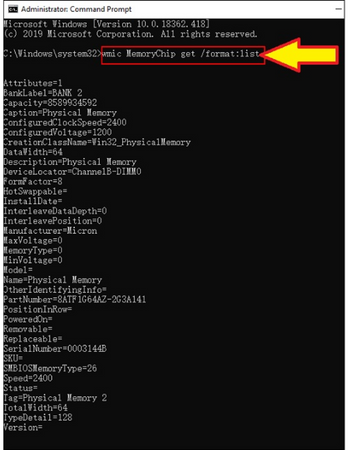
- Among the details, if the ‘MemoryType’ has the value of ‘24’, it means your computer’s RAM is a DDR3 type. If it is ‘0’, that can mean ‘unknown’. The interpretations are based on the syntax list of the Physical Memory class.
- Another detail to take note of is ‘TypeDetail’. If the value is ‘128’, this means the RAM used is synchronous.
Summary: Check RAM type in Windows 7
- Right-click on the My Computer icon on the desktop and select Properties.
- On the left side of System Properties window, select Advanced system settings.
- In System Properties window, go to Advanced tab and click on Settings under Performance section.
- In Performance Options window, go to Advanced tab and click on Change under Virtual Memory section.
- In Virtual Memory window, it will show you all drives with space in your PC. The RAM slots are labeled as Memory 0-3.
Conclusion
Having knowledge about your computer’s RAM can be a deciding factor in whether to upgrade or not. If you plan to expand, you can purchase another RAM module with the same specifications indicated in your research of the current RAM. One of the most important aspects of optimum computer performance is compatibility, so taking note of the details of your RAM is important.
