Have you ever wanted to commit to a repository, but weren't sure where to start? You're not alone. Committing to repositories can be one of the most intimidating things for beginners to learn in Git. By the end of this article, you will know how to successfully commit code in Bitbucket and contributing to open source projects.
Bitbucket is a Git repository management system that is web-based. It is a program like Github but more flexible with unique features in it. It is a system which organizes all of your Git repositories and guide and develops your source code. It has some awesome and unique features built-in. Also, you can import your code from Git, CodePlex, Google Code, SourceForge, and even from SVN. It is free to use up to 5 users or for small teams. Bitbucket comes from Atlassian which also has commercial accounts for use in a big team or systems.
From the Bitbucket server, you can edit your source file anytime. But after editing you have to Commit your changes. In this article, I’ll show how to edit and commit a file simply from Bitbucket. Please follow through with the article carefully to be successful.
Before You Get Started
You need to ensure a few things before you start Committing your source codes from Bitbucket. So please follow the instruction below for removing any interruption in this process:-
- Ensure you have a Bitbucket ID open. If not go to the https://bitbucket.org/ site and create a new id and start the work.
- You need some active works, codes, or repositories to download them. If not please create a sample project or new work.
- Be sure about the changes you make in the editor or in source code and the make the Commit process or your previous progress may be lost.
Committing to Bitbucket
Follow the below steps carefully to properly Commit your source in Bitbucket.
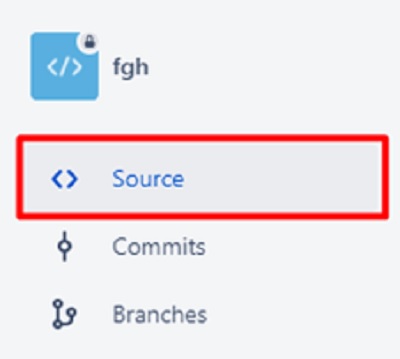
- From the Bitbucket repository, first, click on the Source form the left navigation.
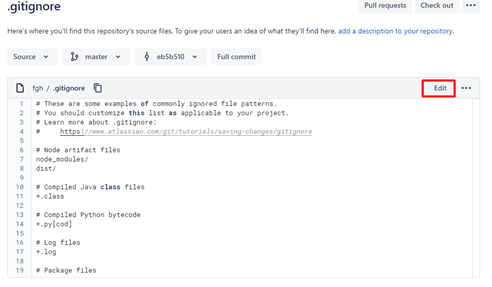
- Now you have to select the file or click on the file name you want to edit. Navigate and find your file or apply Filter files and find it.

- Now from the right side of the top bar where your filename is click on the Edit option to be able to Edit your source or simply it’ll open the Edit view of your source code.
- Now you can update or make changes as you want in your source.
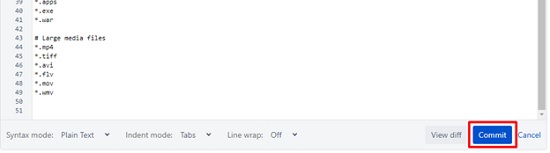
- After making all the changes in the Edit screen. Scroll down and you’ll see the Commit button. Click the button to Commit to Bitbucket. If you click the View diff* option left to the Commit then you can view the changes you made.
- After you are sure about the changes click on the Commit button.
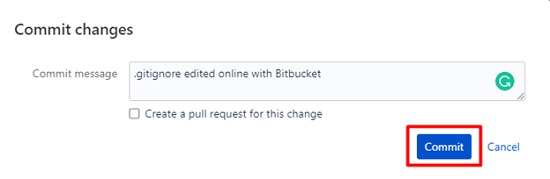
- Now from the Commit changes dialogue box type any message if you want to type. You can also check the “Create a pull request for this change” option if you need it.
- After typing the message click on the Commit button from here again.
So that’s how with these simple steps you can Commit to Bitbucket with ease.
Summary: Commit to Bitbucket
- Commit your new file.
- Add your file locally, using this command.
- git add hello.txt.
- You've now added the file to your local 'stage'. You need to commit the changes before you can push them to Bitbucket.
- git commit -m "First commit".
- Stage and commit all at once.
- If you prefer, use this command to stage and commit all at once. The -a flag tells Git to automatically stage files that have been modified and deleted, but new files you have not told Git about are not affected.
- git commit -a -m "First commit"
- Push your changes to Bitbucket
- Once your files are committed, use this command to push them up to Bitbucket git push -u origin master.
