Are you a .NET developer and wondering how to use Bitbucket with Visual Studio? Have you heard of Git, but don't know anything about it? In this post, Howard Dierking will explain the basics of Git for you. He will show an example on how to use Bitbucket with Visual Studio using Git.

Bitbucket is a Git repository management system that is web-based. It is a program like Github but more flexible with unique features in it. It is a system which organizes all of your Git repositories and guide and develops your source code. It has some awesome and unique features built-in. Also, you can import your code from Git, CodePlex, Google Code, SourceForge, and even from SVN. It is free to use up to 5 users or for small teams. Bitbucket comes from Atlassian which also has commercial accounts for use in a big team or systems.
Visual Studio on the other hand is a Microsoft app that is used for coding and developing programs or websites or various apps. The functionality of this app is huge. But the question is if you use the Bitbucket server can you use it with Visual Studio. In this article, I’ll show how can it be used.
Before You Get Started
You need to ensure a few things before you start using Bitbucket with Visual Studio. So please follow the instruction below for removing any interruption in this process:-
- Ensure you have a Bitbucket ID open. If not go to the https://bitbucket.org/ site and create a new id and start the work.
- You need some active works, codes, or repositories to download them. If not please create a sample project or new work.
- You need to know how to create a repository and clone them in Bitbucket.
- Download Visual Studio and install it on your pc.
Using Bitbucket with Visual Studio
Follow the below steps for using Bitbucket with Visual Studio
- First, log in to your Bitbucket id by providing proper credentials from the https://bitbucket.org/ site.
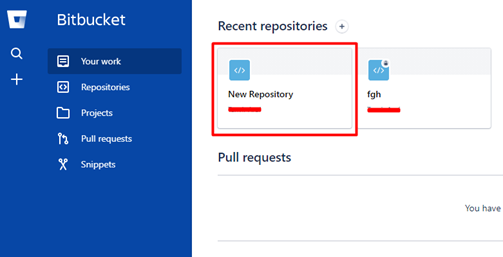
- From your work select the Repository you want to clone from the Recent repositories list.
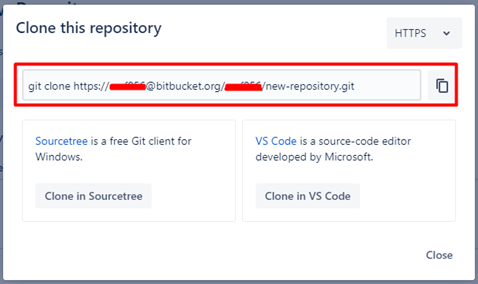
- After clicking on the repository you want to clone you’ll find a Clone option in the top right corner. Click on the option to proceed with the cloning process.

- Now from the Clone this repository option copy the Clone link by clicking the copy to clipboard option. Later you’ll be able to clone it in the Visual Studio app. If you have the VS code app which is a source code editor by Microsoft you can directly select Clone in VS code option then it’ll open clone options in your VS code app. But for this tutorial proceed with copying the repository link.
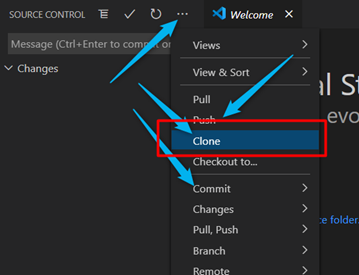
- Now open the Visual Studio Code app and fin the Clone option as shown in the image so that you can insert the remote repository link you have copied in step 4 and clone here.
- You can make the changes here as you want or copy any existing project.
- After you finished making all the changes you want you can commit it to the Bitbucket server or then Push it.
So this is how by following steps 1 to 7 you can use Bitbucket with Visual Studio in no time. But as it is mentioned you can also use VS code if you want to clone directly from the Bitbucket server and work with it.
Summary: How to use Bitbucket with Visual Studio?
- First of all, open the Source Control Explorer and click on Change Source Control.
- Please click on the File menu and choose Source Control.
- Click on 'Change Source Control'.
- Make sure that none of the projects are bound to source control.
- Now you can bind a project or multiple projects to source control.
- To do so, follow these steps please :
- Choose Bind in the window of Unbound Projects.
- Select a team project if you have several team projects in your team project collection then select a repository in that team project.
- If you want to create a new repository, you can do it by choosing New Repository from the drop down menu at Step 3 then enter its name.
- Click on OK for closing the dialog box and binding your projects or solution to source control.
- When you're done, you're ready to start working in Visual Studio
