Whenever we are working on our computers and laptops, sometimes, it gets hit with a situation where the second operating system window pops up and makes use of a desktop. Second Operating System windows is known as virtual window which mostly appears on top of your current active window or task on the computer. Here in this guide, we will discuss how to delete second operating system windows 10?
You can have two operating systems set up on the PC because of mistakes during the setup process or not formatting the drive that contains the previous operating system. For that, you can delete the extra operating system without disturbing the performance of the primary operating system.
Deleting Second Operating System on Windows 10
- First, back up the files you wish to have on the PC associated with the second operating system. After deleting it, you can’t recover anything related to it.
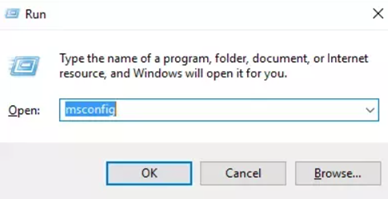
- Start the PC with your selected Windows operating system. Access the “Run” option and put “msconfig”.
- Open the “Boot” section from the “System Configuration” page. It will display the Windows operating system you have on the PC. Pick the one you need to remove and click on “Delete”.
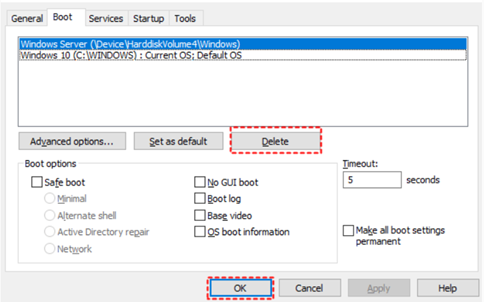
- Remember not to delete the working window operating system and which is acting as default. After removing the second operating system, pick the “Apply” option, then “OK”. Restart to complete the removal.
- You may also pick a default operating system to disable the other and always open the PC with the selected one. For the, select the “Start” menu. Go to “Control Panel”.
- Locate the “System” option and choose the “View advanced system settings” option beneath it.

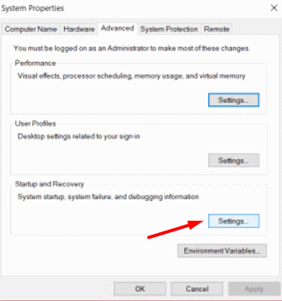
- Select the “Advanced” section from the “System Properties” window. Go to the “Startup and Recovery” option and select the “Settings” option.
- Expand the “Default operating systems” dropdown menu and pick the one you required as default for the PC. Untick the box below this option. Then, choose “OK” to complete the process. Restart the PC.
- You can also apply the “BCDedit” application to remove the second operating system. First, download any “BCDedit” application from the web and set it up on the PC.
- Open the “Start” menu and put “cmd” on the search bar. Click on “Command Prompt”.
- Put “BCDedit” and tap the “Enter” button. It will show the operating systems active in the “bootmgr.dll”.
- Select the operating system you wish to delete and copy their “alphanumeric string” from the right part of the “Identifier”.
- Put the “BCDedit /delete [IDENTIFIER]” command and change the “Identifier” with the alphanumeric string you copied. Tap “Enter.” It will delete the different operating systems. After completing, reboot.
Deleting Second Operating System on Windows 8
- First, backup the necessary files and start the PC with the first operating system. Select the “Search” option and put “Computer management.” Tap “Enter.” Open the “Computer Management” when it displays the results.
- Windows will ask permission to access it. Pick “Yes.” Select the arrow beside the “Storage” option and choose the “Disk Management” option from the left panel.
- Look for the volume that has the dual operating system. Then, select it and pick the “Delete Volume” option by right-clicking on it. Remember not to remove the volume titled “C,” as it has the first operating system of the PC.
- Pick “Yes” to confirm the removal. You can remove the disk partition too for recovering the space the operating system used. Select the disk partition and pick “Delete Partition”. Then, select “Yes”.
- Select the “C” drive and pick the “Extend Volume” option. Advance through by selecting “Next” and click “Finish” to include the disk space.
Summary: Delete Second Operating System Windows 10
- Start with your computer powered off.
- Power on the computer and while the display is blank, press the f10 key repeatedly (once every second) until a BIOS Setup screen opens.
- Use the right arrow key to choose the System Configuration menu, use the down arrow key to select Boot Options, then press Enter.
- Use the down arrow key to select Secure Boot, then use the right arrow key to modify its setting to Disabled.
- Use the down arrow key to select Legacy Support, then use the right arrow key to modify its setting to Enabled.
- Use the down arrow key to select Boot List Option, then use the right arrow key to modify it setting to Legacy.
- Press F10 to save and exit from BIOS Setup Utility
- After exiting from BIOS Setup Utility, turn off your computer completely and disconnect all devices (such as a personal USB drive or printer).
