Windows Registry is a storage of information that contains critical settings and configurations to the whole functioning of the operating system (Windows). The access to Windows Registry can be readily controlled using Group Policies in Windows. But there are also other ways, or are there? In this article we will talk about how you can help prevent hackers from modifying the contents of Windows Registry.

When network access is enabled in the Windows registry, it may lead to a lot of problems. Other users with remote access from the same network may enter your computer registry and may corrupt files.
You don’t want that. That is why it is essential to know the processes for disabling network access to the registry of Windows. This article will discuss disabling network access to the Windows registry for Windows 7, 8.1, and 10.
Disabling in Windows 7
In Windows 7, there are a few processes for you to follow to disable network access in the registry. These methods are:
Editing the Settings in Services
- Open “Run” in your Windows 7.
a). Use the search tool to search for “Run” and open it.
b). Press the “Windows” button and “R” at the same time on your keyboard. - In the box, type “services. msc” and click “Ok” or press “Enter.”
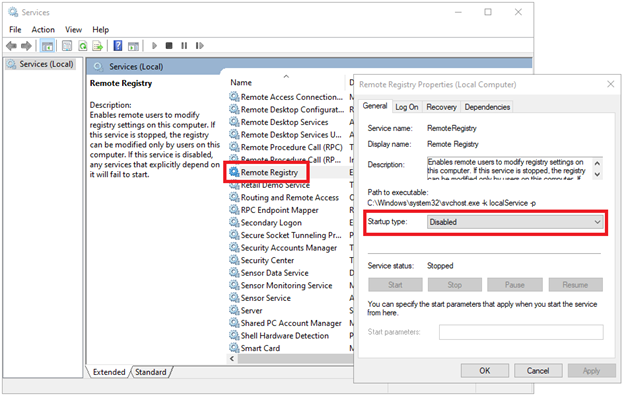
- From the list of all services, find “Remote Registry.”
- In the “General” tab, you will see the “Startup Type” option.
- From the dropdown menu, choose “Disabled.”
- Click “Apply” and then “Ok.”

It will disable network access in the Windows registry.
Editing in Windows Registry
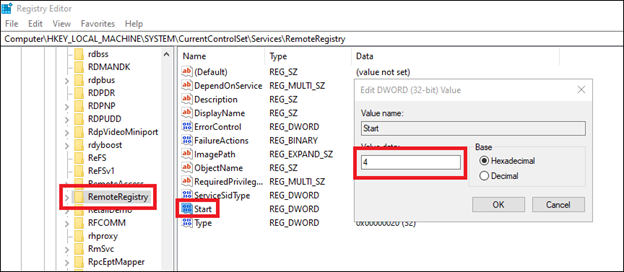
- Launch “Run” and type and enter “regedit” in the box.
- Expand the following folders in the registry editor:
“HKEY_LOCAL_MACHINE/SYSTEM/CurrentControlSet/Services/RemoteRegistry” - Find the “Start” REG_DWORD entry and double click to open it.
- You will find a value data box where you need to type the number 4.
- Number “4” means it is disabled. Here, “2” means automatic and, “3” means manual.
- After entering the number, click “Ok” to close the registry of Windows.

Now network access from the Windows registry will be disabled.
Disabling in Windows 8.1
- Open the Start screen and search MSC.
- When found, launch the program.
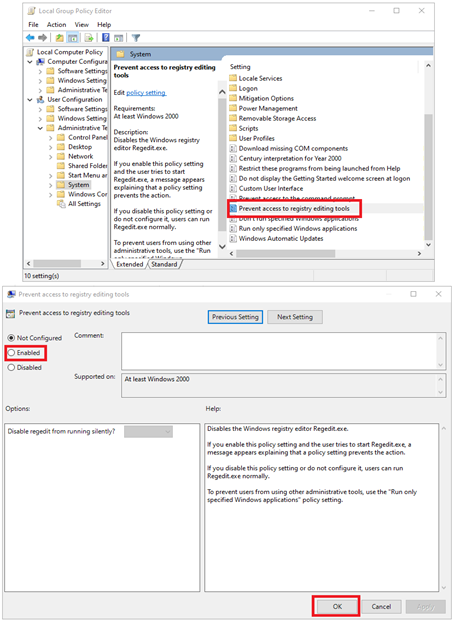
- On the left side, find the “Group Policy Editor.”
- From there, go to “User > Configuration > Administrative Templates > System.”
- Now double click on the “Prevent Access to Registry Editing Tools” option found on the right side.
- Change the option to “Enabled” and then close the Window.

After that, the network access for your Windows 8.1 computer will be disabled in the Windows registry.
Disabling in Windows 10
- Launch “Run” and type “Regedit.”
- Press and hold “SHIFT + CTRL” on your keyboard and then click “Ok.” It will make the registry editor open as administrator.
- Alternatively, you can search for the registry editor and run as administrator from the search result.
- Now expand the below folders:
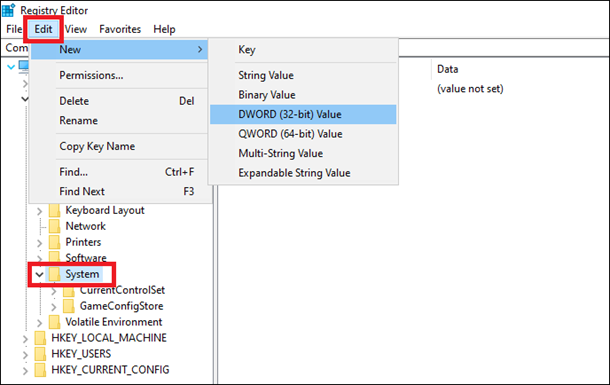
“HKEY_CURRENT_USER/System” - In the “System” folder, click on “Edit” on the top.
- Click on “New” and then on “DWORD (32 bit).”
- Name this file as “Disable Registry Tools,” and under the value box, type “1.”
- Click “Ok” to save and close this registry file.

After you are done, your Windows 10 computer’s network access will be blocked from the registry.
Some Final Tips
- Whether disabling the registry in Windows 7, 8.1, or 10, always keep a backup of the registry files.
- It would be better not to edit this and disable network access if you don’t have to.
- Always be careful about editing registry files because a wrong edit may lead to errors.
- To prevent errors or wrong editing, you can use the “Services method” rather than deleting from the registry editor.
Summary: Disable Network Access to Windows Registry
- Click the Start button.
- In the Search programs and files field type regedit and press enter.
- If asked, Allow regedit to make changes to your computer.
- Click the HKEY_LOCAL_MACHINE folder.
- Click on File in the top left corner of this window. Then click on Connect Network Registry.
- Uncheck Enable Remote Registry.