If you have installed VPN software and want to undo the changes in Windows 10, you’ve come to the right place. Fear not, because uninstalling VPN is extremely simple. Even novice users will have no difficulty doing this procedure. This step-by-step tutorial will show you how to uninstall VPN from your computer even if it has no interface or menu.

If you want to keep your identity secured as you browse the internet, the best way is to use a VPN. VPN, short for Virtual Private Network, allows you to connect to the internet through another server run by a VPN provider.
Connecting through a VPN server comes with a lot of benefits like anonymity, heightened security, and having the ability to access geo-restricted websites and contents. VPN basically protects your identity and all the vital information about you. It enables you to surf the web without having to worry about getting exposed to hackers and spammers.
Although using a VPN comes with a lot of advantages, there are also various reasons why you would want to disable it sometimes. The use of a VPN may slow down the speed of your internet, and that’s one of the main reasons why some users prefer to sometimes turn it off.
Whatever your reason is, here are the fastest and easiest ways to disable VPN on Windows 10:
Through Network Connections
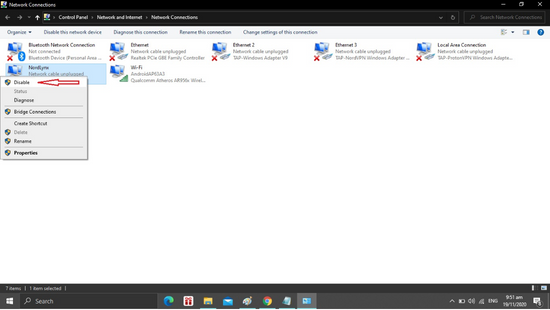
To do this, you just have to follow these steps:
- Open Network Connections on your computer. You may do this by typing “View network connections” in the search bar of your computer screen.
- Then under Network Connections, find the VPN you’re currently using.
- Right-click on the VPN icon and disable it.
Through Network & Internet
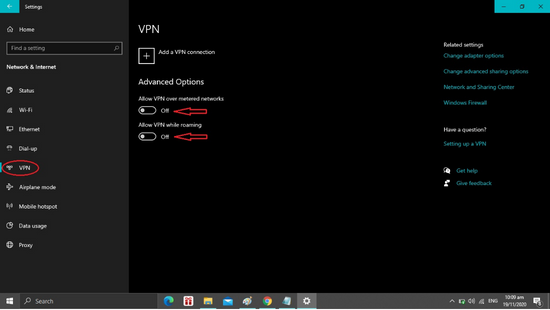
- Press the Windows key together with the ‘I” key simultaneously on your keyboard. This will automatically open the Settings.
- Go to the Network & Internet option and select VPN from there.
- There, you will have the choice to either Disconnect the VPN or to completely remove it from your computer.
Through the VPN App
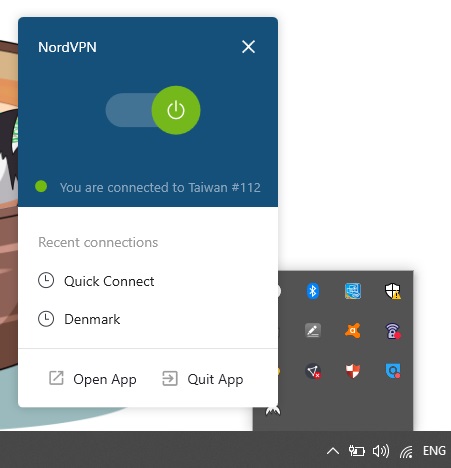
You may also disable the VPN app that you are using by simply following these easy steps:
- Go to the system tray of your computer. You can find this by clicking on that arrow key on your Window’s taskbar.
- Right-click on the icon of the VPN you are using.
- From there, you can find the options to either exit, disable, or quit the app.
Through Local Group Policy Editor

One of the reasons why you might need to disable your VPN is when your employees use it for non-business related purposes. If this is the case, then you can disable the Windows 10 VPN through the Local Group Policy Editor. To do this, simply follow these steps:
- Press the Windows and R keys simultaneously. This will automatically open the Run dialog box.
- Type gpedit.msc in the Run search bar then go to this address:
ConfigurationAdministrative TemplatesNetworkNetwork ConnectionsProhibit access to the New Connection Wizard - Look for the “Prohibit access to the New Connection Wizard” option then double click on it. After that, you’ll find the Enabled radio button. Click on it as well.
- Lastly, click on Apply before you click on OK.
These are four of the easiest and fastest ways to disable the VPN on Windows 10. The good thing about most of the VPN services is that they are quite easy to disable and enable as well.
Although you might need to disable your VPN once in a while, you might feel the need to turn it back on, especially if you are using public Wi-Fi. Connecting to a public Wi-Fi is very dangerous since you will be putting all your personal information at risk.
So, the next time you work in a café or are traveling somewhere and you need to send some quick emails, always enable your VPN first. The last thing you want is to expose all your vital data and information to hackers.
Summary: Disable VPN on Windows 10
- Click the "Network" icon in the system tray.
- Select "Open Network & Internet Settings".
- Click the "VPN" option on the left side of the screen.
- Select the VPN connection and then click its "Disconnect" button.
- Takeaway: You can easily disable VPN on Windows 10.
