Ah floor plans…those things you need to make but keep wishing that someone had already done it for you. If only you could find a fast and easy way to make them. Well, luckily, Lucidchart has an easy-to-use floor plan maker that will save you all that time and energy! In this article, we’ll take a look at the types of floor plans you can use Lucidchart to create, how they all work, and how to use them.
Did you know that you can create a floor plan using Lucid chart? It’s very easy and comparatively less complicated. The best thing is, you won’t be needing all those heavy CAD software for design and drafting. As Lucid chart is fully online-based, free, and simple.
Lucid chart is primarily a workflow design platform that lets you create interactive flowcharts, team hierarchy, and process diagrams. It lets you use countless shape bundles to perfect your design and diagram. Additionally, you can revise, share, and present your design diagrams directly from Lucid chart.
Being a design platform, Lucid chart now supports floor design/planning. You can accurately generate your floor plan within a matter of minutes. Besides, it lets you maintain a suitable scale for a perfect visualization.
So let’s get started.
Before you begin
You need a Lucid chart account. It’s not software and its operations are fully online based. So simply go to the Lucid chart website from your browser to create a free account. Some premium account options offer additional accommodations. You can check them out as well.
Floor plan creation
There are several ways of creating a floor plan with Lucid chart. We’re going to go through them one by one.
Using the shapes library
The most convenient way of creating a floor plan. By default, Lucid chart offers countless shapes for various design purposes. One of them is the “Floor plan shapes”. This shape pack contains a lot of essential shapes for generating a working floor plan. Here’s how to do it.
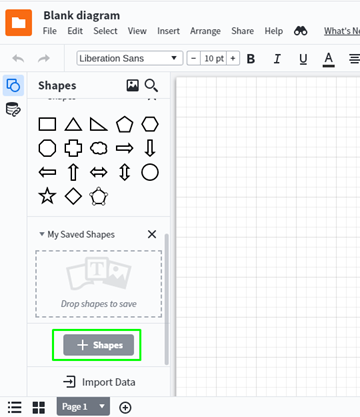
- Open a design workspace in Lucid chart.
- From the left-hand tool menu, locate “+Shapes” at the bottom. Click to open the shapes library.
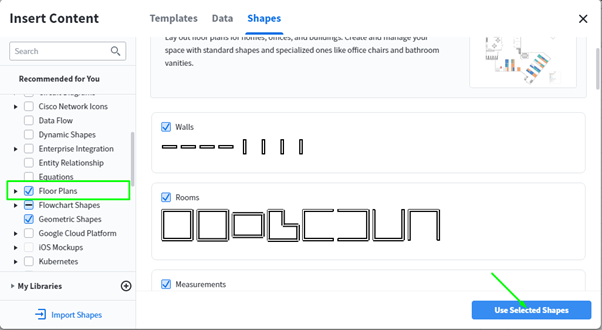
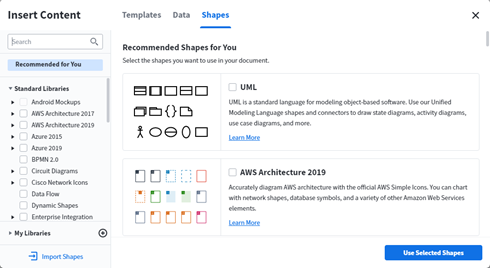
- A new shapes library window will open. You’ll see various recommendations including Architectural shapes and other important floor planning/building designing shapes. For now, locate the “Floor Plans” option. Check the box and press “Use selected shapes”. Note that you can also enable/disable some selective shapes from the “Floor Plans” menu.
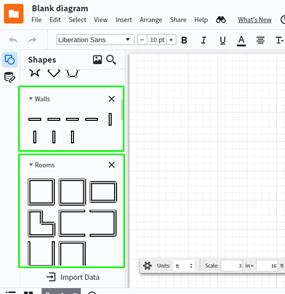
- And the shapes are added! You’ll see the new shapes below the default shapes panel. And the new shapes are categorized as well. Now simply drag and drop the shapes to get started with your floor planning.
Using floor plan templates
You can also access Lucid chart floor plan templates for a faster CAD experience. With the templates, you won’t have to brainstorm every placement. Just adjust the existing plan to your liking and that’s all! Furthermore, the templates are scaled and drawn professionally. No problem with the measurements.
- Open a new document.
- Navigate to “+Shapes” from the tools menu. Or you can press “M” on your keyboard. The shapes manager will open.
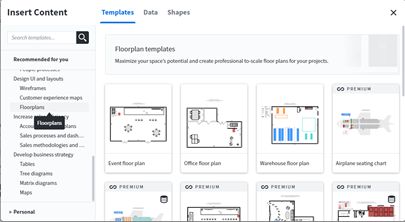
- Go to the “Templates” tab. A variety of template recommendations will appear. To find quickly, you can use the search panel or scroll down the left-hand menu until you find “Floor Plans”. Select to open the floor plan template recommendations.
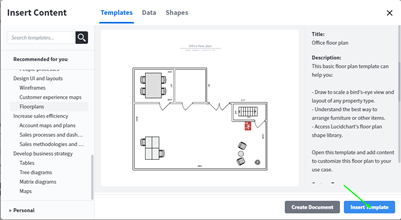
- Select a suitable template for your work. Then press “Insert template”.
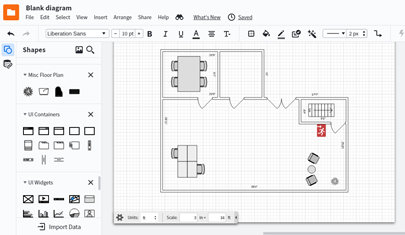
- Voila! Your template is now online for editing.
Some additional tips:
- You can adjust the measurement units and scale the drawing using the scale tool.
- Use a measurement object for a visual reference.
- Use the “Page Setup” option to set up your canvas.
Summary: Do a floor plan in Lucidchart
- Clear out a large workspace.
- Measure and draw the walls.
- Add doors windows, and fixtures.
- Add the stairs.
- Include details like outlets, molding, and seating.
