It is very tiresome if you have to change your font every time after starting a new file for writing in Microsoft word. You can change your settings permanently or temporarily so that you will not face the same problems in the future while working with Microsoft Word.
Before you get started
You must have Microsoft Office installed in your system. If you don’t have the application, then go to https://www.microsoft.com/en-ww/microsoft-365/mac/microsoft-365-for-mac from your web browser and install the application for you to use the features.
After you complete the installation, you will be able to view the applications in your list and use them. Before you open your application, you must buy your license. Otherwise, the applications will not work.

Changing the settings for a single document
You can change the default settings of your Word application by following these steps:
- Open your “Microsoft Word” application from your Mac interface.
- Start writing a paragraph containing some words. After you have finished writing your paragraph, move your cursor on the right side of the word where you intend to put double space.
- Right-click on your mouse to see the options. Now, click on the “Paragraph” option.

- A list of actions will be available for you to change. You can change your style from these options. Look for the “Line Spacing” option. Click on the Drop-down list and select “Double” and click “OK” to finish applying your changes.
- Now go back to your paragraph and press “Enter”. This action will create a double space among the words.
Changing the settings permanently
You may get annoyed if you have to change the double space action every time you open a new document to do your work. In that case, you will have to set some settings to permanently apply your changes. After that, you won’t have to set your settings for double-space every time as the Word application will save your specified settings for you to use after you open a new blank page for your work. To save your settings:
- Open your Word application and go to the “Home” options.
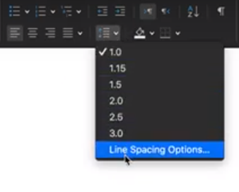
- Click on the “Line and Paragraph spacing” icon which is on the top middle section of the Home options.
- Select the “Line Spacing Options” option to make custom changes to your paragraph spacing.
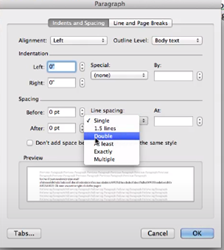
- You will be taken to the “Paragraph” settings of your Word file. There are two sections. First is the “Indents and Spacing” section where you will be able to change your space settings and use your preferred style of spacing. The next is the “Line and page breaks” where you will be able to manually set where you intend to break your line or page.
- Stay on the “Indents and Spacing” tab and select the drop-down option of “Line spacing”. There are various options for you to choose but you must select the “Double” option if you want to provide double spacing in your paragraphs or texts.
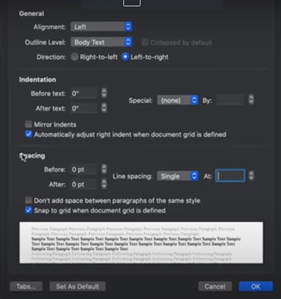
- Click on the “Set as Default” option to permanently apply your settings. The application will ask you if the changes are being made for the single document which you have opened or for all the documents in the future. Click the second option to ensure that all the documents will have the settings that you prefer.
Summary: Double space in Word on Mac
- Open Microsoft Word and click on the section in your document where you'd like to apply the double spacing.
- Click on the "Home" tab towards the top of the screen.
- Click on the small icon that looks like a line. It's located toward the right side of the ribbon, in the "Paragraph" section.
- You should now see a small pop-up window appear with line spacing options. Click "2.0" to select it.
- The double spacing should now be applied to your document.
