How can I export Outlook Calendar? This is a common question on the internet. There are plenty of platform and service which allow to export Outlook Calendar, however, there are more complicated to export Outlook Calendar and simply do not work for this specific tasks. In this tutorial, we will show how easy you can export Outlook Calendar by using iStonsoft Export Notes for Mail.

Do you want to Export Outlook Calendar for better navigation and easier planning? Some people have very hectic schedules that they have to constantly rearrange things in their own favor to foster productivity, especially at work. One of these rearrangements is exporting the Outlook calendar in different ways depending on what’s most convenient and familiar to you. Below are two different ways to export Outlook Calendar.
Export to Excel
If you are searching for ways on how to allow other people to access or view your Outlook calendar, you may export it to Excel. After exporting it to Excel, you may now import it to other people’s Outlook calendar. To achieve this, follow these steps.
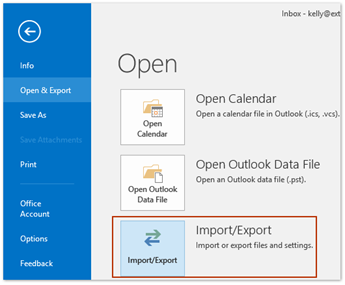
- Open File.
- Click Open & Export.

- Then, choose Import/Export.
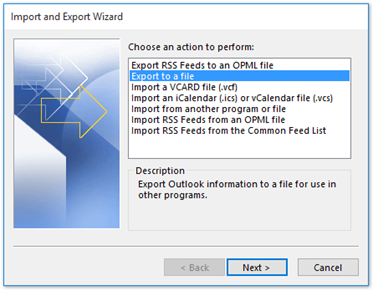
- As soon as the Export and Import Wizard pops up, choose Export to file.

- After that, click Next. In the dialogue Export to file, click Comma Value Separated. After doing so, click Next.
Please be reminded that if you’re utilizing Outlook’s earlier versions, choose Excel 97-2003 directly. - Then, under the Select what folders to export from, choose Calendar found in Outlook File Data.
- After that, click Next.
- When the dialog box of “Export to File” appears, click Browse to choose the file’s destination.
- Browse on the window and select where you want your file to be saved. Enter the file’s name and select OK to close the dialogue.
- When the dialog box saying “Export to File” appears again, just select Next to proceed.
- Then, another dialog box saying “Export to File” appears, and this time, you need to click Finish to export the Outlook calendar.
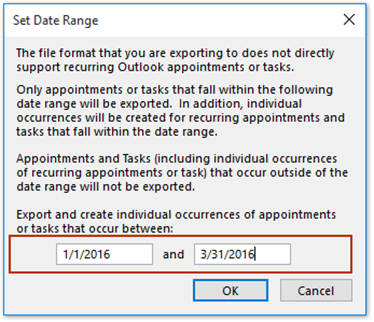
- In the dialog box of Set the Date Range, you need to specify and enter the dates you want to export your calendar within.

Export to Google
First, you have to export your calendar from Outlook. To do this, follow these steps:
- Open Outlook. In the Calendar, choose what calendar you need to export.
- Select File. Then, Save Calendar.
- Apply the default label for the file iCalendar inside the File box.
You will be able to see the summary displaying the calendar’s name, detail level, and date range next to More. If you are already contented with the shown summary, skip to step number 7. If not, proceed to the next step.
- Select More Options.
- Select Date Range and click the data calendar amount you need for your iCalendar file. You may also select Specify dates to input a custom range for your date.
If you want to choose a Whole calendar or a larger date range, you can make a bigger iCalendar file. However, this can actually take a little while to completely generate.
- Select the arrow Detail and click the Detail amount you need to show.
- Select OK.
- Click Save.
If the calendar is still empty, you will see a notification offering you an option to cancel the iCalendar file saving.
After exporting our calendar from Outlook, you can now import it to Google Calendar.
- Sign in to your account in Google Calendar.
- At the page’s top part, select Settings> Settings.
- Under the Calendar Settings, select Calendars.
- Then you need to select Browse and choose your created file.
- After doing so, click Open.
- Next to the Calendar option, choose what Google Calendar you wish to import your Outlook calendar details to.
- Select Import.
- Select Close.
- Finally, click the Back to the calendar button to go back to your Google calendar.
These are two of the several ways to export your Outlook Calendar. Undeniably, these alternatives allow you, especially as an employee or businessman, to conveniently plan and navigate your calendar events. I hope this helps.
Summary: Export Outlook Calendar
- On your computer, open Google Maps.
- On the left, click Menu.
- Click My Places.
- Click the map with the directions you want to use.
- At the bottom, click Send Directions.
- Copy and paste the code in to a note on Basecamp.