- Why Formatting WD Elements on Mac?
- Step by Step Guide on WD Element Format on macOS
- 1. Preparing WD Element Before Formatting
- 2. Opening Disk Utility to Find WD Element Drive
- 3. Pressing Erase to Fill Up the Necessary Options
- 4. Formatting the Connected WD Elements Drive
- Summary: Format WD Elements for Mac
How to format WD Elements for Mac When Windows 10 Fall Creators Update was released, many users chose to switch back to the macOS on their WD Elements. Since the macOS is so secure and reliable, you can freely download and install whatever apps you want because it won't hurt your system at all. But there's still one thing that people worry about, that is whether they could still format the WD Elements for Mac or not. If you are one of the people who would like to know details about formatting your WD Elements for Mac, follow this article to find out more.
Differences in OS results in incompatibility issues for external drives. And the universal NTFS format doesn’t support Mac for WD Elements.
You need to format the connected drive from your system to make it work. And the article covers the detailed steps on its full formatting.
Why Formatting WD Elements on Mac?
Almost all the external drives feature NTFS formatting. And it explicitly supports Windows OS. However, NTFS doesn’t go with the format. That’s why you’ll have to initiate suitable formatting to patch external drives.
You can either ask the seller to deliver an HFS+ format to use the drive on Mac. Also, you can implement the formatting by yourself. Not to mention, ExFAT or FAT32 can support almost all standard operating systems.
Step by Step Guide on WD Element Format on macOS
1. Preparing WD Element Before Formatting
- Plug your WD Elements drive into the macOS device using a USB Micro B cable.
- The connected external drive (WD Elements) should appear as a desktop icon.
- Start navigating the ‘Applications’ folder at the Dock by making a double-click.
- Make another double-click on the ‘Utilities’ in the opened Applications folder.
- Right inside the ‘Utilities’, you’re to locate the ‘Disk Utility’ to open its contents.
2. Opening Disk Utility to Find WD Element Drive
- A new window containing the Disk Utility details will appear onscreen.
- Start navigating the immediate section list on the left of the window.
- The intended menu features the list of internal drives on the top segment.
- Right below the internal drives, you should find the ‘External’ heading.
- Look into the list to locate the connected drive under ‘WD Elements’.
- Select the top ‘WD Elements’ appearing above other similar headings.
3. Pressing Erase to Fill Up the Necessary Options
- At the top section of the onscreen Disk Utility window, locate the ‘Erase’ button.
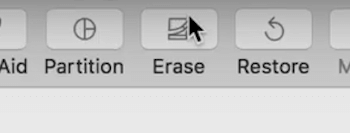
- Click on the button to proceed with your intentions in WD Element format.
- A new pop-up window will appear, requiring some information on the action.
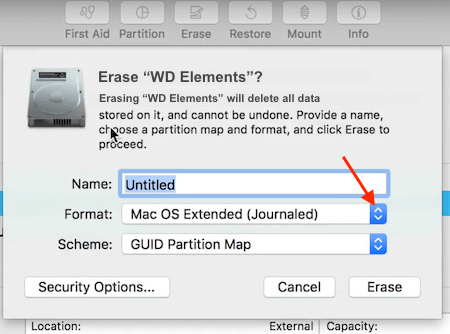
- Start with the ‘Name Field’; insert a suitable name for your formattable drive.
- Inside the ‘Format Field’, you’ll find an arrow to initiate a full dropdown list.
- From the dropdown options, press the ‘Mac OS Extended (Journaled)’ section.

- Enabled simple ‘Drag & Drop File’ operation comes with Time Machine Backup.
- On the ‘Scheme Field’, choose the ‘GUID Partition Map’ from its dropdown list.
- Check all the fields for proper format requirements, as mentioned right above.
4. Formatting the Connected WD Elements Drive
- Press the ‘Erase’ button appearing at the lower-right segment of your current window.
- It should immediately start the formatting process; completion of its action requires minutes.
- Once the formatting task gets finished, close the Disk Utility window from your screen.
- On the desktop screen, the WD Elements drive will appear with the name of your definition.
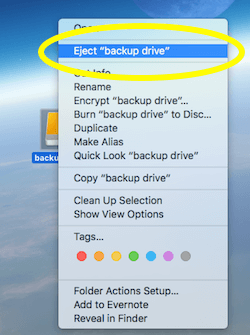
If you want to remove WD Element from your Mac immediately, right-click on the desktop icon. Several enlisted options, including ‘Eject’, will appear. Press on the section to safely eject the drive.
That’s all for the formatting action on a WD Element at your Mac. A fresh WD Element stands ready to serve your purposes. Right there, you can easily perform any operation without looking back.
Summary: Format WD Elements for Mac
- Connect the drive to your Mac.
- Open Disk Utility.
- Find the disk for your WD Elements drive in the left-hand column.
- Select that disk.
- Select Partition from the Edit menu.
- Set a Volume Scheme to 1 Partition.
- Set Format to MS-DOS (FAT).
- Name your new drive and select Options.
- Click Apply, then Partition.
