Have you noticed unwanted McAfee popup windows 10 while browsing the Internet? If you are among those millions of respondents who deny to want anything to do with the free anti-virus software because they always get the McAfee Popup windows and thinking how to get rid of McAfee popup windows then keep reading. We'll show you today how to get rid of McAfee popup Windows 10 automatically.
If you have the McAfee antivirus installed on your Windows 10, you will get different popups (notifications) from time to time. These can come up because of the antivirus itself or for the extensions. Many users find the popups annoying and want to get rid of them. There are different methods to get rid of the McAfee antivirus popups in Windows 10. These are discussed below.
Disabling the Notifications
You can directly disable the McAfee antivirus notifications from its settings. You can also use Windows 10 notifications settings.
From McAfee Settings
If the McAfee antivirus is running on your computer:
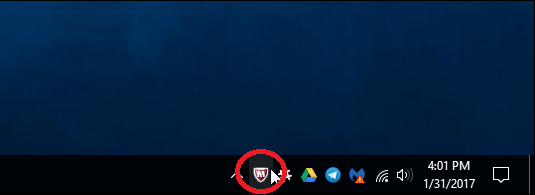
- Find the McAfee icon on the system tray.
- Double-click on it to open the McAfee Window.
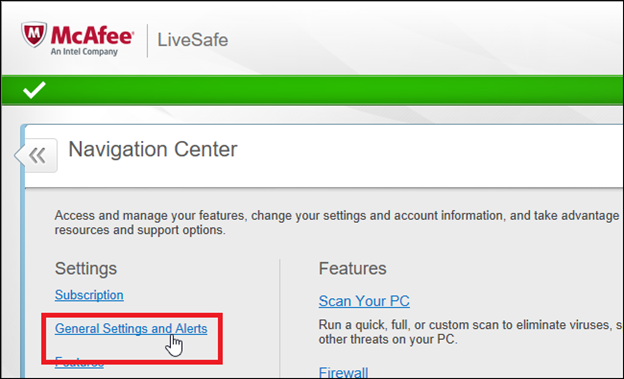
- Open the “Navigation Center” found in the right panel.
- Find “General Settings and Alerts” and click on it.
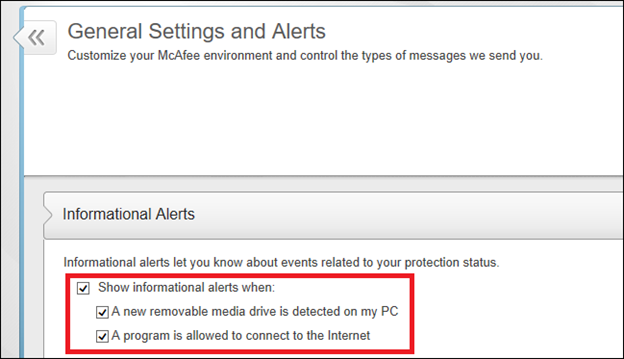
- Uncheck all the boxes under the “Information Alerts” and “Protection Alerts” sections.
- Come back to the main window.
- Now open the “Manage Security” settings.
- Go to the “Web and Email Protection” option and open the “Firewall.”
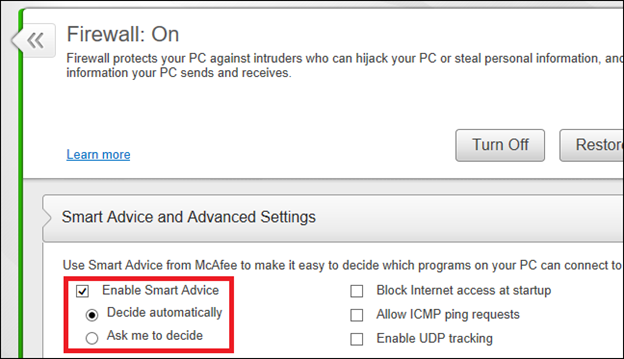
- Scroll to the “Smart Advice and Advanced Settings.”
- If you want to keep the “Smart Advice” option enabled, choose the “Decide automatically” option.
- Otherwise, disable the “Smart Advice” option.
Finally, close all the McAfee Windows and reboot the computer. You should now have fewer or no popups from the McAfee antivirus.
From Windows Settings
Windows 10 allows you to disable notifications for a particular app. To do this:
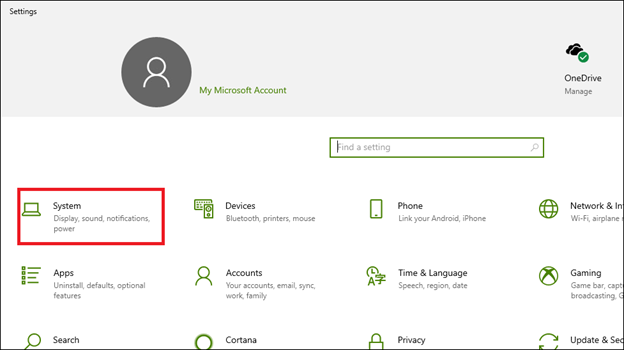
- Open the settings of Windows 10 and go to “System” settings.
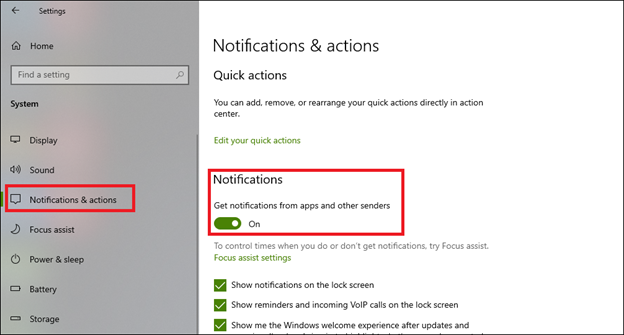
- Find and enter the “Notifications & actions” settings from the left sidebar.
- From there, you can either disable all the notifications by turning off the “Notifications” button.
- Alternatively, you can scroll down and find the McAfee app and disable notifications for that app only.
After disabling, close the Settings Window and then reboot the computer. It should get rid of all the McAfee popups.
Disabling the Extensions
The McAfee antivirus has Google Chrome extensions, and these extensions also cause popups (send notifications). So, disabling these extensions may help you get rid of the popups. To do this:
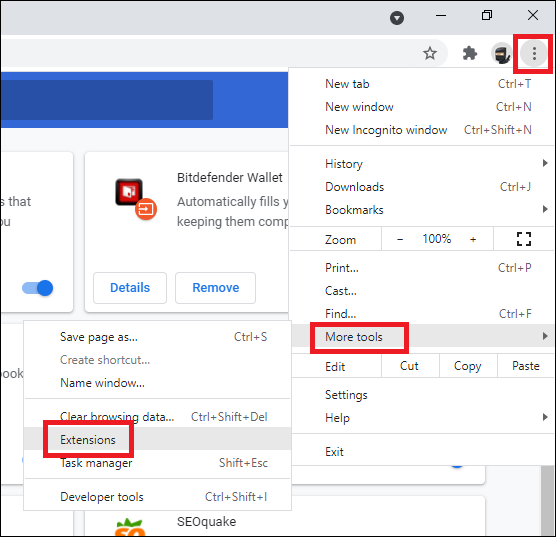
- Launch “Chrome” and open the “Extensions” by clicking the three dots on the top and then going to “More Tools.”
- Find all the McAfee extensions that are installed.
- Use the “Disable/Enable” button to disable the extensions.
- If you do not need the extensions, you can remove them by clicking the remove button.
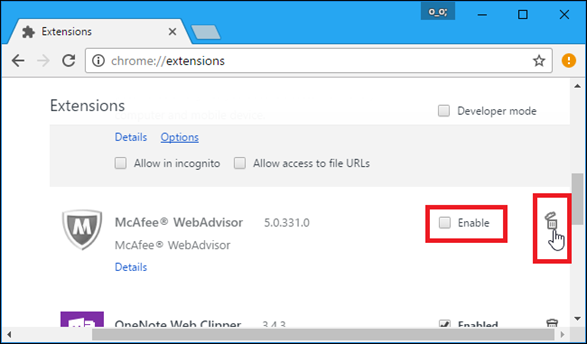
After removing, close the Chrome browser and reboot your computer.
Removing McAfee from Computer
One last thing you can do to get rid of the McAfee popups is to uninstall the McAfee apps from Windows 10. Windows 10 already has a default antivirus, and it works very well. So, uninstalling McAfee will not put your computer at risk. To uninstall:
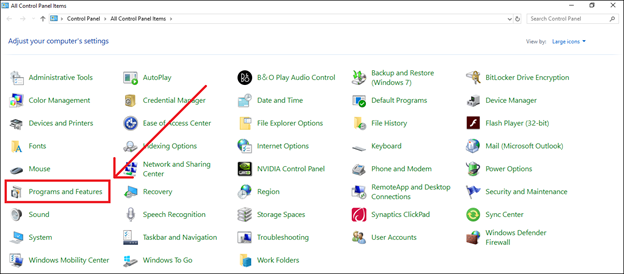
- Open the Windows 10 control panel.
- Go to “Programs and features.”
- Find all the McAfee apps from the list.
- Click on the apps and then on the uninstall button at the top.
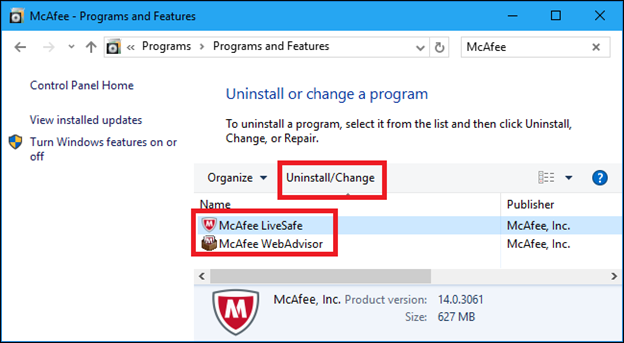
Wait for a while, and Windows will remove the McAfee apps from your computer. Restart the PC to make this more effective.
Summary: Get Rid of McAfee Popup Windows 10
- Locate the McAfee icon on your desktop.
- Right click the McAfee icon, then select Change.
- Click Yes when asked if you want to uninstall the program.
- Once the uninstallation is done, go to your desktop and click Start and then select Control Panel.
- Under Programs and Features, click Uninstall a Program.
- Look for McAfee on the list of programs installed on your computer.
- Select McAfee by clicking it once.
- Click Uninstall located at the top of the list of installed programs.
- Follow any prompts that may appear throughout this process and wait for the uninstallation to complete.