Installing a Windows Service is the perfect solution for applications that run on Windows server and perform continuously background processes, like FTP servers and antivirus software.

Developing and installing a Windows Service is crucial if you handle long-running scheduled jobs at a time interval. It is a reliable solution that can help businesses execute long applications for scheduled periods without causing interruption to other users using the same computer.
For instance, a Windows Service can come in handy when you need to send an email alert or newsletter every two hours. It usually starts when the operating system boots and can be paused or stopped automatically.
Windows Service can be installed through the command line Utility InstallUtil.exe. Below is a step-by-step guide on how to install the Windows Service by running the command line.
Install the Windows Service by Running the Command Line
Step 1:
- Open the Microsoft Visual Studio page and then go to File.
- On the dialog box, click on the new project and then choose Windows Service. Click Ok.
- Locate the Visual C# option on the left panel and click on Windows Desktop.
- From the options provided, click on Windows Service and give a name to your project. Then click Ok.
- After doing this, a screen showing your service will appear.
Step 2: Create an Installer
In order to run a Windows Service, you will be required to install the installer. This registers the Service with the Service Control Manager. To add the Installer:
- Right-click on any blank area on the screen.
- Then, choose “Add Installer.”
Step 3:
After adding installers to the Windows Service, your project will be added by ProjectInstaller. The ProjectInstakkers.cs file will also open. Press Ctrl + shift + s key to save everything.
Step 4:
- On the ProjectInstallers.cs file, right-click on a blank area and choose “View Code”.
- From the options provided, locate the InitializeComponent method. This method has logic that develops the user interface objects and offers the Property Grid of Form Designer. It is recommended not to call any other method before calling the InitializaComponent method.
- Press F12 and go to the implementation of the class.
Step 5:
Add the service description and name. This will display the windows service name during the installation.
Step 6:
The next step involves adding a timer and code to the service. These are useful for calling the service at any time. In the Service1 cs. Class, write the log data in the text file.
Step 7:
Now, you need to rebuild your application. To do this, right-click on your solution or project and then click on Rebuild.
Step 8: Installation of the Windows Service
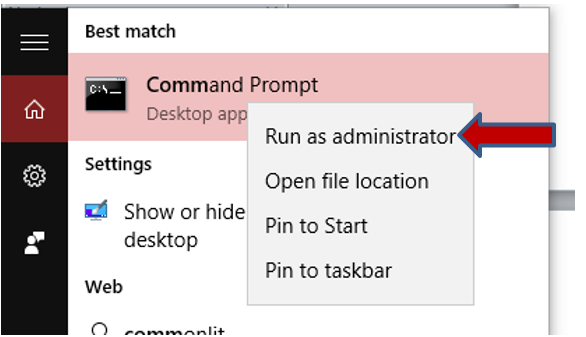
In this step, we will use the command prompt to install the Windows Service. To do this, go to the search button on the Start menu and type “Command Prompt.” Then click on the “Run as administrator” option.
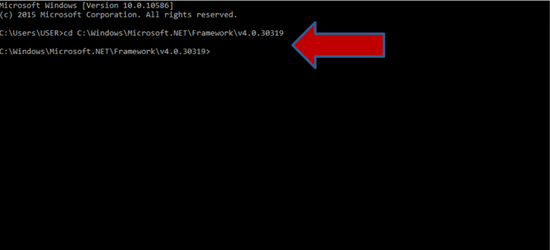
Step 9:
On the command prompt, input the following command and then press enter.
Cd C:WindowsMicrosoft.NETFrameworkv4.0.30319
Step 10:
Next, you need to open the folder that holds the windows service exe file and input the command.
InstallUtil.exe C:Users (username)
Step 11:
Once the transaction has been completed, you can open the Services through the windows application menu. Here is how:
- On your keyboard, press the Windows key + R
- Type service.msc and locate your Service.
You should be able to find your Service and see its status. The Service output will show you that the Windows Service has been installed and is running and wiring the log.
A log folder for the Service will be created in your folder bin.
Summary: Install Windows Service
- Install a Windows Service using the InstallUtil.exe command line and a Visual Studio Setup Project
- Create a Windows Service project
- Create an installer class
- Create the installer by adding an Installer Class to the project
Conclusion
By following each of the steps indicated above, you will be able to install Windows Service on your device through the command line. While the process is a bit long, it will successfully install the Service in your system.
