To get the most satisfactory gaming experience, you need to configure your PC to make it work for gaming. For example, you will have to modify the settings of your Windows 10 operating system. The first thing you should do is clean up all the junk files and cookies on your computer to free space for the game files. Then you can set up internet connection depending on whether you play using WiFi or not.
Windows 10 is an all-around operating system that’s equipped with a special Game Mode for better gaming performance as well as excellent operating systems and debatably the best graphic drivers based on word of mouth from gamers themselves.
With that said, you can optimize your computer to perform its best during games through the following methods.
Enable Windows 10 Game Mode
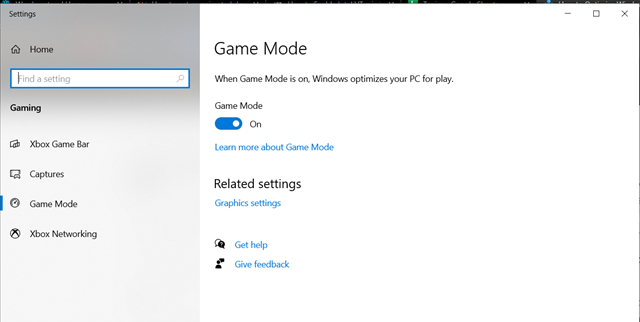
To start, you need to enable the Windows 10 Game Mode. To do so, you need to do the following:
- Locate Game Mode Settings by pressing the Windows key + I .
- Type out ‘Game mode’ on the search box for easy navigation.
- Next, click on Control Game Mode for optimizing your PC for games which would lead you to a menu where you could find the Game Mode.
- Turn it on.
This way, the system optimizes the PC for better gaming performance.
Disable Nagle’s Algorithm
Nagle’s Algorithm is utilized for efficient TCP/IP networks which means it bundles data packets for the sake of a better and smoother internet connection.
You can disable Nagle’s Algorithm through the following steps:
- Press Windows key + R key to open Run dialog. Type down ‘regedit’ and click OK.
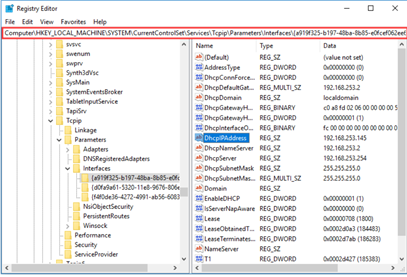
- As soon as the Registry Editor window pops up on your screens, navigate and proceed to the folder:
HKEY_LOCAL_MACHINESYSTEMCurrentControlSetServicesTcpipParametersInterfaces - Several folders with numbers and letters should be seen on your screen by now. The IP address must correspond to the listed DhcpIPAddress inside one of the folders. To know the IP Address, go to Network and Sharing Center > Connections > Details to check.
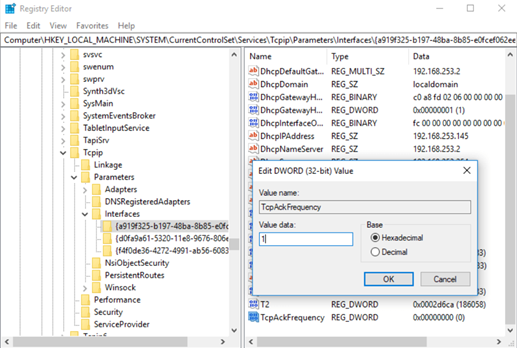
- Right-click on the right panel, and under ‘New - DWORD (32-bit) Value’, two keys must be created namely ‘TcpAckFrequency’ and ‘TCPNoDelay’.
After double-clicking the two, change the data value to 1. With this, you have successfully disabled Nagle’s Algorithm.
Manage the PC’s Active Hours
Computer gaming experience may be affected by automated system updates and computer reboot. While you can disable these features directly, it’s not recommended.
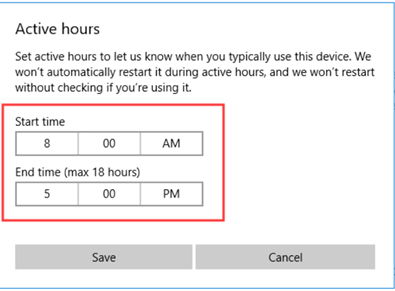
To prevent such updates from affecting your gaming experience, you can specify your gaming and work schedules through the following steps:
- Open the Settings and go to Update & Security.
- On the right, click on Change active hours.
- Set the start time and end time, click Save, and you’re good to go.
Tweak the Settings for Visual Effects
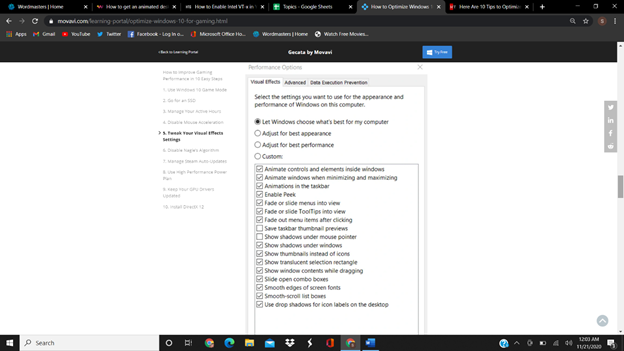
Pretty background graphics that are turned on by default can affect the available processing power of your PC during game time. You can tweak these settings through the following steps:
- Press Windows key + I, search “performance” and click on “Adjust the appearance and performance”
- As soon as another window opens, click on Adjust for best performance.
- Then, go to the advanced tab and verify. Tweak however you may like.
Prevent Steam Auto-Updates
Auto-updates will eventually eat up your PC’s memory which means slowing down your gaming performance. Prevent Steam from doing so by following these steps:
- Log into your Steam account, and proceed to Steam - Settings - Download.
- Uncheck the option Allow downloads during gameplay.
Utilize a Power Plan with High Performance
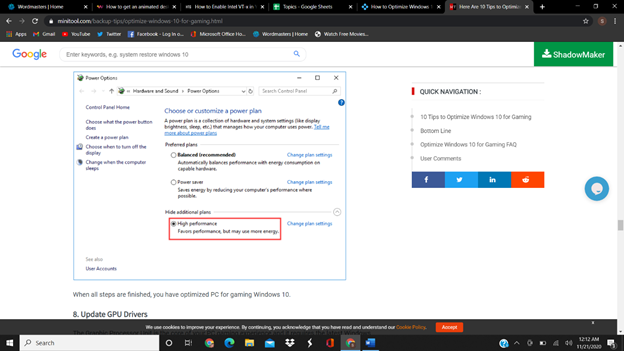
A high-performance power plan will equip you with better battery use management, and to do so, all you have to do is:
- Open Settings and click on System.
- On the Power & Sleep tab, click on Additional power settings.
- Check the option High Performance.
Update GPU Drivers
To keep your gaming performance fast and excellent, make sure to update your GPU drivers to the latest one since it is considered the ‘core’ of your PC gaming experience.
To do so, here are the steps:
- Open Run dialog by clicking on Windows key + R .
- Type in ‘devmgmt.msc’ and click OK.
- Expand the Display adapter found on the Device Manager window and select the driver on your computer.
- Right-click and click on the Update driver option to continue.
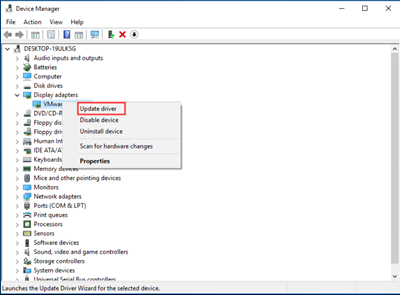
- Afterward, you can choose Search automatically for updated driver software and follow the guide.
Disable Mouse Acceleration
Not much on improving the PC performance, but rather the gaming performance aspect. Adding an extra parameter to the mouse movement can lead to inaccuracy. Thus, if you’re fond of shooting games like Counter-Strike, Call of Duty, or Overwatch, then this setting is better off disabled.
For this, you need to do the following:
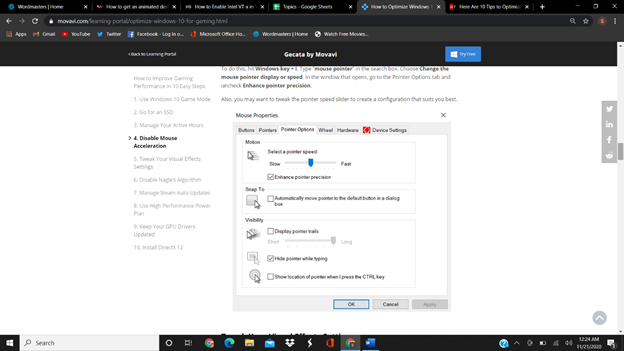
- Press Windows key + I and type down “mouse pointer”
- Click on Change the mouse pointer display or speed and go to the Pointer Options tab.
- Uncheck Enhance pointer precision.
- You can also tweak based on your liking.
Install DirectX 12
DirectX 12 enables users to communicate with the computer and make commands. By installing this, you can enhance your gaming and computer’s overall performance.
To check if you already have the DirectX 12 downloaded on your PC:
- Open Run dialog by pressing Windows + R .
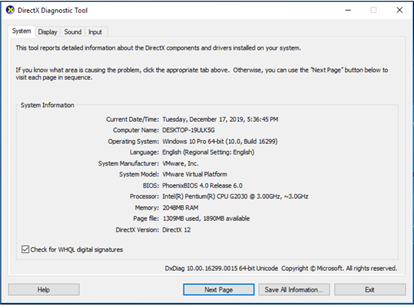
- Then, type ‘dxdiag’ and click OK.
- If you have already installed DirectX 12 on your computer, it will look as below. If not, then you can just go download and install it. Then you can proceed to the Windows Update page to click Check for updates.
Summary: Optimize Windows 10 for gaming
- Disable Xbox Game Bar and DVR.
- Optimize Windows 10 for gaming with the Windows Game Mode.
- Turn off virtual memory.
- Update your drivers.
- Change your computer’s power plan.
- Clean up your storage or storage drive.
- Enable large system cache (Windows 10).
- Add your games to Windows Defender’s exclusion list.
Conclusion
Windows 10 has a lot to offer when it comes to gaming, and the aforementioned steps can help you optimize your operating system to give you the best gaming experience possible.