If you have a USB disk which contains your personal information, photos or some other important files, you may want to protect it with a password so that no one but yourself can access the data stored on it.Let's take a look how this can be done.
In today’s tech age, USB drives are among the many advanced yet simple inventions that had made information storage and transfer convenient. It has become such a crucial part of our day-to-day lives that almost everyone owns one, and we probably have a USB drive for particular files – especially confidential ones.
This is where the importance of password protection comes in, and you can learn all about them as we go on.
What is USB Drive Password Protection?
This is a feature that protects and locks the data in your USB drive through access prohibition unless the user knows the password. This can be utilized through third-party apps or through Bitlocker, an encryption feature that is already included in the Microsoft Windows 10 version of your PC.
The best way you can protect your USB drive in Windows 10 is through Bitlocker. If you have the Pro or Enterprise version of your operating system, then a built-in Bitlocker feature should come in handy. Here’s how.
How to Password-protect a USB Drive?
Password protecting an external drive is a task made simple with Bitlocker. With that, here are the steps you should follow to password protect your USB drive:
- Run your PC and connect your flash drive. Make sure that your gadget can detect the device.
- Head over This PC. Under Devices and Drives, you will find the icon for your USB drive. Right-click on the icon, look for the Turn on Bitlocker option, and click on that.

- Once you open the BitLocker option, a pop-up window will appear containing the drive’s Bitlocker Drive Encryption.
You will be shown more options on how to unlock your drive. Check the box that will require you to use a password to unlock the contents of the drive. This allows you to enter the password of your choice, provided that it contains the necessary characters to ensure security.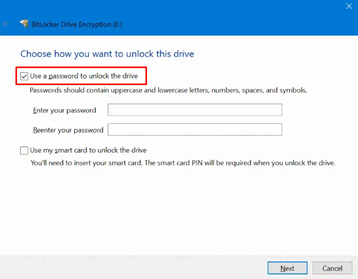
- After putting in the password, you are given ways to back up your recovery key. This is in the case that you forget your drive password.
You can choose from saving it to your Microsoft account, which may require you to sign in; save it to a different file; or print it so you can have an on-hand hard copy. Choose any of the options and click Next.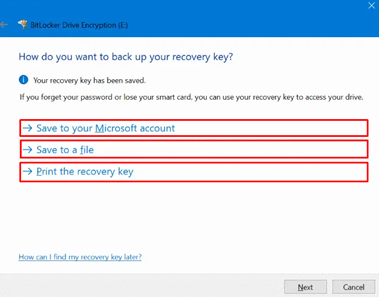
- You will now be led to choose your drive’s manner of encryption which will be between encrypting the used disk space or encrypting the entire drive. The first option is ideal for new PCs and drives while the second option is recommended for PCs and drives that are slower and already in use.
With that, the second option will more likely be suggested.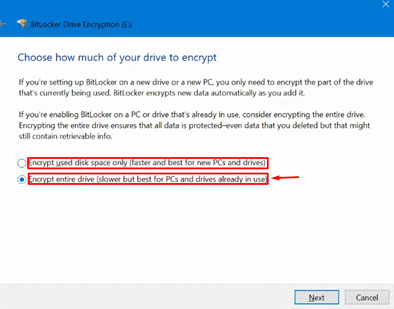
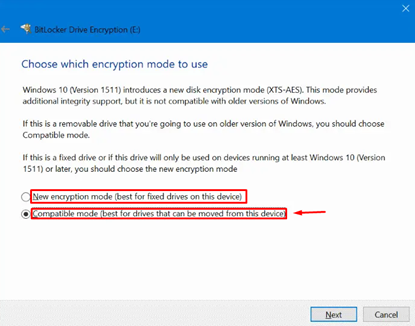
- Upon clicking next, you can now choose the mode of encryption which will either be the new model or the compatible mode. The first option is the best-fixed driver while the second option is best for removable.
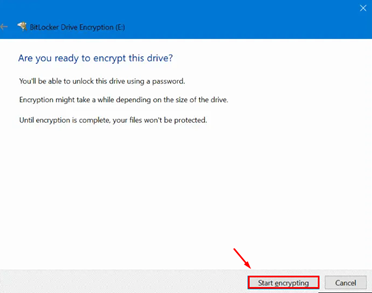
- After clicking next, you will now be able to begin the encryption process. Click on the Start Encrypting button, and you will be notified once the process is done. It will usually take from minutes to hours, but either way, users will only be allowed to access the contents of the drive using a password.
If you followed through with the instructions laid out, you will now be able to access the contents of your USB drive using a password. A good alternative to Bitlocker would be Folder Lock which offers similar functions with no limitations. We hope this little guide proves helpful to you.
Summary: Password-protect a USB Drive in Windows 10
- Go to the USB drive and right-click on a folder that you want to password protect.
- Click Properties, then go to the General tab.
- You'll see a checkbox that says Encrypt contents to secure data. Check this box.
- Click Apply and then click OK. When asked if you want to encrypt the folder only or child items as well, select Apply changes to this folder only.
- A popup appears titled Advanced Attributes. Enter a password. Type it again in the second window to confirm it. Click OK.
