How To Regain Storage Space Post Windows 10 Upgrade?
540 Views
Have you upgraded to Windows 10? Have the painful experience of losing your storage space after the upgrade? This is the post for you then, as this article covers on how to regain that storage space and hard disk drive space.
During an upgrade, Windows 10 usually retains a copy of the previous installation files. This safeguard feature is useful when the system needs to return to its original settings should an error occur during the upgrade.
However, these files (Windows.old and Windows10Upgrade) can take up a lot of space. Therefore, if you are running low on space, it is best to delete these files. Here are methods for deleting the previous installation files and reclaim back disk space after an upgrade.
Method 1: Using Storage Sense
One way to free up space in Windows 10 is using the Storage Sense feature. Here is how:
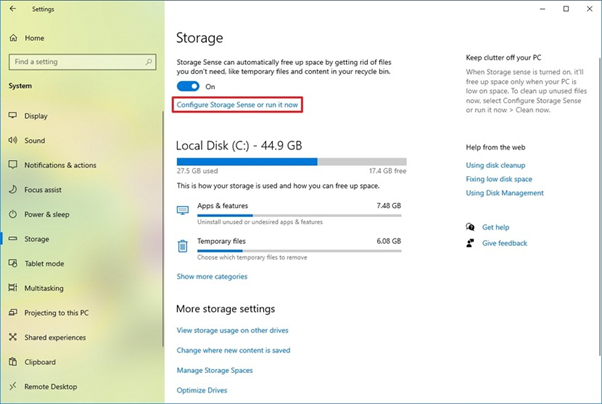
- Open Settings and select System.
- Click on Storage and go to the Storage sense section.
- While here, click on the option Configure Storage Sense or run it now.
- Now, navigate to the Free up space now section and check the box that is next to the Delete previous version of Windows option.
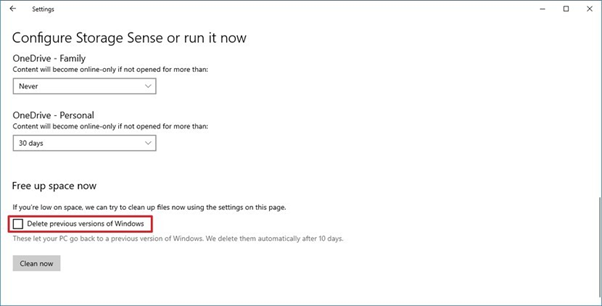
- Finish by clicking on the Clean now button. By doing this, Windows will get rid of the “Windows.old” folder that is responsible for storing previous installations that take up much space. While you may still see this folder, most of its contents will have been erased. If you want to delete it entirely, right-click on it and then choose Delete from the options.
After the clean-up process, a message will appear letting you know how much disk space has been freed.
Method 2: Using Disk Cleanup
Another method to save some valuable space is by using disk cleanup.
- Open Start and search for Disk Cleanup.
- Once you have launched it, click on Cleanup system files and it will scan your system.
- Look for the Previous Windows installation(s) on Disk Cleanup tab and check the box next to it. If you want to get more space, consider selecting other temporary files like Delivery Optimization Files.
- Then click OK to delete the folder with the folder containing the previous installation files.
Method 3: Using Temporary Files
The temporary files settings can also be used to regain disk space after upgrading Windows 10. Follow these steps:
- Go to Settings and then click on System.
- On the left panel, click on Storage.
- Click on the Temporary files option under the Local Disk (C:) section.
- Check the box next to the Previous Windows installation(s).
- Now, click on Remove files button.
Using this method will delete the temporary files and the previous installation files. It is, however, important to clear the option of the Downloads folder if you have any important files.
Method 4: Remove Windows Update Assistant
After installing a major Windows 10 upgrade, you will find two folders: Windows10 Upgrade and Windows.old. The Windows10 Upgrade is utilized by the Windows Update Assistant to do the actual update. Hence, you can free up space by uninstalling it.
- Open Settings.
- Navigate to the App category to open the Apps & Features screen.
- Once here, scroll down and locate the Windows 10 Upgrade Assistant.
- Click on this option and then select the uninstall button.
- Confirm that you want to uninstall it by clicking on the uninstall button in the next screen.
Another way to uninstall the Windows Update Assistant is through the control panel.
- Open the Control Panel and click on the Programs and Features icon.
- You should a list of installed applications. Now, double click on the Windows Update Assistant to uninstall it. Doing this should remove the Windows10 Upgrade.
Summary: Regain storage space post Windows 10 upgrade
- Open the start menu.
- Select Settings.
- Click the System icon.
- Click the Storage link on the left side of the System window.
- Click the Change How We Free Up Space link.
- Uncheck all items in the "Temporary Files" section except for "Previous Windows Installation(s)".
- Click the Clean Now button under "Free Up Space Now".
Conclusion
The above methods will help you remove the files of Windows previous version that may be taking up a lot of drive space. Using any of these methods will help you regain several gigabytes of space.
