How To Upgrade Motherboard And CPU Without Reinstalling Windows 10?
579 Views
- How to Upgrade CPU and Motherboard Without Reinstalling The Operating System?
- Integration of Upgrades by Registry (Started Before Upgrading CPU and Motherboard)
- Integration Of Upgrades By Offline Registry (Started After Upgrading CPU And Motherboard)
- Summary: How to upgrade motherboard and CPU without reinstalling Windows 10?
- Conclusion
This guide will show you the easiest way to upgrade your motherboard and CPU without reinstalling Windows 10 again. As time goes by, computer users worldwide have been facing the issue of their computer slowing down due to outdated hardware. Fortunately, there is an easy solution that doesn't require a full system re-install. This article is going to show you how simple it can be when you follow these steps:
There might come a time wherein changing the CPU and motherboard is inevitable. Luckily, you can do this without necessarily reinstalling Windows. Here is a step-by-step guide on how to upgrade CPU and Motherboard without reinstalling the operating system.
How to Upgrade CPU and Motherboard Without Reinstalling The Operating System?
Integration of Upgrades by Registry (Started Before Upgrading CPU and Motherboard)
- You can choose to link the Windows account to the Microsoft online account. In that way, you can just reactivate the installed Windows via online after upgrading your CPU and motherboard. To begin, click on ‘Start’ and select ‘Settings’.
- Select ‘Update & security’ and then, in the leftmost panel, choose ‘Activation’.
- In the rightmost panel, select ‘Add an account’ and sign in your account in Microsoft.
- Whether you link your Windows to your Microsoft online account or not, you need to modify the Registry. To do that, press the keys ‘Windows icon’ and the letter ‘r’ to launch the dialog box ‘Run’.
- On that dialog box, enter on the cursor the word ‘regedit’. Press ‘Enter’ afterwards.
- The Registry Editor window will open. In that window, locate the Hkey with msahci at the end.
- In the right panel, double-click on ‘Start’ and replace the existing value into 0.
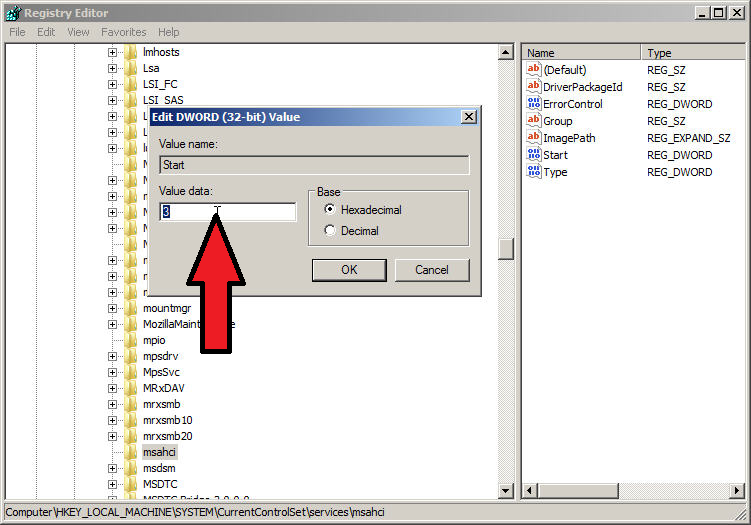
- Afterwards, locate another key on the Registry Editor:
Enter the HKey with the pciide at the end. - Replace the DWORD existing value into 0 also.
- Click ‘File’ and then ‘Save’. You can now exit the Registry Editor window.
- You can now proceed to shutting the computer down and replace the necessary hardware. By the time you are finished and you boot the computer, Windows must be successfully launched.
- After booting Windows, it is now time to reintegrate with the Windows 10 settings you have prior to upgrading the hardware. Click on ‘Start’ and choose ‘Settings’.
- Afterwards, select ‘Update & security’ and then, choose ‘Troubleshoot’.
- Locate the option ‘I changed hardware on this device recently’ and click on it.
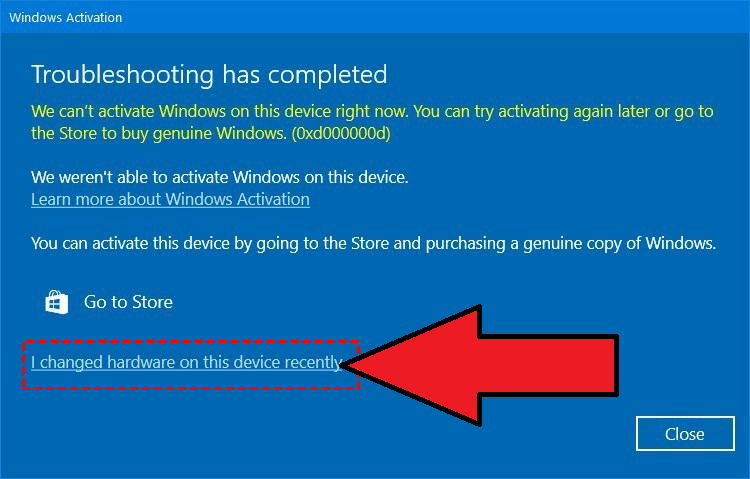
- Sign in with the Microsoft account you have set-up before and click on the button ‘Active’.
- Wait for the key activation process to complete. You can change the Windows account back if you want to.
Integration Of Upgrades By Offline Registry (Started After Upgrading CPU And Motherboard)
- In this method, if you forgot to modify the registry beforehand, you can proceed to these following steps. Make sure the installation disk is inserted.
- Enter the BIOS settings by pressing repeatedly the key ‘F2’ or ‘Del’ right after turning the computer on.
- On the BIOS setting, make sure to set up as primary booting priority the CD Drive or any port where the installation disk can be enabled first rather than the hard drive.
- Save the changes. Restart the computer through the CPU casing reset button.
- Once the installation disk boots up, you can set the language and initial settings. After setting up, click on ‘Repair your computer’ to proceed.
- Click on ‘Troubleshoot’, and then select ‘Advanced options’, and finally ‘Command Prompt’.
- On the Command Prompt, type regedit to launch Registry Editor and press ‘Enter’.
- Highlight the key HKEY_LOCAL_MACHINE, select ‘File and Load Hive’.
- Go to the path C:Windowssystem32configsystem.
- Type ‘Offline’ and click on ‘OK’ to save.
- Locate the keys and replace the ‘Start’ value into 0:

- Afterwards, highlight the key ‘Offline’, and then select the option that lets you file and unload the hive to preserve the changes being made.
- Exit Registry Editor and restart the computer.
- Re-enter to the settings of BIOS, set the boot priority back to the hard drive and save the changes. Restart the computer again and remove the installation disk properly.
Summary: How to upgrade motherboard and CPU without reinstalling Windows 10?
- Turn off your computer and all attached peripherals, such as the monitor and printer, and unplug them from their power source. Wait about five minutes for the computer's capacitors to discharge; then open up your PC case.
- Open your PC case and disconnect any peripheral components from the motherboard such as hard drives, optical drives, expansion cards etc.
- Note that if you have a RAID configuration of multiple hard drives, you need to be sure to preserve the same drive position order. In other words, when you mount the new motherboard in the case, make sure that your previous “Drive 0" goes back into the same position in the case on the new motherboard otherwise you will lose data.
- Install the new motherboard into its resting spot in your computer case along with your new CPU and heat sink/fan assembly as necessary so they are properly seated in their sockets. Make sure that all external cables connected to the previous.
Conclusion
Before proceeding, make sure to back up all your files. This is because changing any values of the Registry affects the overall performance of your Windows. If the methods don’t work, the only choice left is to reinstall Windows 10.
