How to Enable Disk Controller in BIOS? In computing, BIOS (Basic Input-Output System) are essential pieces of software that are the first thing to load when a computer starts up, enabling users to access their operating system. They serve as sort of a translator between the hardware and software on your computer. The BIOS is built into the motherboard which means it is not removable and cannot be upgraded.

When picking a partition for a new Windows installation, we occasionally run into a difficulty that necessitates enabling the disk’s controller in the computer’s BIOS menu.
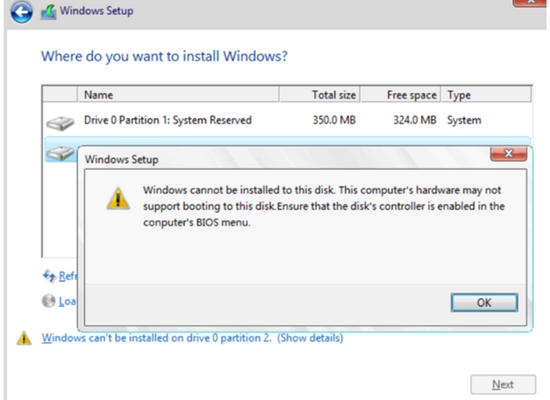
If the error occurs, the Windows installation won’t be fulfilled successfully. We should enable it before things get more complex. Today, I’ll explain how you can activate the disk’s controller in your system BIOS.
Enabling Disk Controller in BIOS
On a PC with Windows previously installed and Windows that typically run after this process, there are several ways to activate AHCI mode for SATA. Take a look at these procedures to figure out how to enable the disk controller in the bios menu panels
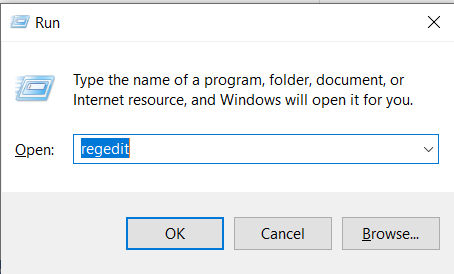
- Press “Windows + R” to launch the “Run” program. Type “Regedit” and hit “OK” to open the “Registry Editor” menu.
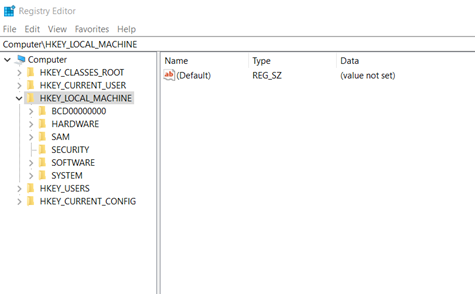
- Click the arrow and expand the “HKEY_LOCAL_MACHINE” option.
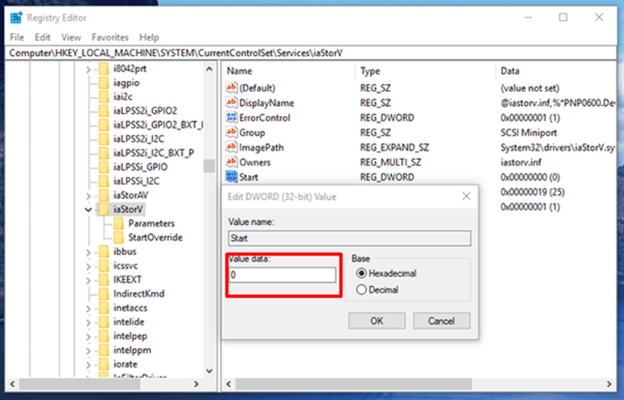
- Go to “SYSTEM > CurrentControlSet > Services > iaStorV.”
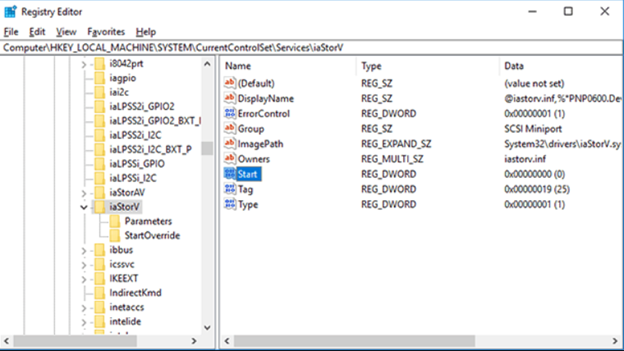
- Double-click on the “Start” option. Set the value data to zero “0” and hit “OK.”
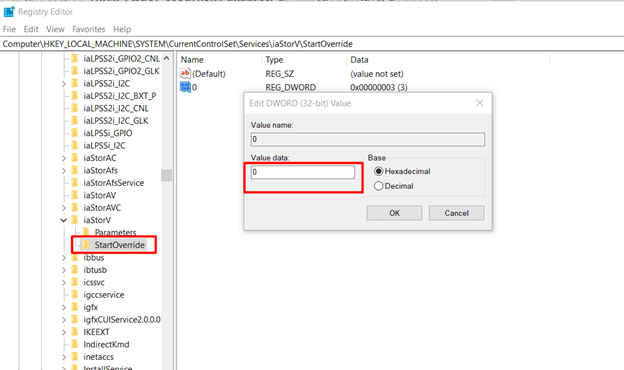
- From the “iaStroV” section, go to “StartOverride” and set the element 0 value to zero “0.”
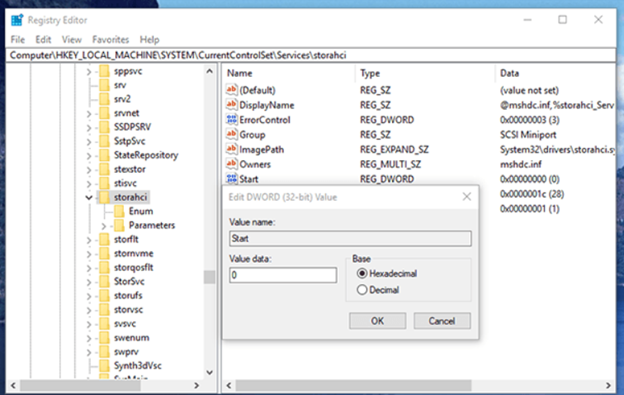
- Go to “HKEY_LOCAL_MACHINE > SYSTEM > CurrentControlSet > Services > storahci.” Set the value for “Start” to zero “0” then click on “OK.”
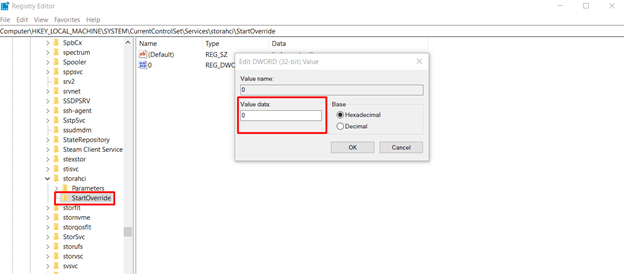
- Go to the “StartOverride” option in the same section and set the element 0 value to zero “0.”
- Exit the “Registry Editor,” then reboot your PC.
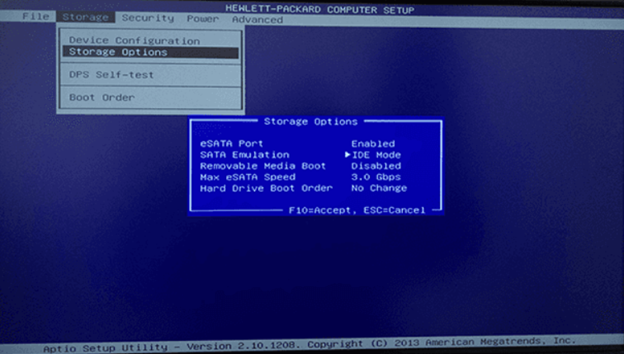
- Go to your BIOS or UEFI settings and find the “Storage” or “SATA” options to select a particular mode for memory devices. Switch the mode option to “AHCI” and save it. Restart your PC.

- After resuming, Windows can begin installing SATA drivers, and once completed, it will prompt you to restart. Users will need to activate the AHCI function in Windows to do so. It will enable the disk’s controller for you.
- Here’s another option if the above strategy doesn’t work out. To begin, if users are having trouble launching Windows in the AHCI method, switch back to IDE and reboot the desktop. Follow the rest of the steps for IDE mode.
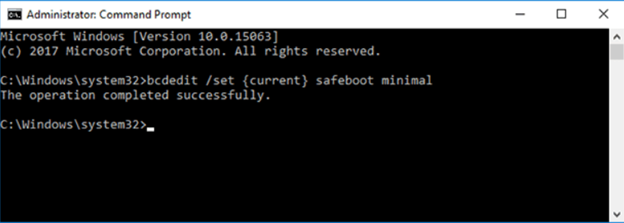
- Now, open the “Command Prompt” program as an administrator.
- Type “bcdedit /set {current} safeboot minimal” then press “Enter.”
- Restart your PC and go to the BIOS settings before booting. Change the mode to “AHCI” again using the above method and save the modifications.
- Open the “Command Prompt” program again and run the “bcdedit /deletevalue {current} safeboot” command.

- If the operation is successful, restart your PC again. Now, your PC should start with “AHCI” enabled without facing any restrictions.
Note: In theory, these instructions could cause unforeseen consequences, such as the inability to launch the operating system. Furthermore, to complete the assignment, this strategy necessitates technical abilities and knowledge. So, you need to be very careful when following the process.
What is AHCI mode in BIOS?
The Advanced Host Controller Interface or the AHCI mode allows advanced functionality to be used on SATA disks. In addition, AHCI enables a hard disk to run at more incredible speeds than it could in IDE mode.
Summary: Enable Disk Controller in BIOS
- Press “Delete” or “F2” when the computer boots up, to enter the BIOS setup.
- Navigate to the “Integrated Peripherals” section of the menu using your keyboard.
- Enable the disk controller by using your keyboard arrow keys to scroll to the "Disabled" option and press "Enter" to change it "Enabled".
- Exit and save changes. This can be done by pressing “F10” and again pressing “Enter”. The machine will reboot.
