You installed Snip & Sketch on your Windows 10 computer but you are facing several problems with this program and you want to remove it. But you don't know how to do that because Microsoft doesn't provide any tool to save you from this trouble. In this article, I will provide a detailed tutorial for you for removing Snip & Sketch on windows.
Windows 10 usually comes with several default apps that users can utilize for their needs. Some of them are meant to replace classic Windows programs while some are new. One of these is the Snip & Sketch app, previously known to users as the Screen Sketch app.
While it can be useful for many reasons, especially when taking screenshots and annotating those images, it still lacks the advanced features of third-party apps like what PicPick and Greenshot have to offer.
Thus, many choose to uninstall the app and replace it with their preferred alternative. If you want to uninstall the Snip & Sketch app, check out the following steps to find out how.
Removing Snip & Sketch Using Windows Admin
There are two ways to remove Snip & Sketch from your computer. This section will be discussing how to do so below.
Method 1: Via Windows Powershell
1). Run Powershell (Admin)
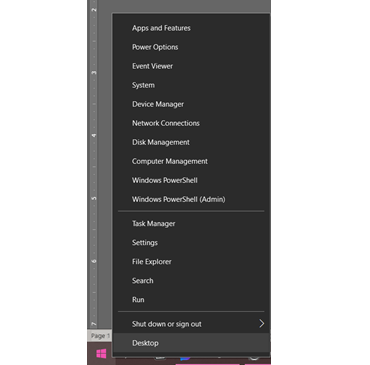
The first method is by removing it via Windows Powershell. To start this, you first need to run Powershell with Admin Rights. For this, you can right-click the Start button on the lower-left side of your taskbar and select the Windows Powershell (admin) option.
2). Find Snip & Sketch’s entry
Once you have opened Windows Powershell, you now need to locate the app’s entry in the list of installed apps on your PC. To do this, you need to type in this command – Get-AppxPackage.
After doing so, press Enter. This will list down all the apps currently installed on your computer. On the list, you need to locate and copy the Snip & Sketch app’s PackageFullName. You will need this to uninstall it from your PC.
3). Uninstall Snip & Sketch
Once you have it, you can now uninstall Snip & Sketch by executing the following command: Get-AppxPackage PackageFullName | Remove-AppxPackage

Replace the “PackageFullName” with the actual PackageFullName of Snip & Sketch. Running this command should uninstall Snip & Sketch from your PC.
Method 2: Using CCleaner
If you’re uncomfortable with uninstalling the app via Powershell, another alternative for this is using the software CCleaner. This is free software you can use for optimizing your PC’s operation by removing unnecessary files.
While there are paid versions of the app, the free version is more than enough to uninstall Snip & Sketch from your PC.
1). Open CCleaner and go to the “Tools” tab
Once you have downloaded and installed the program on your PC, open it and go to the “Tools” tab of the program.
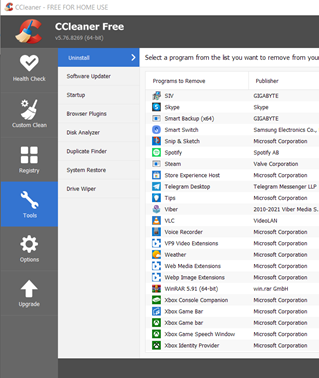
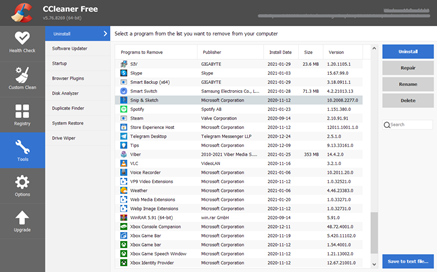
Under the Tools tab, you will find the Uninstall options, and next to that, you can find a list of all the apps installed on your PC.
2). Uninstalling Snip & Sketch
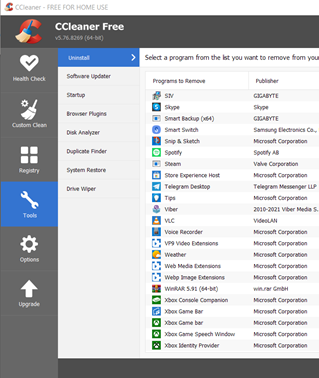
On the list of apps, locate Snip & Sketch. Select it, and on the right side of the window, you’ll find an Uninstall button. Clicking on this will uninstall and remove Snip & Sketch from your PC.
Final Thoughts
Some Windows 10 default apps can be handy for users, especially for basic operations like taking screenshots. However, for those who require more advanced features, third-party apps are often the better option to meet this need.
Thus, some choose to uninstall the default apps because they are only taking up space on their PCs. Regardless of why you choose to remove them, it’s still essential to understand how to remove these default apps.
Hopefully, this guide was able to help users understand how to remove Snip & Sketch from their PCs using either their Windows admin rights or via the free tool, CCleaner.
Summary: Remove Snip & Sketch Using Windows Adm
- First of all, open the Start menu.
- Go to Settings.
- Open Apps.
- Select Snip & Sketch from the list of apps and then click Uninstall button to uninstall.
- Click Uninstall again in the prompt window to confirm and then wait for the process to finish.