How To Remove Strong Wind Noise From Audio Using Adobe Audition?
578 Views
Have you ever gone out recording audio and had problems with wind noise? It is the worst! Well in this article we will learn how to remove the wind noise in Adobe Audition. You can use both Adobe Audition and Audacity to remove the wind noise from your audio recordings.

No matter how experienced and qualified your audio crew is, there will always be hindrances in achieving the best audio quality. These hindrances can come from several external factors, such as breathing sounds and intense wind noise.
However, the good news is imperfections in your audio system no longer have to be scrapped. Instead, you can easily edit them using Adobe Audition.
As an editor, there are several ways to optimize Adobe Audition's beneficial features to minimize or altogether remove strong wind noise. Learn more here.
You should fix distorted audio
You may have discovered that the field settings were too hot. This issue often occurs for those working as a single-person crew.
So, when the audio setting is very hot, it will be distorted. However, don't worry because this can be fixed.
- Access your audio's Waveform by double-clicking on its track.
- Go to Window. Then, go to Amplitude Statistics.
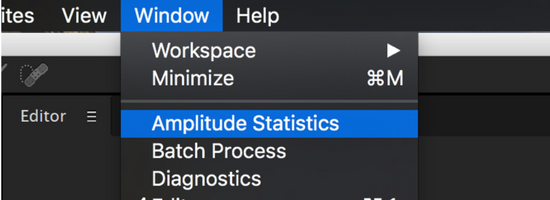
- After that, a window will display on your screen.
- Select the Scan option, which is located in the window's left part.
- Once it'll scan, you need to search for the section with Clipped Samples.
- Select the small diamond-shaped node located next to the number. This should show you where your audio file is clipping.
Utilize the Spectral Frequency Display
Suppose you and your crew have been filming on a vast open field or in a windy location. In that case, you surely will experience audio interruptions. Secondary interferences may also ruin your audio, such as your crewmate's heavy breathing.
Noises like this can be effortlessly taken away with Spectral Frequency Display. Refer to the pictures below to understand the process.
- Double-click on the audio Waveform, which is found in your Files Panel.
- As soon as the audio Waveform appears in your Editor Panel, you will see a small divider at the Panel's bottom.
- Click and hold on to that small divider to pull it up.
- Pulling it up would reveal the Spectral Frequency.
- By looking at this, you will have a clear reference of the noises you wish to remove from the main audio.
Make use of adaptive noise reduction
This is another simple way of reducing unwanted noise in your audio recording. This adaptive noise reduction method works perfectly at removing background noises such as strong wind noise, vehicle noise, and others.
This can take effect in real-time using your Multi-track Editor. This handy editor can be utilized through the following steps.
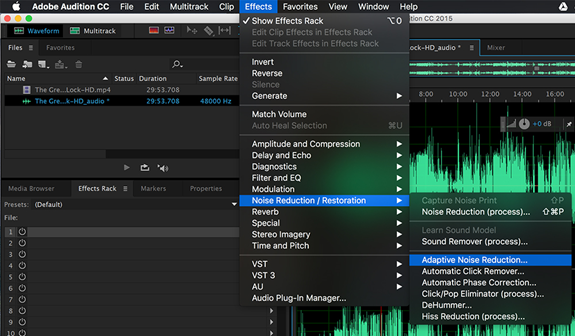
- Double-click on the source of the audio located in your Files Panel and activate the Waveform.
- With the Waveform activated, you should go to the Effects Menu or the Effects Rack.
- After that, access Noise Reduction or Restoration and head over to Adaptive Noise Reduction.
Remove echo
Another issue that causes terrible audio interruptions is an echo. For low-quality audio, hearing echoes is already considered normal.
It happens from time to time, especially when you are recording when there are plenty of reflective surfaces such as tiles, bricks, metals, and concrete.
These materials are expected to reflect voices and bounce these voices all over the place, causing many audio interruptions.
Although Adobe Audition does not include polishing effects specialized for this kind of issue, there are some plugins you might want to purchase. These plugins are sold at a reasonable cost, and indeed, they work well in eliminating echoes. These plugins are highly recommended:
- SPL De-Verb plugin
- Acon Digital's DeVerberate
Summary: Remove Strong Wind Noise from Audio Using Adobe Audition
- Create a new project in Adobe Audition.
- Select the audio file you want to remove noise from.
- Select the area where only noise is present. In this case, we will select it in the very beginning because there are no voices there.
- Now go to Effects > Noise Reduction / Restoration > Capture Noise Print. This will capture the noise model that we will use to remove background noise.
- Select entire audio file with Ctrl + A or Cmd + A and then go to Effects > Noise Reduction / Restoration > Noise Reduction (Process). This will open up the noise reduction dialog box.
- Click on OK, and you're done
Conclusion
Removing wind noises and other audio interruptions is pretty simple. All you need to do is follow the steps above to achieve smoother and clearer audio recording outputs.
