How can we recover a file that gets erased or unavailable to use, like the file remove by anti virus chest? Well, I'll try to help you out! This is one of my friend's problems.
The Avast Virus Chest, or ‘Quarantine’, is responsible for storing files considered as a virus by Avast. They can be transferred through automatic detection or manual scanning. However, your Avast can wrongly identify a file as a false positive. For that reason, you need to learn how to restore it to be able to use it again.
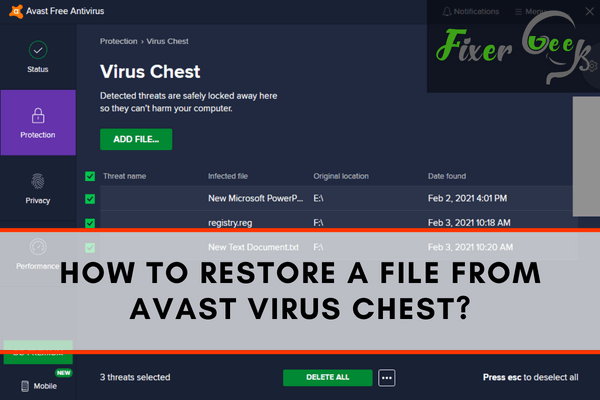
How To Access Avast Virus Chest And View Files?
There is more than one way in accessing the Avast Virus Chest or Quarantine.
Opening Through Notification Tray
- Assuming that your PC is turned on, locate the Avast icon in the notification tray at the right side of the taskbar.
- Right-click on the Avast icon. Then, choose ‘Quarantine’.
Opening Directly The Application
- Click on ‘Start’. Then search for the Avast program easily by typing on the search bar.
- Once Avast is located, open the application.
- Then, hover the mouse on ‘Scan’ found on the menu. Click on ‘Scan for Viruses’.
- Finally, click on ‘Quarantine’.
How To Restore Files Stored In Quarantine?
Before you start restoring, you have to make sure that the file you are about to restore is not a virus. Some viruses can replicate files. Make sure you are certain of what you will be doing.
Assuming that you are sure of the file, tick the box beside it. You can tick as many as you would like to.
- Click … More options’ and then choose an action. You can do either:
- Restore = this transfers the chosen file to its previous location.
- Restore and add exception = this transfers the chosen file to its previous location and adds it to the list of exceptions.
- Extract = this transfers the chosen file to a new location outside the Virus Chest.
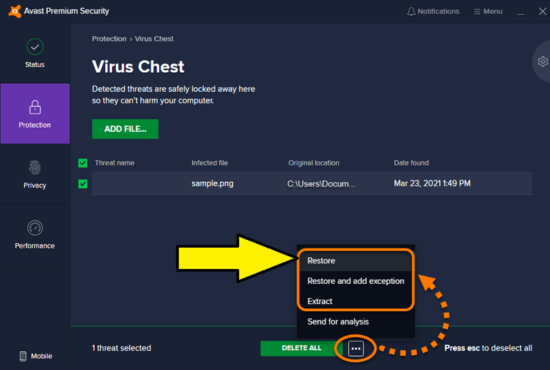
- After choosing the appropriate action, click on ‘Close’.
How To Prevent False Positive Detections?
To prevent future instances of false-positive detection, you can report the problem to Avast or you can manage the Quarantine settings or you can do both.
Submitting Files To Avast Threat Labs
If you aren’t so sure about the state of the file you want to restore, either it may be compromised or still safe from infection, you can send it to Avast Threat Labs for analysis. Just make sure you have a fast and stable internet connection while performing the succeeding steps.
- Assuming you are still on the Virus Chest or Quarantine window of the Avast application, tick the box beside the chosen file.
- Click on ‘… More options’ and choose ‘Send for analysis’.
- Now, choose either of the options: ‘Potential malware’ or ‘False positive’. This will be the basis of the Threat Labs’ analysis.
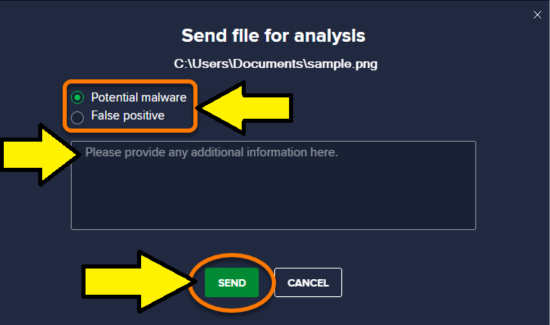
- Type any additional relevant information in the text box about that certain file.
- Afterward, click on ‘Send’.
- You can close the window and continue using the PC. You will be notified if Avast Threat Labs have responded.
Manage The Quarantine Settings
To prevent a restored file from being detected again, you can perform the particular procedure mentioned above. If you wish to prevent a certain file from false detection as Avast performs either its scheduled or manual scan, you can add that file to the exceptions list.
- On the Avast window, click on ‘Menu’.
- Next, click on ‘Settings’, then proceed on to ‘General’ and finally go to ‘Exceptions’.
- There, you can browse the file address of the chosen file and add it to the list.
Summary: Restore A File From Avast Virus Chest
- Open the Avast user interface.
- Click Protection in the menu on the left.
- Click Virus Chest.
- Select the computer where you want to restore the file(s).
- Click Restore next to the file you want to restore, or click Restore all items if you want to restore every file in the Virus Chest.
- Select where to save the restored file(s).
- Click OK.
Conclusion
As you upgrade your Avast application, the user interface may change. However, the principles of locating and restoring a file are intuitively the same as the procedures stated above.
