You created an amazing movie in iMovie, but you lost all your hard work. If this happened to you, you are not alone. iMovie is one of the most used video applications on Mac platform, and often people hit its limits. You need to fix some audio or video issues, and at some point, you realize that your movie is gone. How can you save a iMovie project?

For Mac users, iMovie is a valuable tool for editing their videos, turning them into high-quality projects without the complexity of other video editing software. It allows users to create professional-looking videos with just a few clicks.
With iMovie, you can even add effects that add to the overall effect of your final project. However, this can all be for naught if you forget to save your iMovie project. With that said, how do you save an iMovie project once you’re done?
Check out the steps below.
Saving on a macOS computer via the Share Project option
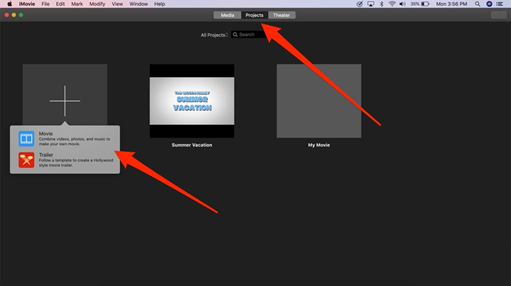
The first is to open iMovie on your Mac computer and select one of your current projects from the “Projects” tab. If you don’t have an ongoing project, you can create one by clicking the “+” symbol and then selecting a template or creating one from scratch.
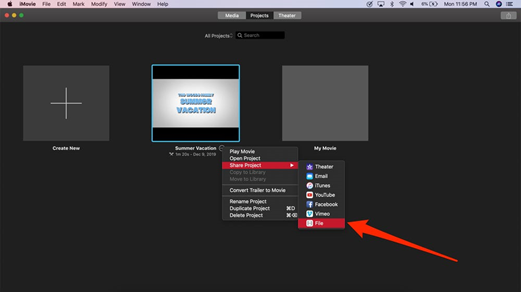
After doing so, right-click the project and click on “Share Project.” A drop-down menu will appear from which you should choose “File.”
This will then open a window wherein you can choose from several options to customize the settings of your video. Here, you can add descriptions and tags and adjust the video settings like its resolution and quality.

Don’t forget to check “Add to Theater” then click “Next.” The program then will prompt you to type in the File Name and select a location in which you will save the file.

Once you have typed in a file name and selected the location to save it in, you can now click “Save.” This will complete the process and save your file on your computer.
Saving on a Mac computer via the File option
Another way you can save on your Mac computer is by using the File option. To do this, first, you have to click the “File” option at the toolbar on top of the app.
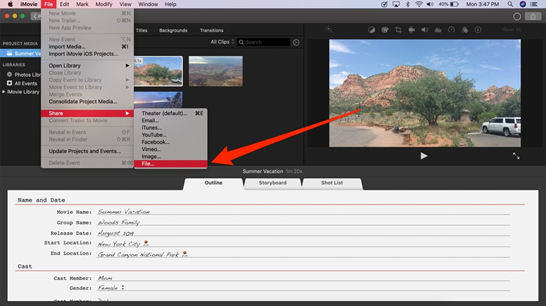
After doing so, a drop-down menu will appear, and from which you should choose “Share” then click “File” from the options.
After doing so, it will open another pop-up menu wherein you can input details such as the file name and location to save the project in.
Saving on a removable drive via the File option
If you’re saving your project on a removable flash drive, you can do so via this method. First, you need to open iMovie if it’s not already open. Then, at the top of the app, you can find the File option which upon clicking, a drop-down menu will appear.
From the menu, click on “Open Library” and select “New.”
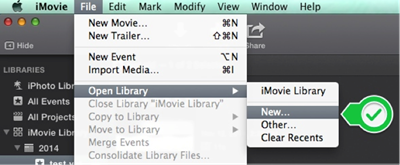
Under “Save As,” you can give your new library a name. After doing so, click on the drop-down button to look for and locate your flash drive.
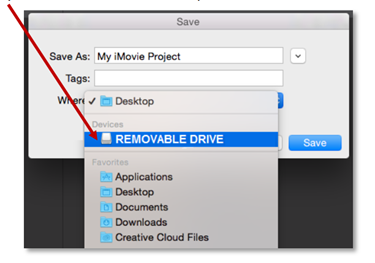
Once you locate it, select it, and press “Save.” This will create a second library in the navigation bar on the left.
After doing so, click on the “Projects” button located at the upper-right area of the app. After doing so, locate the icon with the three dots like this:

This will make the menu appear from which you should select “Move to Library” then select the library you created in your flash drive.
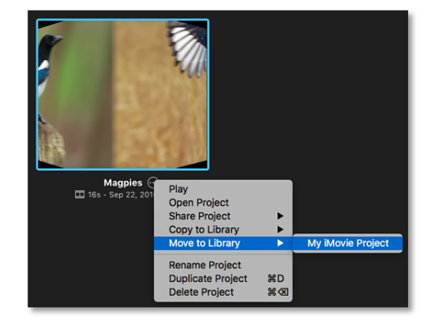
Once you do, save it and your project is now saved in your removable flash drive.
Final Thoughts
Saving your iMovie project is as easy as that. With a few clicks, you can save your impressive-looking video and share it with your loved ones. iMovie is a handy tool for anyone looking for a more convenient way to edit their videos.
Summary: Save a iMovie project
- Select "File" in the main menu.
- Click "Save As."
- Click on your name on the left of the screen.
- Look for a folder called "My Documents."
- Find the folder where you want to save the file.
- Type the movie name into the box under the "Name" label.
- Check that the location is where you want it to be saved.