You can share your computer's sound with your skype callers. You don't have to hold a mic next to the speaker or headset, so you can let others hear through the speakers. This way of sharing audio is called system sound. I'll show you how easy it is to set up system sound on you mac.

Skype is an online conversation software where you can have your audio or video conversations through the application platform. If you are working in a team and you need to collaborate for instructions, you can always share your system sound on Skype in your Mac system interface.
Before you get started
You will need to have the Skype software installed in your system to share your system sound. If you don’t have it, then open your web browser download it from https://www.skype.com/en/get-skype/download-skype-for-desktop/ and select the “Download for Mac” option. After the download has been completed, install it in your system.
To share your sound system with other people, you will also need audio sharing software as it will work as a platform that will connect your Skype application and the output devices. The “Loopback” audio software is a good software to share your sound system. If you want to open one channel and close the other, you can change your channel output by changing the settings if the application is integrated with Skype. You can also add multiple output channels from this application.
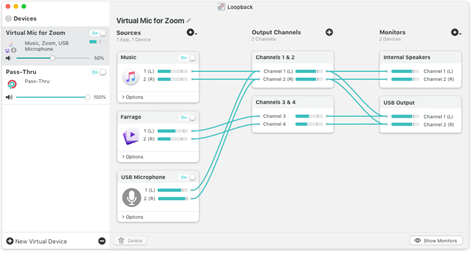
To download the application, open your web browser in your Mac OS and paste the web address https://rogueamoeba.com/loopback/ in your web URL box. Click on the “Free download” option to start the download. After downloading the application, install it in your system
Setting the route of system sound
Change the settings of the sound by following the procedure:
- Open the “Loopback” application. Click on the “New Virtual Device” option to share your output devices.
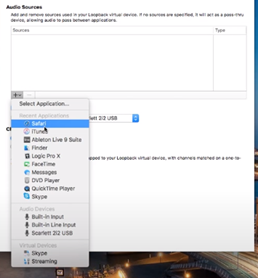
- Name the new output device. Click on the “+” icon to add audio resources. There is a list of software that you can use from which you can share your audio. Click on the “Skype” option to proceed. You can also select multiple apps which you want to share with other people.
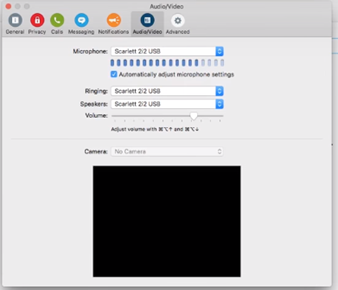
- Now open your “Skype” application and go to its “Settings” option and click on the “Audio and Video” options. There are drop-down options for Microphone, Ringing, and Speakers. Click on the “Microphone” option. There will be a list of devices on which you can play the audio. You will see that the new device which you name on the Loopback app is visible. Select that option to proceed.
- After selecting the option, go back to the Loopback application and add your microphone to the audio device that you created.
- After you add the mic device, if you have a mono input, you will see that the output will be in a single channel (left by default). To set your output to both channels, click on the “Manual” option under the “Channel mapping” criteria. This will open up an option where you can drag your channels manually to decide on what side you prefer the output.
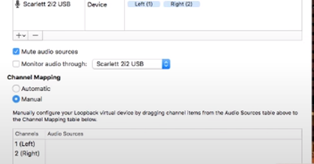
- The channels working for the device will be available to you. Now drag the “Left” channel of your mic device and place it on the “Left” channel. As the mono output works on the Left by default, there will be no channel in the “Right” section, so drag the “Left” channel again and place it to the “Right” option and save your settings. You will now be able to hear it on both sides.
Summary: Share system sound on Skype Mac
- Set your Mac to use the same audio device for input and output.
- Open up System Preferences > Sound.
- Click the Output tab, and select Soundflower.
- Click the Input tab, and select Soundflower again.
- Quit out of System Preferences.
- Right-click on your Skype icon in the dock and then click Options, then choose Keep In Dock.
- Open Skype, start a call with anyone, and send an audio file to your contact to test it out.