- Fix for the crackling sound in Windows 10
- Method 1: Setting the Minimum of the Processor State
- Method 2: Changing the Sound Format
- Method 3: Uninstalling drivers
- Method 4: Editing on the Registry
- Method 5: Disabling the Audio Enhancements and the Exclusive Mode
- Method 6: Buying a USB-to-3.5mm adapter
- Summary: Fix the crackling sound in Windows 10
- Conclusion
Are you getting a crackling sound in Windows 10? Don't worry, you're not alone. Most of the people who upgraded to Windows 10 are facing this issue. Sometimes this issue occurs when you're listening to music, watching videos or playing games with your headphones. Here in this tutorial, you'll learn multiple ways through which you can fix crackling sound in Windows 10.
Upon using Windows 10, there will some random moment that a crackling sound will be heard from your speakers. It may be a sound of interference on the hardware aspect of the computer but there is also a possibility that a software problem causes it. It might be just a slight annoyance and it can also be fixable with the following steps.
Fix for the crackling sound in Windows 10
There are around 6 methods of fixing the problem, either a software approach or a hardware fix. These are the following:
Method 1: Setting the Minimum of the Processor State
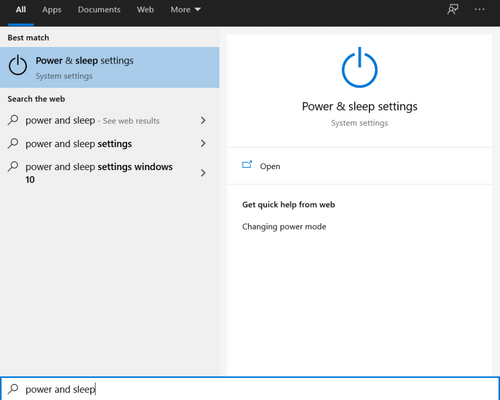
- Press the ‘Windows’ + ‘S’ keys for the search bar. Input ‘Power and Sleep’ and open the first entry.
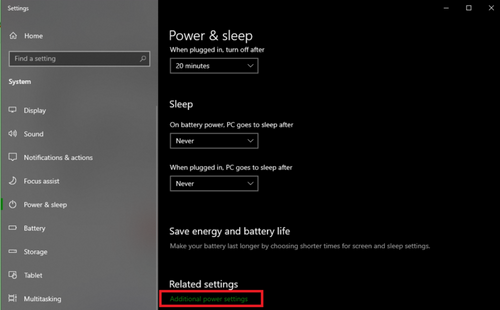
- When the window opens, choose ‘Additional power settings’.
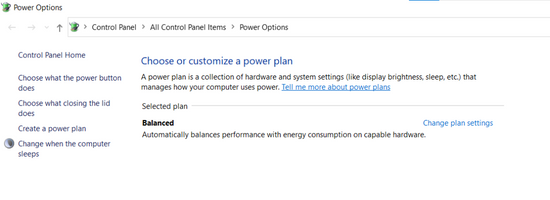
- As you see the different power plans, choose the one you are now using and select ‘Change plan settings’.
- A new window will pop up with details such as when to turn off the display etc. Ignore all of these and click on “Change advanced power settings” located near the bottom of the tab.

- As another window pops out, navigate through, and find ‘Processor power management’. Under it, select the ‘Minimum processor state’.
- Change the 5% value into 100%, on cases ‘On battery’ and ‘Plugged in’.
- Save the changes, then exit and restart the computer. Check if the improvement of the audio.
Method 2: Changing the Sound Format
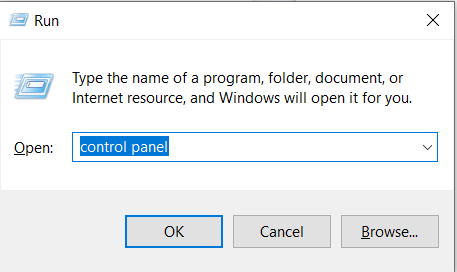
- Press the ‘Windows’ + ‘R’ keys for the ‘Run’ dialog box. Type in ‘Control Panel’ so that the application will launch.
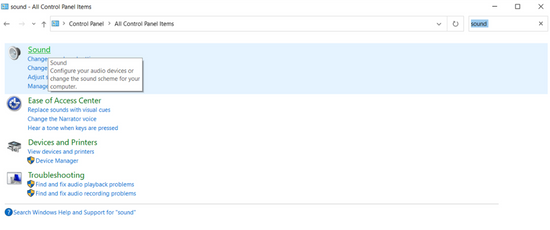
- Inside the Control Panel, for convenience, type in ‘Sound’ on the search bar at the top-right side of the window. Open the result that matches exactly the word searched.
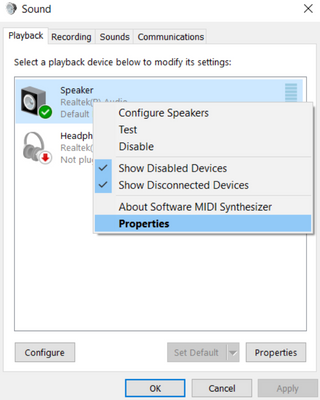
- When opened, click the audio device that is connected to the computer. Right-click and choose ‘Properties’.
- Choose the ‘Advanced’ tab and look for ‘Default Format’. Click and the drop-down menu will appear.
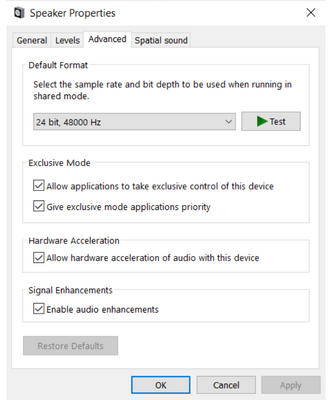
- Select the first option available and save the changes.
- Restart the computer and observe the changes.
Method 3: Uninstalling drivers
- Press the ‘Windows’ + ‘R’ keys for the ‘Run’ dialog box. Type in ‘devmgmt.msc’ so that the Device Manager will launch.
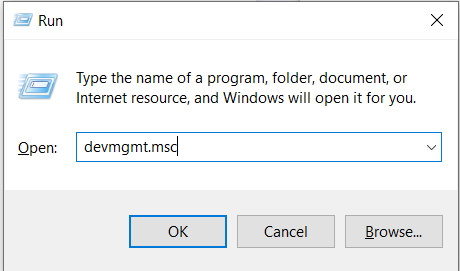
- Click the category ‘Audio inputs and outputs’.

- Right-click on the ‘Speakers’ and select the ‘Properties’.
- Click the ‘Driver’ tab at the top. You’ll see here the option to uninstall the sound driver. Click on it.
- After confirming the action, the driver will now be uninstalled.
- Restart the PC and the Windows will automatically install the speakers’ default drivers.
- Repeat the first few steps up until opening ‘Properties’.
- Click the ‘Update Driver’. Select ‘Automatically’ and the Windows will do the search and will install the drivers.
- Check for improvements.
Method 4: Editing on the Registry
- Press the ‘Windows’ + ‘R’ keys for the ‘Run’ dialog box. Type in ‘regedit’ so that the Registry Editor will launch.
- Navigate towards the destination:
HKEY_CURRENT_USERSoftwareRealtekRAVCpI64Powermgnt - Adjust the following settings:
a. ‘Delay time’ has to be in the default value of 10.
b. Set the value of ‘Enabled’ to ‘1’ instead of the default value of ‘0’. This is to prevent popping sounds.
c. Set the value of ‘Only Battery’ to ‘1’ instead of the default value of ‘0’. This is to prevent popping sounds when the laptop is on battery mode. The PC doesn’t have this.
Method 5: Disabling the Audio Enhancements and the Exclusive Mode
- Press the ‘Windows’ + ‘R’ keys for the ‘Run’ dialog box. Type in ‘Control Panel’ so that the application will launch.
- Inside the Control Panel, for convenience, type in ‘Sound’ on the search bar at the top-right side of the window. Open the result that matches exactly the word searched.
- When opened, click the audio device that is connected to the computer. Right-click and choose ‘Properties’.
- Choose the ‘Enhancements’ tab and uncheck the enabled enhancements or check the ‘Disable all enhancements’.
- Now, switch to the ‘Advanced’ tab and uncheck the ‘Exclusive mode’. Save the changes and exit.
Method 6: Buying a USB-to-3.5mm adapter
Out of all methods, this is the one that deals with the hardware. Instead of connecting the speakers to the speaker port of the motherboard, it will now be connected to the USB port using the said cable adapter.
Summary: Fix the crackling sound in Windows 10
- Disable audio enhancements.
- Select the correct playback device.
- Try lowering bit rate and frequency.
- Update or reinstall your sound driver.
- Update Windows 10 itself.
Conclusion
Try one method that seems to be convenient for you. If not, there are 5 more methods you can try on. The crackling sound is not that big of a deal on most occasions but it can get annoying over time.