Many computer users do not know how to uninstall Windows Defender or do not need the software. If you are one of them, you have arrived at the right place. In this article, I will show you how to turn off Windows Defender and choose more suitable software for your needs.
Windows Defender is the free, built-in antivirus software that comes along with the operating system. It exists on Windows 7 and the more recent versions of Windows. When it comes to performance, many third-party antivirus programs are far more capable but it still works well for the basic Windows environment.
However, the nature of an antivirus program is that there must be only one running in the operating system. Having two of them is not advisable and therefore,
Uninstalling one of them is the only choice
If for any reason you want to stop the services of Windows Defender, here are the steps to perform how.
Step 1: Running A Malware Scan
- Before you stop the services of Windows Defender to give way for the installation of a new and better antivirus program, you need to scan your computer for any potential threats.
- If you disable Windows Defender without running a malware scan, there is a chance for a hidden virus to attack. Therefore, it is better to deal with existing or hidden threats first.
Step 2: Disabling Windows Defender (Windows 10)
- Go to ‘Start’ and type on the search box the word ‘defender’. Select the ‘Windows Defender’ from the results.
- In the main window of Windows Defender, click on the button ‘Settings’ located at the upper right portion.
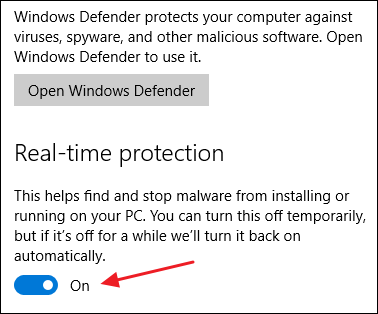
- The ‘Settings’ window will appear. Another alternative route is to access the ‘Settings’ app, then choose ‘Update & Security’ and then, select ‘Windows Defender. Ensure that you set the toggle button for the ‘Real-time protection’ portion.
- Next, on the ‘Windows Defender’ page, click the link ‘Add an exclusion’. Choose the button ‘Exclude a folder’ and select the drive C or the drive where Windows is installed. Include the rest of the drives if you have partitions and other hard disks. The whole point of this step is to basically turn off the antivirus protection.
Step 3: Disabling Windows Defender (Windows 7& 8)
- Go to ‘Start’ and type on the search box the word ‘defender’. Select the ‘Windows Defender’ from the results.
- Select ‘Tools’ from the menu and then, click the link ‘Options’.
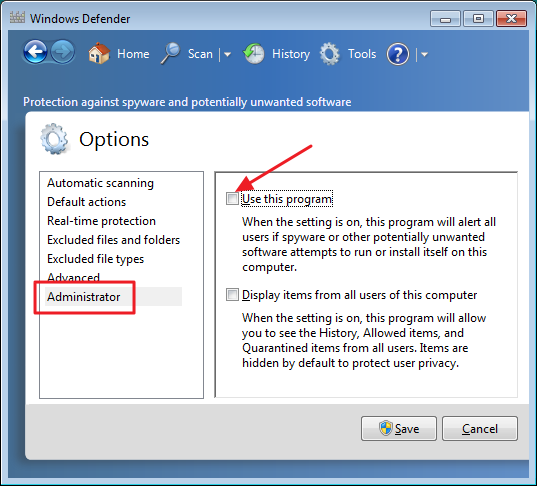
- Select the tab ‘Administrator’ located on the left side.
- Mark the checkbox ‘Use this program’ and click on the button ‘Save’. Something will prompt that Windows Defender is being turned off. Click on the ‘Close’ button for confirmation.
Uninstalling Windows Defender
The uninstallation process can be done but it can be a very complicated process. It is highly discouraged to uninstall Windows Defender at all costs for the following reasons:
- Windows Defender only uses very few computer resources. Uninstalling it will not greatly change the storage or improve the RAM capacity of the computer.
- It is better to have a backup antivirus program in case the third-party software you have installed will encounter problems and uninstallation is needed.
- Undergoing the complicated uninstallation process will be rendered useless since, in every Windows update, the Windows Defender will be automatically installed again.
For those valid reasons, disabling the Windows Defender is the only beneficial choice you have.
Summary: How to uninstall Windows Defender?
- Go to Settings > Update & Security > Windows Security > Open Windows Security.
- Click on Virus & Threat Protection in the Windows Security window.
- In the Virus & threat protection settings, you can see a Manage settings link from where you can turn off Windows 10 built-in antivirus.
- Turn off Real-time protection.
- You will get a warning asking “Are you sure you want to turn off real-time protection?”
- After disabling real-time protection, click on Yes in the System Alerts section.
- Disabling Windows Defender Real Time Protection can help you fix problems with computers that have been infected by malware and viruses or other issues related to Windows Defender.
Conclusion
As soon as you have disabled the Windows Defender, quickly head out to your browser and download the antivirus program, even if it is a free version. Do not open any other websites as much as possible since your computer has no protection from any malware attack.
After downloading and installation of the antivirus program, you can now go back to your regular computer activities. Make sure that the Windows Defender stays disabled by checking if the icon is present in your taskbar. If not, you’ve successfully disabled Windows Defender.
