Are you having any idea about uploading your website on Amazon EC2? If no then don't worry, I will help you regarding the same thing in this article.
So you can create a website but you don’t know how to upload it online. Don’t worry. You can easily upload your website on Amazon EC2. You can upload it on Amazon EC2 applying two ways: with a Linux Ubuntu server or using Internet Information Services (IIS). Here, we will inform you about both processes. SO follow this article to know about how to upload the website on Amazon EC2.
Uploading Website on Amazon EC2 with Linux Ubuntu Server
- First, arrange your server. Log in to Amazon AWS and navigate to the AWS Management console. Choose Amazon EC2. Select “Launch Instance”.

- Pick Linux Ubuntu 16,04 LTS as the Amazon Machine Image. Keep all the configurations as defaults. And, launch your instance with a new key pair. Download it and store it securely.
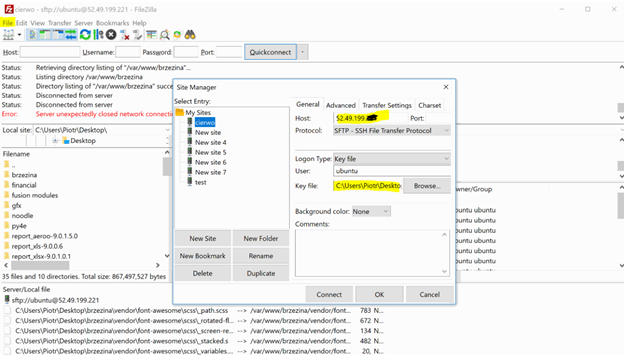
- Now, you have to pick up an FTP client for moving the files to the server. Choose FileZilla and configure it. Select “File Manager” and put the server address and the key pair file in it. If you come across any problem, just follow the picture given below.
- Then, you have to find an SSH client for joining the server and alter variables. PuTTY is a good choice as an SSH client.
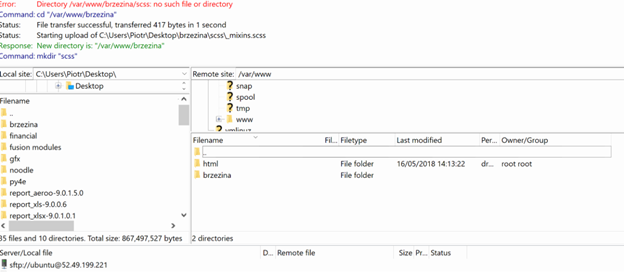
- After linking up with the server, move on to uploading the website. Click on the index and move it to the server employing FileZilla. If it gives an error saying “Access Denied”, then select the “www” file and fix the authorization.
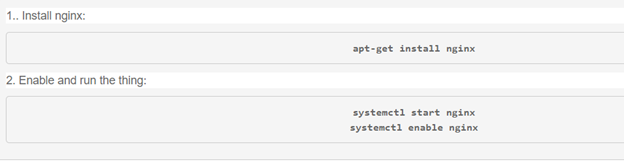
- Now, Install Nginx on your server. When you upload more websites on a single server, it will help people to search for the appropriate website they need. For that, first, join the server with the PuTTY. For installing Nginx, apply these commands one by one:
- Assemble your website by making a configuration file using this command:

- Afterward, cut and paste the given text:
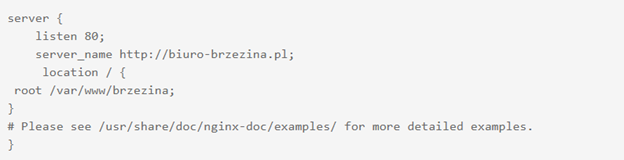
- Close it after saving. And, move the file to the authorized websites. Finally, relaunch Nginx.
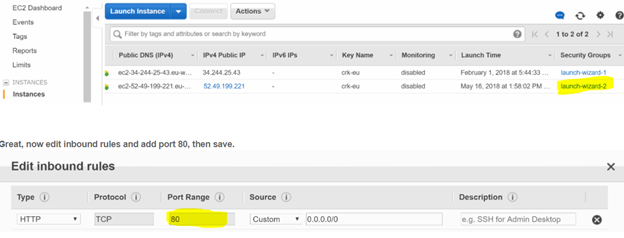
- Don’t forget to modify your domain title and folder. For modifying the domain, access “Port 80” from the “Security Groups” at the “EC2 Dashboard”.
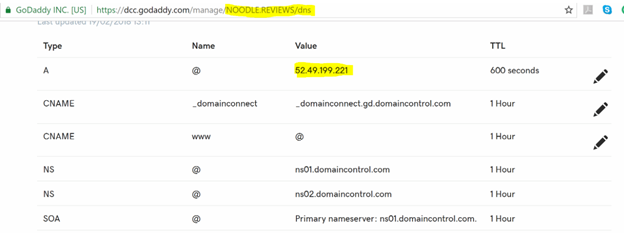
- Then, fix the DNS of your domain. Navigate to the website on which you purchased the domain. Select “manage DNS” and modify it. And, your website uploading is complete.
Uploading Website on Amazon EC2 using Internet Information Services (IIS)
- First, join your EC2 server instance working Remote Desktop Protocol (RDP).
- Make certain that the instance has access to the appropriate ports. And, Install IIS. Arrange it according to your need at the instance.
- Store your “Public IP” address. Locate it from the “Description” option of your instance, which you can access from the “EC2 Dashboard”.
- Now, for arranging the website, go to the “IIS Manager”. Extend “Sites”. Select “Default Web Site”. Then, pick “Explore”. And, select the home page of the “.html” website. Make certain that you have the local entrance permission of the website.
- Write down the “Public IP” address in a web browser and validate that you have the external entrance permission of the website.
- Select the “Elastic IPs” from the “EC2 Dashboard”. Pick out “Allocate new address” and select “Allocate”. Then, close it by clicking on “Close”. Access the “Actions” option and go for “Associate Address”.
- Then, select your “Instance ID” and pick “Associate” from the “Instance” option. Now, you may access your website utilizing an Elastic IP address.
- Go to the “Amazon Route 53 console”. Select “Hosted Zones”. Pick your “Domain Name” and go for “Create Record Set”. Write down your “Public IP” address in the “Value” option. Pick out “Save Record Set”. And, now your website domain name is allowed with the IP in Route 53.
So, that’s how you can upload a website on Amazon EC2 following the above steps.
Summary: How to Upload Website on Amazon EC2?
- Click on 'Sign In' button and enter your login details.
- Go to EC2 Dashboard and click on 'Launch Instance' button
- Here, you will see a huge list of AMIs (Amazon Machine Images).
- Select the appropriate option and click on 'Next' button.
- This step is very important, as here you have to select the instance type.
- Set the configuration details for your instance (upto you) and click on the 'Next'.
- Add your storage space required for your website. (Minimum 5 GB)
- Now, create a security group with all privileges enabled to run any program on it. Give it a name too.
- Review your permissions and then click on Launch.
- You have successfully created a new instance on AWS EC2 that can be used to host websites or run other services.
