How To Access A Laptop Camera Inside A VMware Workstation?
844 Views
VMware Workstation is a paid for application. The program allows users to set up multiple virtual machines but it also comes with some limitations. For example, virtual machines cannot be accessed from the actual workstation due to security reasons. In this tutorial, I will show you how to view a camera inside VMware. The computer I used was a Dell Studio XPS M170 running the latest version of Windows 10 and the latest version of VMware Workstation.
VMware is software that allows you to use different Operating Systems in one machine simultaneously. It gives users the freedom to use any other OS and go beyond the limitations of their machine. VMware has several advantages including easy recovery and maintenance and availability. It also ensures that you to have a better application provisioning.
One of the most common issues that arise when it comes to using a VMware is the camera. Accessing the camera for the first time may give you some errors if it is not properly setup. For you to be able to access the built-in camera of your laptop inside a VMware workstation, you need to make sure that your camera driver is updated. Of course, this will depend on the manufacturer of your laptop.
Nonetheless, you can follow these steps below to get the latest update of your camera driver.
- Go to the website of the manufacturer of your laptop.
- Once you are in the website, navigate to the Drivers section.
- Once in the Drivers section, search for the exact model of your laptop.
- Download the latest driver and install it.
This is how you can manually update the camera driver of your laptop. However, if you don’t want to go through to the hassle of updating your drivers manually, you can download software that will automatically update your drivers. This will ensure that all your drivers, including the camera driver, are updated to the latest patch.
In most cases, VMware workstations usually use the USB pass-through for the camera. This means that your laptop-integrated cameras will show as a typical USB device. In this case, the latest driver for your camera must be installed in the VMware as well. Nevertheless, you should note that not all built-in cameras are integrated as a USB device.
Access Laptop Camera
To get started on adding your integrated camera to your VMware, follow these steps:
- Make sure your VMware tools are updated to the latest patch.
- Install the camera driver in your VM workstation and update to its latest version.
- Click on the Virtual Machine Option tab in your workstation.
- Search for “Connect Removable Devices”.
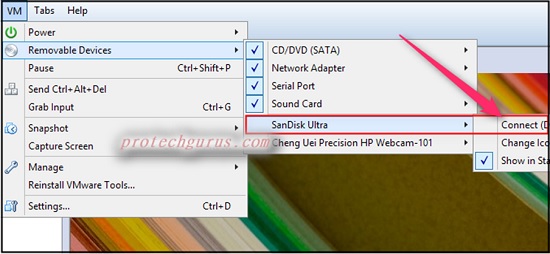
- The built-in camera should show on the list.
- Click on the camera. This should allow the pass-through for the USB.
After following the steps above, the built-in camera for your laptop should now be accessible to your VMware workstations. There are cases that errors might occur upon doing this. If this happens, you may want to try some simple troubleshooting steps as stated below:
- Uninstall and reinstall the camera drivers
- Double-check whether the drivers are updated
- Check if your VMware is also updated
- Try other versions of VMware
How to Use Your Mobile Camera?
If all else fails, you might want to use your mobile camera instead. To use your mobile camera for your VMware workstation, you will require the Droidcam software. You can easily do a Google search for this program. Install the Droidcam on both your mobile device and your laptop.
To be able to use your mobile camera for VMware, follow these steps:
- Input droidcam in the terminal.
- Open the mobile app of Droidcam.
- Enter the IP and Port number found on your mobile device to your laptop.
- Make sure that both your laptop and mobile device are connected to the same Wi-Fi.
If you don’t have Wi-Fi, you can also connect your mobile device and laptop through a USB cable, this will work just as well.
Summary: Access a Laptop Camera Inside a VMware Workstation
- Open VMware Workstation.
- Click the "Edit" menu and select the "Virtual Network Editor" option.
- Click the "Host Virtual Network Mapping" tab and then click the "Add" button.
- Toggle both of the network adapter checkboxes to select them, then click the "OK" button in the window that pops up.
- Click the "OK" button in the Virtual Network Editor to save your configuration changes and exit.
- Locate the .vmx file for the virtual machine with which you want to use a webcam in -- this is typically located in a subdirectory of the Documents directory unless you have configured VMware Workstation to use a different location for virtual machine files -- and open it for editing using WordPad or another text editor.
- Add a new line at the end of the file contents, then type this line as written, replacing "Webcam0" with any name you prefer, but without quotation marks:
- webcam0.present = "TRUE"
- Save your changes in WordPad
Conclusion
If you cannot update the camera driver of your device, then you can do it automatically using software. We hope that this article proves useful to help you access your laptop camera inside a VMware workstation.
