Minecraft is one of the most popular games in the world. And the game has been around since 2009. But, sometimes Minecraft can get boring because you play it in the same way. If you are looking for how to spice up your game, maybe you should consider getting shaders for Minecraft. Shaders allow you to customize your game and add new stuff that isn't included in the original game.
With millions and millions of players worldwide, Minecraft is undoubtedly one of the most popular and best-selling video games available to date. It’s a game with a simple premise – to build your own world.
And like its goal, Minecraft also has simple graphics, unlike most of the video games available these days. However, this can be considered part of its charm. Nevertheless, if you want to enhance your Minecraft experience, there are ways you can do so.
You can enhance the appearance of your virtual world either by adding texture packs or for a more hyper-realistic look, shaders.
With that said, in this tutorial, you’ll find a comprehensive guide on how to add shaders to your Minecraft world when using a Windows 10 PC.
Minecraft Windows 10 shaders
The Windows 10 Minecraft or Bedrock is comparatively lighter than its Java counterpart, using fewer resources than the latter. As such, your options can be limited, but there’s still a way to enhance your world’s appearance by installing Minecraft shader packages.
What are Minecraft shaders?
Simply put, shaders are how you can improve the appearance of your virtual Minecraft world by modifying how the program renders the lighting and shadows in the game. This can give you your desired effect such as a more realistic look that can make you feel more immersed in the game than you already are.
Adding shaders to Minecraft in Windows 10
Before starting, this tutorial only involves how to add shaders to your virtual Minecraft world. This means that it’s assumed that you have already downloaded your preferred shader package.
If not, you can use sites like mcpedl.com. Once you have your preferred shader packages, you can proceed to the next steps.
Note: Take note that Bedrock shader packages will be in the file format, .mcpack.
- Open File Explorer and go to the folder where you downloaded your package.
For example, the default folder for downloads is often the “Downloads” folder. Once you find your shader package, proceed to the next steps. - Double-click the shader package.
Doing so will immediately open the Minecraft program and import the shader package. During the process, you may see a message saying that the importing has started. Once it’s done, you will see a “success” message indicating it’s finished.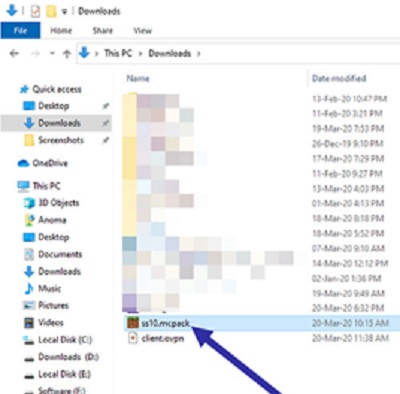
- Open the Minecraft Settings page.
Usually, the shader package will be automatically activated in the program but if not, you need to go to the Settings page of the program. - Go to the “Global Resources” tab in the Settings.
Once you’re in the Settings menu, go to the tab “Global Resources” and expand the “My Packs” section.
- Click “Activate.”
Once you can see the shader package you installed, click on the “Activate” button below it. this will put the package up top and enable it.
You are now free to enjoy your customized version of Minecraft. Shaders can help you feel more immersed in the game, especially with its more realistic appearance.
Final Thoughts
Minecraft is a game that encourages creativity and resourcefulness, and while one of the selling points of Minecraft is its less advanced graphics, some prefer having a more customized appearance for their virtual world.
Shaders are a good way to customize the appearance of your virtual Minecraft world and are often used to modify the game’s rendering to make it look the way you prefer it to be.
Hopefully, the simple tutorial above helped you figure out how to install your shader packages to your Minecraft in Windows 10.
Summary: Add shaders to Minecraft in Windows 10
- Open Minecraft Windows 10 Edition.
- Click Settings, followed by Video Settings.
- Click Shaders.
- Click Open Shaderpack Folder.
- Move downloaded Shaders to the Shaders folder.
- Open Minecraft and click Options.
- Click Video Settings.
- Click Shaders.
