The Windows 10 Startup sound may seem like a minor thing, but when you have to hear it every time you start Windows, it can become annoying. Many people use their PC at night and so the last thing they want to hear while they are trying to get to sleep is that dreadful sound. In this article we'll show you how to change the startup sound in Windows 10.

Every PC user who uses Windows knows that the startup sounds are music to their ears. After all, the sound itself represents your eagerness to explore and use your computer to its full potential. Over the years, Windows’ startup sounds differ from one operating system to another. For long-time PC users, Windows 10 probably seems a bit weird.
Those who are used to Windows XP and Windows 7 will find that feeling relevant at first since the Windows 10 is designed for tablet-friendly usage. With that transition in mind, you might want to get nostalgic even just on the startup sounds. Moreover, even though Windows 10’s startup sound might not be as good as the previous OS, there’s still a way to change that.
Enabling Startup Sounds
Before changing your startup sounds, make sure you have them enabled first. If there is sound prior to changing, then it’s all good. If there isn’t, then follow these steps:
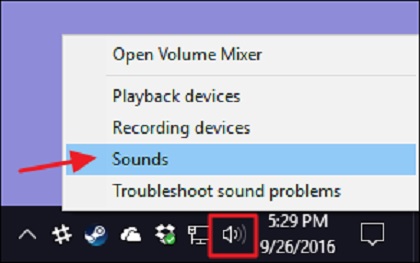
- At the bottom right corner of your screen, right in the system tray, look for the Speaker icon.
- Right-click on the icon and select the “Sounds” option.
- A window will appear. Simply select the “Sounds’” tab.
- After that, look for the “Play Windows Start-up sound” and enable it by putting a checkmark by clicking on it.
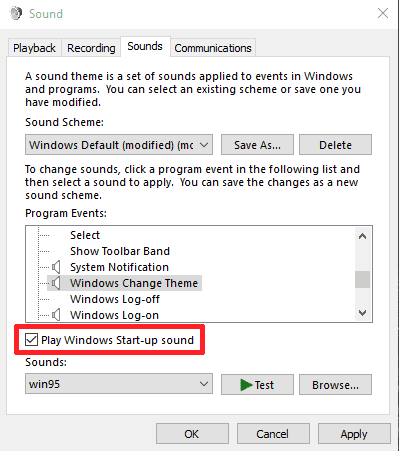
- Click “Apply” then “OK”.
Now that the startup sounds are enabled, you can now change the audio content.
How to Change Startup Sounds?
At this stage, it will be a bit tricky since you will be editing the “Registry”. The Registry Editor is one powerful tool that might cause damage to your computer system if you commit even a single mistake. Changing the startup sounds may be an easy procedure, but you should still make sure not to tinker with the other options unless you know what they do. In order to proceed, simply follow these steps:
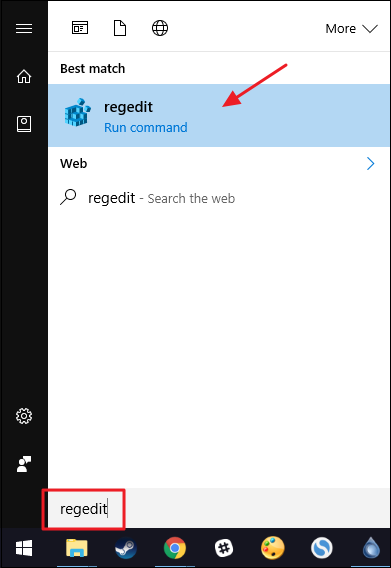
- Click on the Start button and search for the Registry Editor by typing “regedit” on the search bar. As you press enter, Windows will ask for permission to make the changes. Just press “Enter”.
- When you’re in the Registry Editor window, you will then see numerous folders on the left side. Locate the one named “HKEY_CURRENT_USER”. Afterward, click the arrow to open a dropdown menu then select “AppEvents”. Next, click on “EventLabels”.
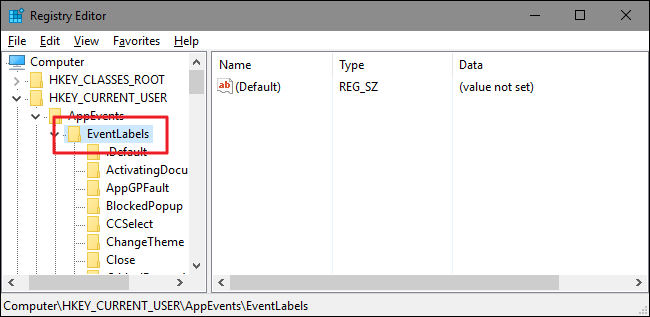
- This will display numerous folders. You just have to search for “SystemExit”. After selecting that, focus on the right side of the screen.

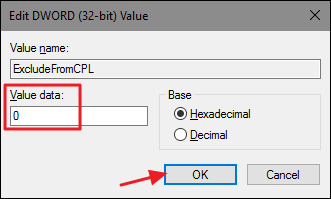
- Double-click on the file named “ExcludeFromCPL”.
- A dialogue box will open. As you can see in the ‘Value data’ box, the value is 1 by default. You will have to change this into 0. After that, click “OK”.
- Now, the same procedure has to be done on “Windows Logoff” and “Windows Logon” sections. From the EventLabels section, search for either of the two mentioned.
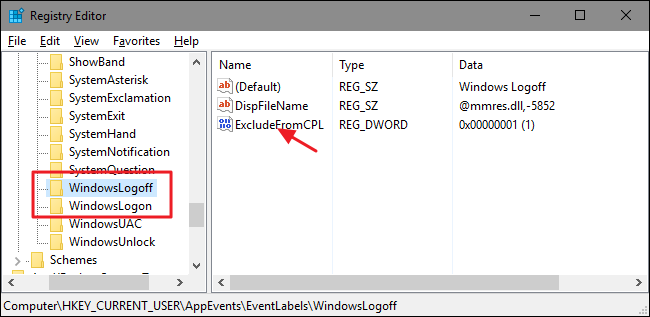
- Double-click the file named “ExcludeFromCPL” then change the value in the “Value data” box from the default 1 into 0.
- Close the Registry Editor and go to the Sounds section in your system tray.
- Look for the “Windows Logon” option. Afterward, double-click and choose the “Browse” option.
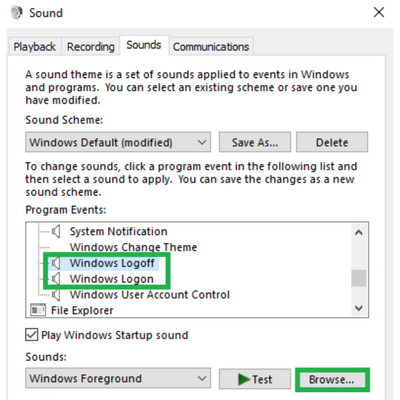
- You can now select a sound file on the location C:\Windows\Media. Keep in mind that you can only use files with the “.wav” format. Therefore, if you want a certain sound effect, you have to download a .wav file or convert your preferred audio to the .wav format using third-party programs.
- After selecting, you can click on “Test” for checking.
- For the shutdown sounds, you can do the same steps for “Windows Logoff”.
- After finalizing, click on “Apply” then “OK”.
For better measures, you can restart your computer and observe the changes for yourself.
Summary: Change Startup sounds in Windows 10
- On the left panel, select Personalization.
- Choose Lock screen from the screen appear on the right side.
- Select a sound or no sound in Sound Settings.
- Now restart your PC to apply changes.
Conclusion
Having to change the startup sounds might be unnecessary. However, for the sake of customization and nostalgia, you can very much do so by following the steps stated above. To further personalize the sound effects, you can even select songs and audio recordings as long as they are in the .wav format. As always, make sure to exercise caution when editing your system’s registry.
