In Windows 10, drivers are one of the important components that should be in good condition. If you noticed some issues over your computer’s performance, running applications or even booting your computer, you need to check whether there’re any driver issues. In this article, I will walk you through several ways on how to check for corrupt drivers in Windows 10.

To run smoothly and perform the necessary features it needs to do, all the hardware installed in your system requires a well-performing driver.
Windows needs to run thousands of devices all using different types of hardware compared to Apple’s two to three handpicked models which explains why Microsoft is far more affordable but with more glitches and errors here and there compared to the former.
These errors and performance bumps, including the infamous blue screen glitch, is primarily caused by corrupt or outdated drivers.
Having bad drivers for your system will lead to extremely poor performance and never-ending errors, so better check for these in your Windows 10 if you don’t want any sort of complications in the future.
To assist you, here are two methods you can do to check for corrupt drivers in Windows 10:
First Method: The Device Manager
This is the correct way to check and fix bad drivers in your Windows 10.
- Start by typing in Device Manager on your search bar and clicking on it.
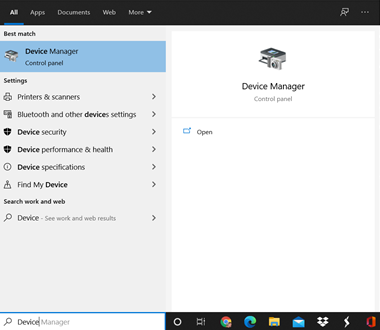
- Right-click on the very first option in the drop-down list and click on ‘Scan for hardware changes.’ A driver that is either unknown or not working should be highlighted afterward. Thoroughly check if there are any of the sorts.

As shown above, there were no sorts of underperforming drivers found in the system. If there are any on yours, however, you can either uninstall, update, or roll back the driver.
Second Method: Windows Driver Verifier
This is a tricky but useful one because the Windows Driver Verifier will verify all your drivers and will update you if any corrupt drivers are spotted.
However, you will need to make sure that you have a restore point or a backup of all of your data because one wrong move will have you locked out of your system and make you lose a lot of files and genuine OS.
This is an advanced tutorial, so if you aren’t that tech-savvy, then it’s recommended that you skip this method and have your system checked by a professional Microsoft software engineer to get your fix.
After all, the last thing you would want to happen is to end up damaging something you were trying to fix.
However, if you’re confident enough and have everything set, then let’s get right into the tutorial:
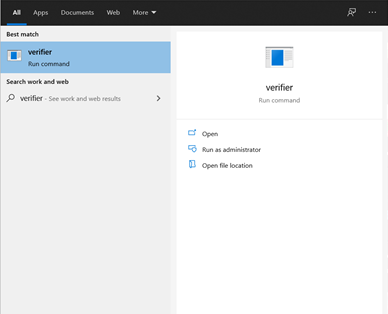
- Start by typing in ‘verifier’ on your search bar. It should show up with a ‘Run command’ below it, like this:
- Select and proceed to ‘Run as Administrator’. It should appear as follows, with a list of tasks.
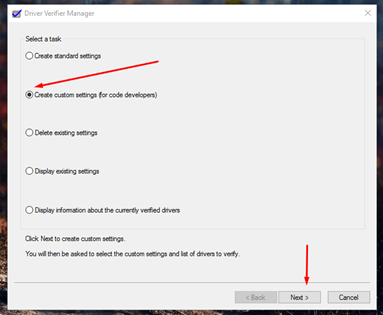
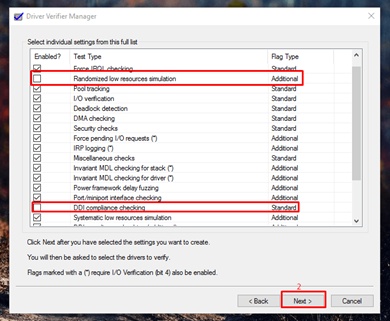
- Click on the option ‘Create custom settings (for code developers)’ and afterward, there should be a long drop-down list of things that you can do.
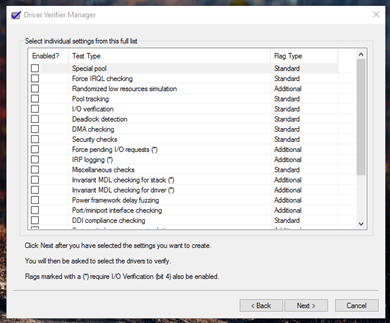
- Make sure to check all options EXCEPT ‘Randomized Low Resource Stimulation’ and ‘DDi Compliance’ for these are unnecessary for what you are trying to do.
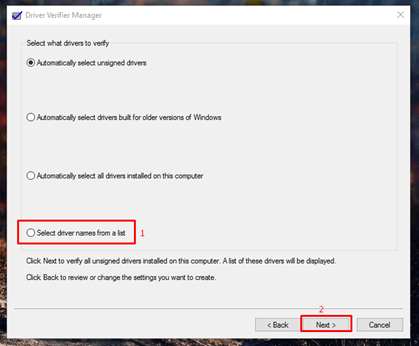
- Next, on another tab click on ‘Select drivers from a list’ and afterward your pc should be loading the drivers’ list. You can begin selecting upon finishing.
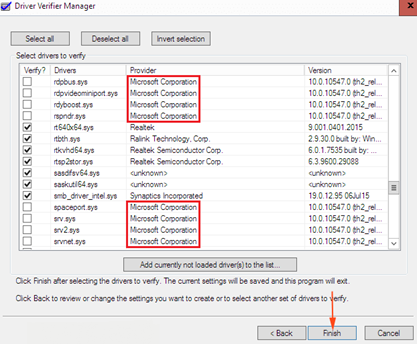
- The overwhelming number of drivers on the list will probably end up confusing you, but a trick would be to only tick drivers that are non-Microsoft. Afterward, click on ‘Ok’ when another window pops up and the pc will now start command and reboot.
- After the restart, proceed by clicking on ‘Continue for a normal start-up’. Possibly, the troubleshoot might pop up but still click on the option mentioned.
- Type in the command: (verifier/querysettings) when the window shows up to have the Verifier run for 36 hours. To stop the verifier, go into Safe Mode and type in the command: (Verifier/reset).
With these, you should already be able to secure your drivers and make sure that they’re all well-functioning. In case of any complications or concerns on the matter, don’t hesitate to call for professional help.
Summary: Check for corrupt drivers in Windows 10
- Open the Start Menu.
- Type in cmd.
- When Command Prompt shows up in the search results right click it and select Run as administrator.
- Type in sfc /scannow and hit Enter on your keyboard.
