You might have installed and configured several operating system in VMware Workstation. And you have seen that you may not be able to access the Internet even though the VM is configured with IP address in Linux. How to Configure IP Address in Linux in VMware? If you are looking for the top-notch answers, then let me help you. Keep reading this article, it may give you some helpful guidance and techniques.

Configuring the IP address in Linux through VMware seems pretty troublesome to many. Many fail to change the IP and run the VM in Linux even after many tries. However, it’s not that tough when you know the proper way to do it. And to get you the most straightforward solution, we are here to instruct you on how you can set the IP address in Linux through VMware.
Here you go.
Configuring IP Address in Linux in VMware
We have explained the entire process in a step-by-step method. The information, including address, name, and numbers, may vary on different devices. Follow every step very carefully to get the preferred result. Let’s get started.
- First of all, download the “Ubuntu Linux” on your computer from any browser you like. We are using the “Ubuntu LTS 16.04.3” server to do the setup.
- Now, you have to make a VM or virtual machine. Use the “.ios.” file from the recently downloaded Ubuntu photo file.
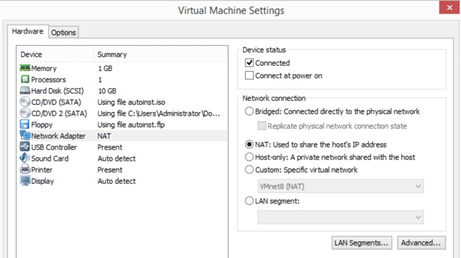
- After creating the VM/Virtual Machine, right-click on it and go to the “Properties” from down. Here you can see all the VM/Virtual Machine settings.
- Please turn on the VM/Virtual Machine to run it. Now, write down the “IP DHCP” configurations.
- In case of a terminal/console issue of the window, the command “ipconfig” will rescue the network interface configuration. The interface of the Ethernet while configuring the “DHCP” setup might show “ens33” or something similar to this for the “subnet- 193.168.247.xxx.” Don’t forget to note this subnet number and other details.
- When done, turn the VM/Virtual Machine off for now.
- To host the “VM static IP, you have to do the network settings on the “Virtual Network Editor VMWare” to host the “VM static IP.”
- To do the configuration, go to the “Virtual Network Editor.” You can find it on the top “Edit” menu. Click on it and open the “Virtual Network Editor” from there.
- Remove all the network interfaces like VMnet00, VMnet1, and others that are already there. Names can be different on your computer.
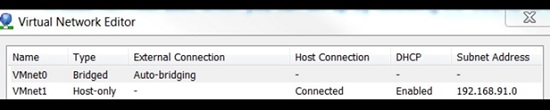
- Now, you have to create a new interface to add a new network. It can be named VMnet1,2,3, or anything else.
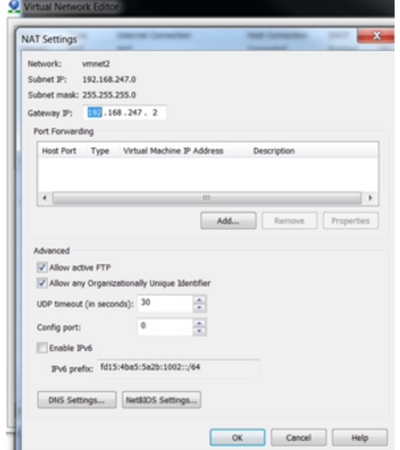
- Now, follow the settings below that you have to do for the newly added network interface.
- Here, the “subnet-193.168.247.xxx.” should be done by the old “DHCP” setup. The VM will use the newly added NAT network setup only.
- When you are done with the new interface configuration, the VM settings will be the same as the picture below. The network adapter must be set to the new network interface.

- Now, start the VM and change the IP setup to “Static” from “Dynamic.”
- First, create the “network/interfaces/file/etc.” backup file and adjust the files to make your entry in the “Primary Network Interface” similar.
- Set the static name, address, getaway, netmask, and other settings correctly.
- Now, Set the “Host Definition” etc/in/hosts accordingly and set the “Hostname” as well.
- Finally, restart the Virtual Machine/VM. It will now run with the configured IP address. Check the outgoing and incoming network access and others for confirmation.
Summary: Configure IP Address in Linux in VMware
- You can connect to your virtual machine with the VMware Remote Console application.
- Use the ifconfig command to check your IP address.
- Disable IPv6.
- Verify that there are no firewalls or other services that prevent you from accessing the connection port.
- If you cannot get a DHCP-assigned address and you cannot communicate over the network, you can assign a static address.
