When you create a virtual machine on your computer, most probably, you want to connect it to internet for various purposes including remote accessing and managing the VM. Here in this article, we are going to learn how to connect virtual machines to internet using VMware Workstation. The version of this tutorial works with VMware Workstation 12.5.2 and above. I hope that after reading this post you might be able to find your answer easily.
Allowing the VM to connect to the internet is necessary before using the VM as a web server, mail server, or for other purposes. So, here we will give you a basic idea about connecting the virtual machine to the internet on VMware.
Connecting Virtual Machine to the Internet on VMware
- Pick the virtual machine you wish to connect to the internet and access the “Virtual Machine Settings” option.
- Open the “Hardware” section from the “Virtual Machine Settings” page. Pick the “Network Adapter” option. You will see four types of network connections that you can apply to connect the virtual machine to the internet.
- As the Bridged connection is the easiest and quickest method, set it to the “Bridged” option beneath the “Network connection” option at the right part of the screen. Select “OK” to exit the window.

- For working the virtual machine on a laptop, tick the box beside the “Replicate physical network connection state” option. When you change from one network to another, the IP address will renew because of this setting.
- Access the properties of the network adapter of the virtual machine and set up the static IP address. You may also apply the TCP/IP settings from the DHCP server based on your network provider’s configuration.
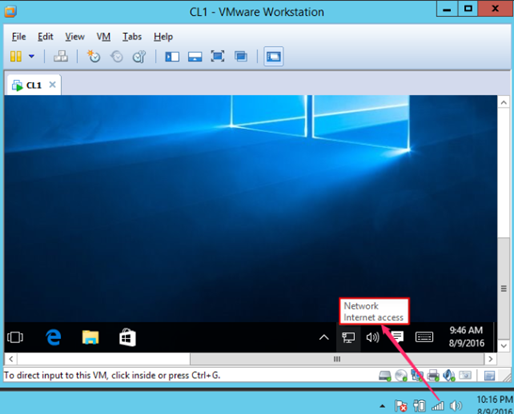
- Exit the network connection settings. Now, you can view that the VMware virtual machine has a connection to the internet from your desktop.
Connecting Windows Server 2019 Virtual Machine to the Internet on ESXi 6.5 VMware
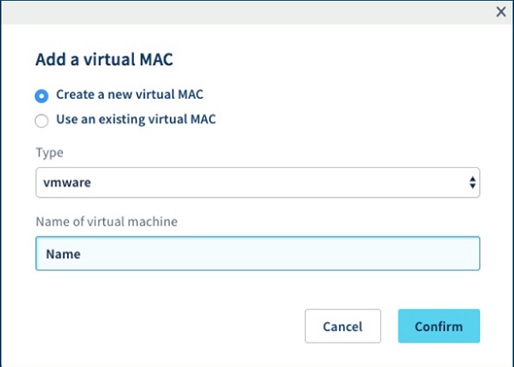
- First, you have to generate a virtual MAC address, which the VMESXi will assign to the virtual machine. Sign in to the “OVHcloud Manager.” Pick the “IP” menu and select the IP you want to set to the virtual machine.
- Pick “Add a virtual MAC.” Set “VMware” in the “Type” option and put the title of the virtual machine. Select “Confirm.”
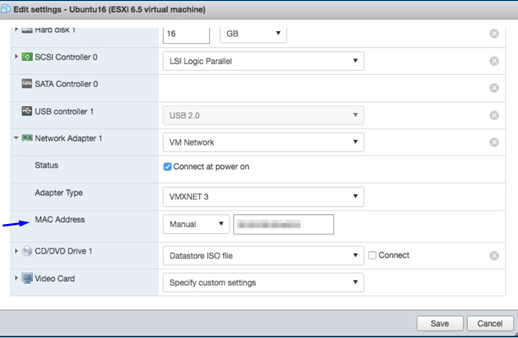
- Next, switch off your virtual machine. In the VMESXi section, right-click on the VM and pick “Edit settings.” Access the “Network Adapter 1” section modify the “MAC Address” setting to “Manual.” Put the virtual MAC address in the blank field beside it. Click on “Save” and initiate your virtual machine.
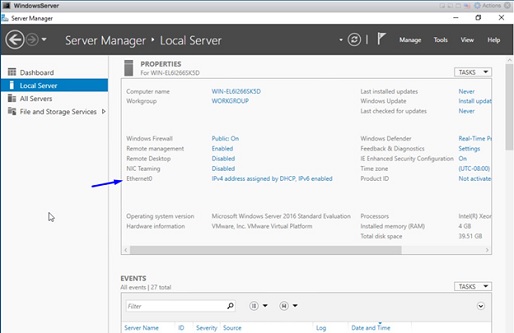
- Go to the “Server Manager” settings. Choose the “Local Server” menu from the left panel and locate the “Ethernet0” field from the “Properties” window. The default setting is “IPv4 address assigned by DHCP”, IPv6 enabled”. Select the option.
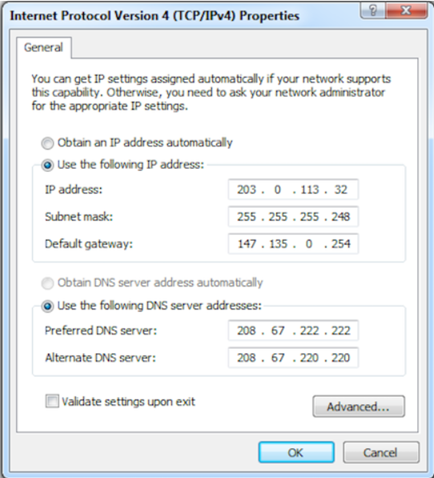
- Access the “Properties” menu of the “Ethernet0” option by right-clicking on it. Go for the “Internet Protocol Version 4 (TCP/IPv4)” option and open its “Properties” page.
- Set the “IP address” as the value you used as the virtual MAC address of the OVHcloud Manager. Put the appropriate “Subnet Mask” according to the size of the block of IPs. For example, if you have “a/28 block”, give “240” on the last part of the subnet mask. In the “Default Gateway” option, exchange the first three parts of the value with your server’s IP and give “254” in the last part. You can apply any server in the “DNS” section if you want.
- Pick “OK” to complete the process. You can test if the virtual machine connection by accessing the internet. If it doesn’t respond, restart the virtual machine and try again.
Summary: Connect Virtual Machine to Internet on VMware
- Open VMware.
- Click on Edit virtual machine settings.
- Click on "Add".
- Select Network Adapter.
- Click on "Next".
- Select "Bridged".
- Click "Finish".
