How to connect Wireless IP Camera to DVR? Today, I will explain how to connect wireless baby camera to internet using broadband modem router. I personally own a wireless IP camera and use it in my home. It is really an amazing device once you are able to install and setup it properly. We never have to compromise our comfort because of temperamental weather conditions when we get this latest IP Camera.
The process of joining a wireless IP camera to DVR (Digital Video Recorder) is not just a simple one but an economical one too. If you have a basic understanding of security systems or products, you can set It up effortlessly from your home or office.
Connecting Wireless IP Camera to DVR
- First, you need to set up the Digital Video Recorder to the local network. For that, join the DVR with a CAT5 cable to any one of the network switch ports. Take another cable and insert it to the network switch uplink ports to connect with the internet router.
- Now, to avoid “IP conflict,” set up the DVR to an IP address that will work with the router’s IP. Access DVR management application. Open the main menu.
- Select the “Settings” option and pick the “Network” menu. Access the “TCP/IP” page. It will show you the IP addresses of the joined devices. The DVR address is at the “IP address” field and should be the same as the router’s address at the “Default Gateway” field.
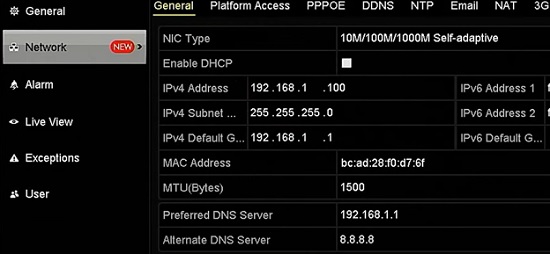
- If the two IP address is not identical, then configure it manually. Only the first three-part will be similar, and the last part will be different. For example, if the router’s IP address is 192.168.2.1, set the IP address of the DVR as “192.168.2.2”.
- Sync the wireless IP camera to the home router. Use the remote viewing features to see the security cameras. Enable Wi-Fi on the cameras and download the manufacturer’s application.
- Then, set it up. Open the software and attach your camera device. Select the camera in the software and scan the QR code. The camera will start streaming.
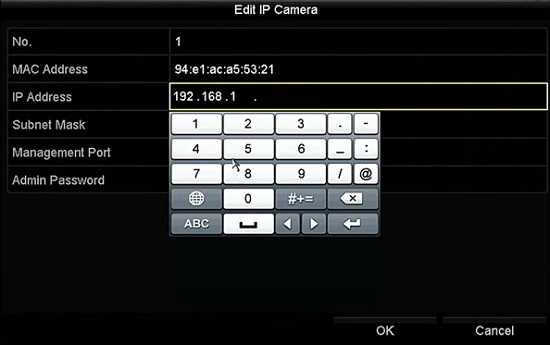
- After setting it, the router will assign a dynamic IP address to your wireless IP camera. You have to change it to a static IP address to avoid discontinuing the network every time you reboot the DVR.
- Put the first three-part of the camera’s IP address the same as the router’s IP address and give a new number at the last part. You may have to set passwords to the cameras too.
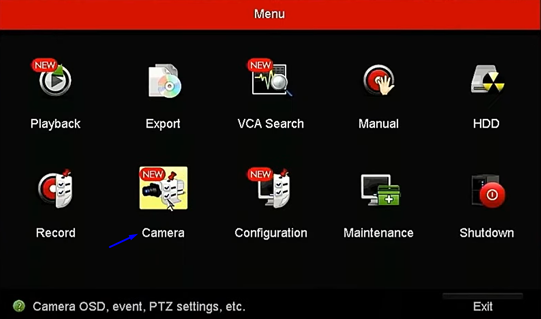
- Access the DVR video management client application. Open the “Camera” menu. Go to the “Channel Type” section and activate the IP camera configuration for every channel. The DVR will restart to enable the setting.
- After completing the reboot, check if the home router is at the same network connection as the DVR. Pick the “Device Search” option to find every wireless IP camera. Then, pick and include them in your network.
- Open the “IP Camera” section from the Camera menu. You will find the set-up cameras in the “Uninitialized” or “Unadded” option. Click on them and pick the “Add” option to put them in the “Added Device” section.

- Now, you can see the green active status of the devices, and you can view them on the live view window with every analog camera joined.
- If there is no image on the window, then modify the “Video Standard” option from the menu or reboot the DVR. Also, some of the DVR video management clients features different configuration, so few steps or option titles will not be precisely similar. Still, the core method is the same for every model.
Summary: Connect Wireless IP Camera to DVR
- Connect to Camera's Network
- Open Internet Explorer
- Search Camera's IP Address
- Configure Camera Settings
- Connect to DVR on Local Area Network
