When you are working with Windows 10 machine, it is not uncommon to encounter system freezes that are caused by the Superfetch service. The name of this system process may suggest that it is super helpful and hardly ever causes any issues — but in reality Superfetch service has been known to cause lots of problems and disruptions. Luckily, in this article we are going to share information about why is the Superfetch bad for your PC and how can you disable its feature using simple Windows settings.

Are you thinking of disabling the Superfetch Function in your Windows 10 to improve your Frames Per Second (FPS) while playing games? If you are, then you are on the right page. In this article, you will learn about the simple steps on how to disable Superfetch in Windows 10.
What is Superfetch?
Before we talk about how to disable Superfetch in Windows 10, you must have a clear idea of its functions.
Basically, Superfetch is a system of RAM management that loads your installed memory ahead of time together with your most utilized programs. It is designed to maximize Windows performance. Aside from that, it also functions as a defragmenter that maintains the drive's efficiency by reuniting the commonly used files and fragmented files in a more accessible part of the drive.
However, the problem is that many users notice that their computer speed is a lot faster when it is disabled. This is mostly the case for those who are running their games from a solid-state drive.
Steps on How to Disable Superfetch on Windows 10
Here are 3 methods on how to disable the Superfetch function on Windows 10:
Using the Task Manager
If your hard drive is pushed to the limit, it is natural to experience issues such as memory loss and poor performance. Disabling the Superfetch function might just be the solution to this problem. Here are the steps on how to disable the Superfetch function using the task manager:
- Go to the Windows Start menu and search for services. From the selection that will appear, click on "Services app." If this does not work, try the alternative. Press and hold the Windows button and the letter 'R' on your keyboard, then type in "services. msc" and press the Enter button.
- Once you are already on the "Service app," go to "SysMain" then right-click and select "Stop."
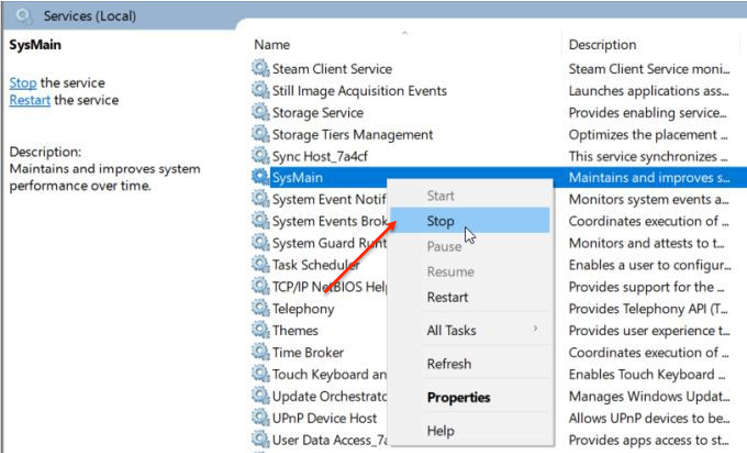
- After finishing that, the next step is to stop the service from restarting when you boot the Windows. Once it is stopped, go to service again and right-click. This time, select "Properties."
- In the Startup section, a dropdown selection will appear. Click on "Disabled."
Using Registry Editor
If the method above does not work, you can try this alternative. However, make sure that you have a backup of your registry in case something wrong happens. Here are the steps for this method:
- Go to the Start menu and type in "regedit," then select "Registry Editor app."
- From there, go to the "HKEY_LOCAL_MACHINE" then select "SYSTEM." After that, go to "CurrentControlSet" then select "Control" then "Session Manager" then "MemoryManagement" then "PrefectParameter".
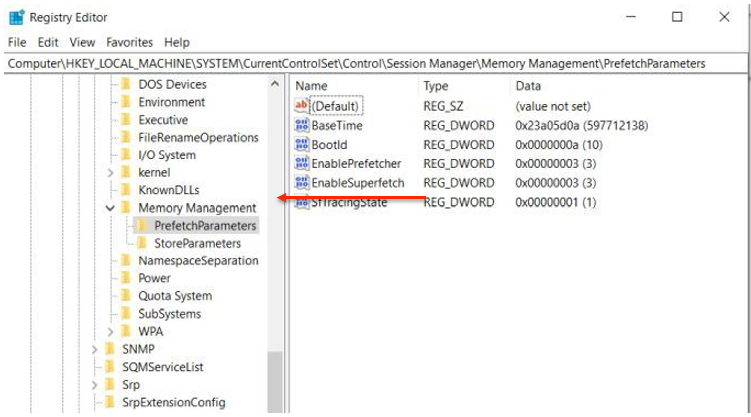
- On this part, you will be able to see the "EnableSUperfetch" key. Right-click on that, then click on "Modify."
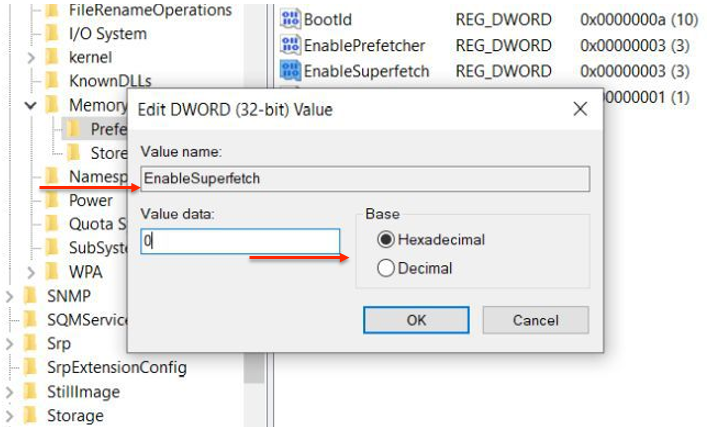
- In the pop-up, edit the Value Data section to 0 and click on OK to save the changes.
- Close the Registry Editor once all the steps are finished.
The Superfetch function will then be disabled by the Registry Editor. However, you might need to restart your device before the changes take effect.
Using Command Prompt
If you are comfortable using the Command Prompt, you can also use it to disable or enable the SuperFetch function. Here are the steps how:
- Open the Command Prompt. Make sure it's in "administrator mode."
- Use the sc stop “SysMain” & sc config “SysMain” start=disabled” command.
Final Words
Disabling the Superfetch function in Windows 10 is very manageable. The steps are easy to follow, so even those who are not techy can do it.
However, if your system is not experiencing any problems, it is best to leave the Superfetch function on. It does help cut down the launching time of programs that you commonly utilize.
Summary: Disable Superfetch in Windows 10
- Press Windows key + R.
- In the Run dialog box, type services.msc and hit Enter.
- Locate Superfetch in the list, right-click on it, and select Properties.
- Click the dropdown menu at Startup type and select Disabled.
- Click on Stop button if the service is currently running.
- Click the Apply button and then click OK to save the changes you made.
- Restart your PC for it to take effect.
