Are you a PC gamer (or someone who frequently uses the computer for gaming) and don’t want to be interrupted by accidentally pressing the Windows key? Maybe you just want to keep your Windows key intact, so when you want to press the Windows key you won’t get a map or drop-down list of open programs instead. As a gamer myself, I had been looking for a long time to find out how to disable the Windows key in games, until I finally found it by myself. This tutorial will also work for other programs from which you could accidentally press the Windows key, even Photoshop, as I found out.

Windows key is a useful feature, that when used with different shortcut combinations, allows users to access numerous features, applications, and configurations settings. However, it can prove to be problematic especially during gaming. For this reason, many people prefer to disable.
Usually, this is done by setting your keyboard to gaming mode. However, this method may not always work. Below are various methods that you can use to disable Windows key during gaming.
Method 1: Use Disable Windows Keys App
The Disable Windows Keys App is a third-party application that operates on any PC without requiring installation. It is a good way to disable the Windows Key without disabling its shortcuts. Plus, it is simple and user friendly.
To disable the Windows Key, you simply need to click its icon and toggle it on.
Method 2: Manually Edit the Registry
Editing the registry manually helps to disable the Windows key. Since the registry includes essential system settings, it can be modified to disable or enable features. Here are the steps to follow to disable Windows key:
- To open regedit, press Windows + R and then enter regedit on the Open bar. Once done, press Enter or Click Ok.
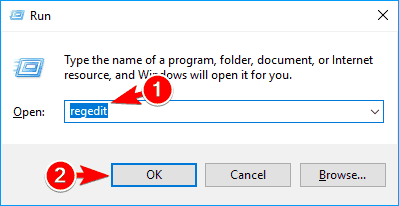
- On the left side of the Windows Menu, navigate to ComputerHKEY¬-_LOCAL_MACHINESYSTEMCurrentControlSetControlKeyboard Layout
- Go to the right panel and right-click on an empty space. Then select New followed by Binary Value from the menu.
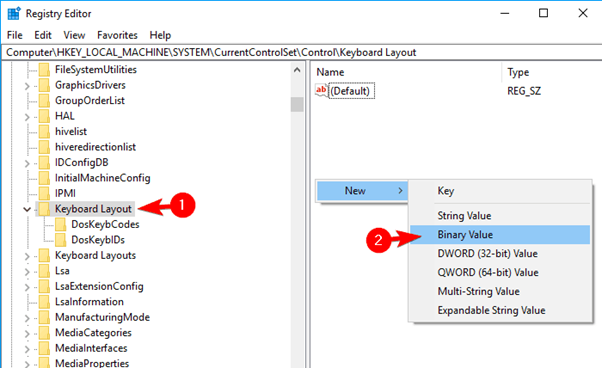
- Input the Scancode Map as the new value name.
- The next step is to double click on the Scancode Map value. On the Data field, enter 00000000000000000300000000005BE000005CE000000000.You need to enter this value manually since it cannot be pasted.
- After entering the value, click OK.
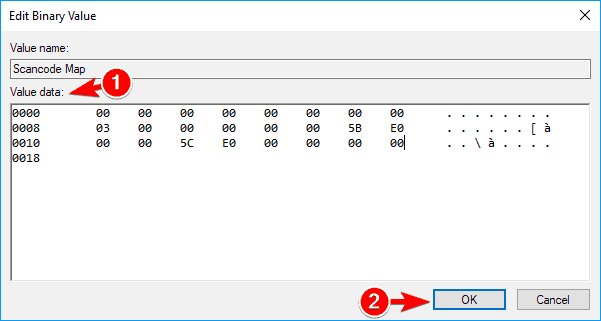
- Lastly, close the Registry Editor before restarting your computer. This will disable the Windows key.
Before going ahead with this method, it is advisable to first backup your registry. To do this,
• Go to the Registry Editor and Click on File.
• Navigate to Export and click on it.
• On the Export Range, choose All and choose the backup location and desired file. Then click Save to create your backup.
Use the backup file to restore registry to its original state should you encounter problems with your PC after modifying it.
Method 3: Using Group Policy Editor
Modifying the Group Policy Editor settings also helps to disable the Windows Key. Here are some simple steps to follow:
- Press the Windows Key + R. On the search box, type gpedit.msc and click OK or press Enter.
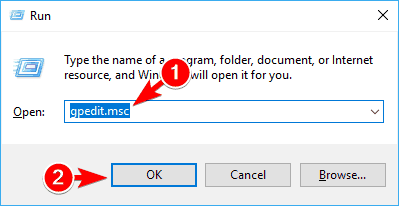
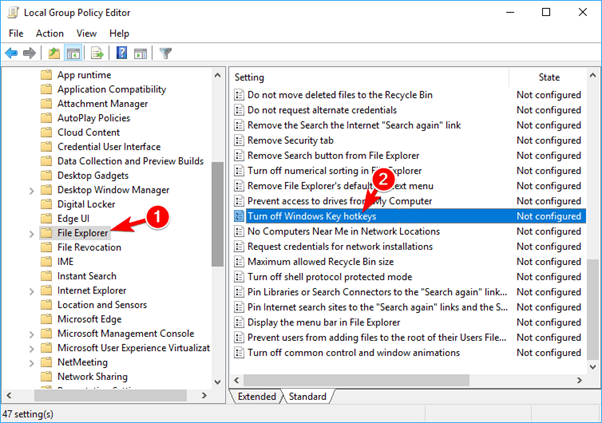
- Now go to the User Configuration> Administrative Templates> Windows Components> File Explorer folder.
- Then go to the right panel and find the Turn off Windows Key hotkeys option. Double click on it.
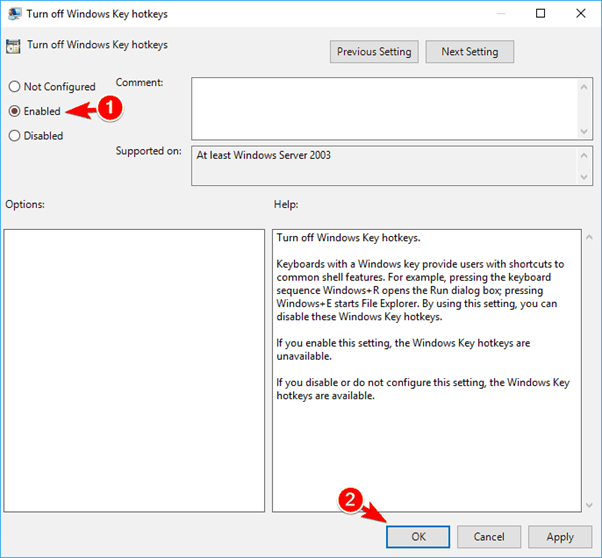
- When the tab opens, go to the Enabled option and turn on its toggle. Click OK or Apply to save changes.
- Restart your PC to make the change effective.
Method 4: Use AutoHotkey
AutoHotKey is an open-source automation scripting language that can be used to disable Windows key. Here is how:
- First, you need to come up with a script that will block the Windows key.
- After creating the script, add it to your AutoHotKey.
- Then, locate the AutoHotKey icon on your taskbar and click on it.
- Select Edit this Script and paste these scripts at the bottom, ~Lwin UP:: return and ~RWin UP::return. Once done, save your script.
- Right click on AutoHotKey and select Reload this Script from the menu. This will disable the Windows Key.
Method 5: Use Winkill Killer
Winkill Killer is another freeware third party app that works best to disable the Windows key. Once downloaded, the app is located on the system tray and it allows you to toggle On or Off the Windows Key.
This simple application can easily be disabled once you are done with gaming. It is a suitable choice for those looking for a straightforward way to disable the Windows Key on the keyboard.
Summary: Disable Windows key in games
- Sometimes, you need to play a game without distraction. This can be difficult when you have a keyboard with the Windows key.
- The Windows key opens the Windows Start Menu, and can take you out of your game.
- Follow these steps to disable the Windows key in games.
- Right-click on an empty space on your desktop and select New>Shortcut.
- Type in explorer and click Next.
- Type in something for the name, like DisableWinKey and click Finish.
- Right-click on the new shortcut on your desktop and then click Cut.
- Go to C:\ProgramData\Microsoft\Windows\Start Menu\Programs folder and right-click on a blank area inside the folder, choose Paste Shortcut from the context menu that appears.
- Right-click on your newly created shortcut in the Programs folder and click Properties.
- Type explorer shell:::{ED7BA470-8E54-465E-825C-99712043E01C} into the Target field and click OK.
- Now try.
Conclusion
There you have it! These are just of the simple methods you can use to disable Windows Key to enhance your gaming sessions. Each of these methods work well especially if you can’t disable your Windows Key by setting your keyboard to Gaming mode.