Overclocking GPUs can be really scary. Some users aren't even comfortable overclocking their CPU or RAM much less their graphics card. There is a reason for this and it's called the BIOS or UEFI firmware. You see, overclocking your GPU requires changing a few settings in this firmware which changes the way a graphics card works internally. If you don't know what you're changing, you could mess it all up! This is why I've created this guide on how to edit GPU BIOS.
The BIOS of your graphics card might need editing for a variety of reasons. To increase the overclocking abilities of your GPU with software tools and ultimately optimizing it with higher working clocks, you need to edit your GPU BIOS. It also makes the GPU more power-efficient.
When you flash the original GPU BIOS, the new changes will be used indefinitely, eliminating the installation requirement and executing extra software every time you start your PC. Changing your graphics BIOS is not complicated; there are a few steps to observe and some crucial guidelines to keep in mind. I’ll explain how you can edit your GPU BIOS and make it more efficient.
Editing GPU BIOS
Keep in mind that if you’re not careful, you may mix things up and create some headaches until you get everything back to usual and running. So, it would be best if you backed up your GPU BIOS for safety purposes.
Backing Up GPU BIOS
GPU-Z is excellent software for backing up your GPU BIOS. Not only does this program provide you with a wealth of knowledge about your GPU, but it also allows you to monitor its many functioning parameters. To back up your GPU BIOS with GPU-Z
- Download the latest GPU-Z and install it.
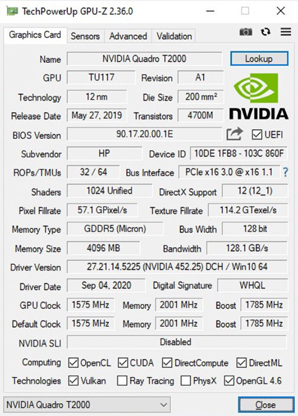
- Select your GPU at the bottom-left section.
- Click the arrow button right next to the UEFI checkbox. Click on “Save to file” and save your GPU BIOS file on your computer.
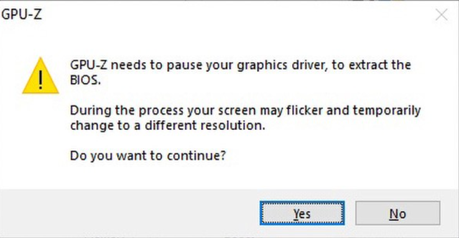
Note: During the backup process, your computer screen may flicker.
Editing the BIOS
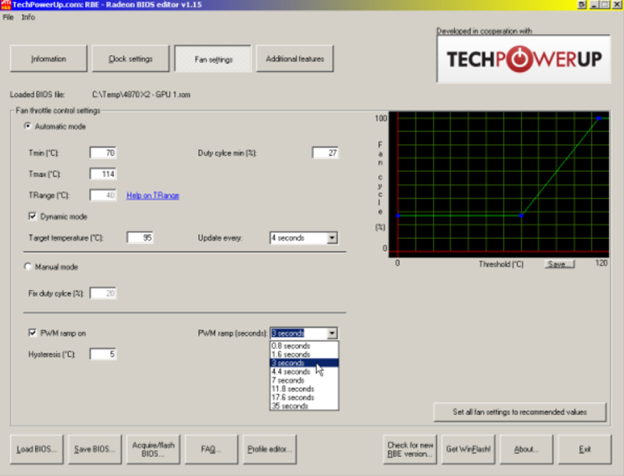
Editing your GPU BIOS will need additional software to change the settings. It also depends on your GPU model. If you are using an NVIDIA graphics card, then you should use NiBitor. For AMD graphics card users, Radeon BIOS Editor is a good option. I’ll demonstrate with an AMD GPU as the procedure is almost the same for NVIDIA graphics cards. Follow these steps to edit your GPU BIOS.
- Download the Radeon BIOS Editor and install it.
- Set your graphics card model in the software and check the essential information.

- Edit the clock settings according to your preference.
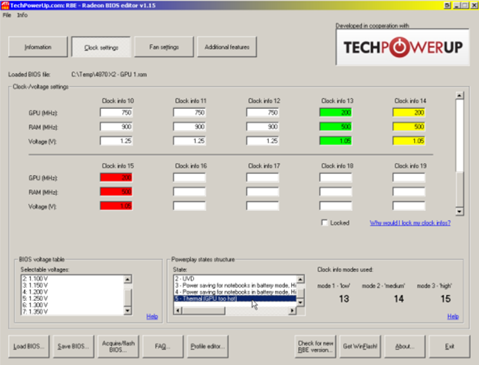
- Change the fan settings that match your work style. Go to the “Additional features” tab if you want to edit more BIOS settings. Click on “Save BIOS” at the bottom-left section to complete the task.
Flashing the Changed BIOS Settings
Now, you have to flash the changed BIOS settings to make it work. You’ll need to get the amdvbflash utility to reload the video BIOS to your AMD GPU. If you are using an NVIDIA graphics card, then use NVFlash software to flash the BIOS. To flash the BIOS settings
- Download AMD flash utility.
- Extract the flash tool in a folder and copy your edited BIOS file in the same folder.
- Open “Command Prompt” as an administrator.
- Run the two commands below:
amdvbflash -unlockrom 0
amdvbflash -p -f 0 biosmod.rom - Reboot your PC. The edited GPU BIOS should work properly now.
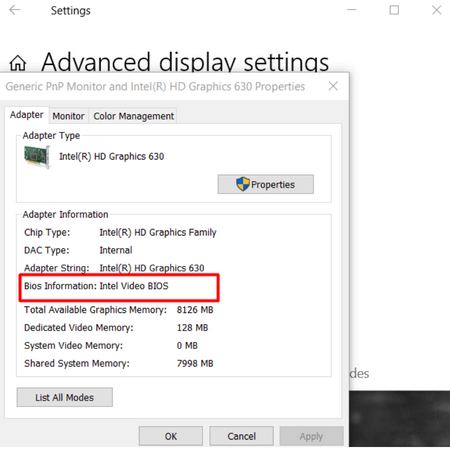
How to Locate the Graphics Card BIOS Information?
To know the BIOS information of your GPU:
- Go to your main desktop screen and right-click on a space.
- Open “Display Settings.”
- Click on “Advanced display settings.”
- Now, open the “Display adapter properties” option.
- Find your GPU BIOS information in the “Bios Information” section.
Summary: Edit GPU BIOS
- Get a copy of the program GPU BIOS editor.
- Get a source of the bios you want to edit.
- Open the program, and select the source bios file on step 2.
- On step 3 give a name to your edited bios and click generate.
- On step 4 add the settings you want to change. NOTE - only change settings that you know what they do!
- After you are done adding settings to edit, click save modded vbios and save it in a place you can find.
- Carry out any bios flashing procedure for your GPU using the new vbios file.
