The GPU is an important component of your computer or laptop, due to it's high-performance and light weight handling. Because of the high caliber that it's work processes make it a vital role in computers performance and efficiency. However you might notice sometimes a faulty GPU, just to find out that is not the problem but rather the GPU BIOS chip. This article will show you how to check your GPUs BIOS and even change it if needed.

The GPU or graphics processing unit is most commonly known as Graphics Card. As we know, it’s an essential part of a computer for graphics and video rendering. Gamers prefer to use high-quality graphics cards for a better experience in the gaming world. As GPUs can render 2D and 3D graphics, gamers can play games at higher resolution with faster frame rates. Also, it is quicker and easier to render graphics and video in a highly defined format.
If you are interested in knowing what kind of GPU you are using and all its systems and information, you can quickly learn from GPU Bios. All you need to do is keep up with us till the end.
Check Bios according to your Windows version
There are different Windows version users like Windows 7, Windows 8, Windows 10, Windows XP. We’ve provided the process to know GPU Bios for all kinds of users. You need to find your section of the windows version to follow the process.
The process to check GPU Bios of Windows 8 and 10
If you are using windows 10 or 8 on your computer, you can easily find out the bios of GPU from your settings. Just follow the given steps to find out the way
- At first, go to the “Settings” of your PC. Now, click on the “System” from there.
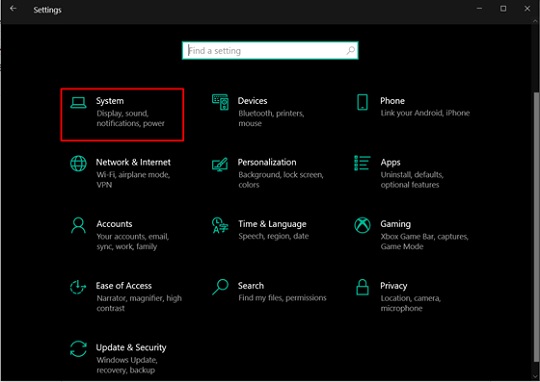
- Now, scroll down in the display section. Here, you will find “Advanced display settings.” Enter to that section.
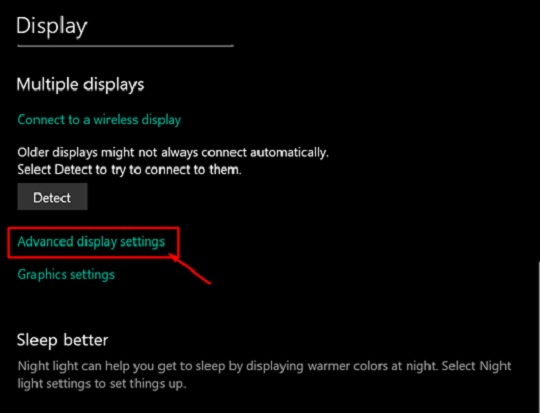
- Here, you will find the display information of your PC. Below the information, you will see “Display adapter properties.” Click on that option.
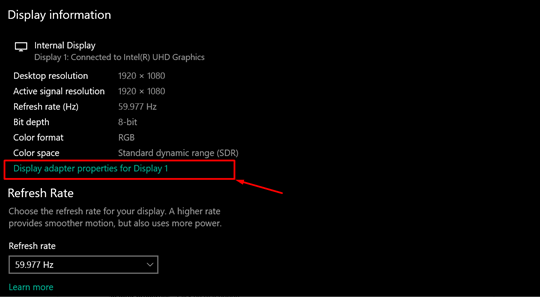
- A new window will pop up on the screen. This window shows you the Bios of the GPU of your PC.
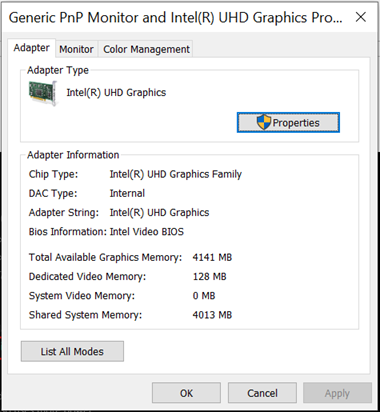
Thus, you can find your GPU Bios of Windows 8 or 10.
The process to check GPU Bios of Windows 7
If you are using Windows 7, then you can follow the given steps below
- First, Right-Click on an empty area on the desktop screen.
- Now, select Personalize from the options.
- Click on Display from the bottom left corner.
- Select Change display settings from the left column.
- Choose Advanced settings. The BIOS version will appear on your screen.
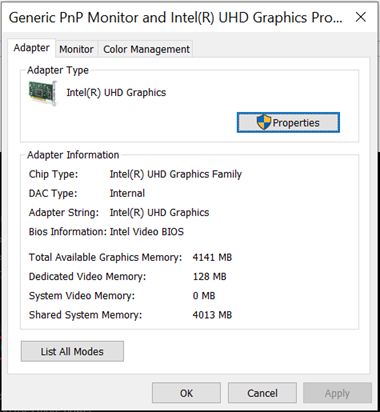
From there, you can learn about the GPU Bios of your Windows 7.
The process to check GPU Bios of Windows XP
If you are a Windows XP user, you can quickly check your GPU Bios from the Properties. Just follow the steps to know further.
- First, go to the desktop screen and Right-click on an empty area.
- Select Properties from the option bar.
- Go to the Settings from there.
- Now, click on the Advanced option.
- Select Adapter from the given tab. Here you will find the Bios information of your GPU.
Also, some other tabs may appear with additional information and advance option if you are using NVIDIA or ATI video cards. You can also check all of them from there.
That’s how you can check the GPU Bios of your PC.
Summary: Check GPU Bios
- Follow these steps to check your GPU Bios.
- Check GPU Bios from Windows device manager.
- Check GPU Bios from Ubuntu device manager.
- shutdown and Reboot the system then check.