In this article, we'll be discussing how to enable 5Ghz WiFi on android phones. With the introduction of high-speed 802.11n standard Wi-Fi, there has been renewed interest in faster Wi-Fi speeds, as well as sub-gigahertz (GHz) frequencies (5GHz band). Android 6.0 Marshmallow is the first version of Android OS to allow users to connect to 2.4GHz or 5GHz networks when available — no 3rd party apps required.

To set your android WiFi network speed to the highest frequency, 5Ghz is the best option. The default setting of androids prefers 2.4Ghz, but you can change it to 5Ghz with some accessible settings.
If you want to enable 5Ghz WiFi on your android, you are absolutely at the right place. We are about to review the easiest method to set your WiFi to 5Ghz speed. Go on reading and follow the steps below to get your work done.
Enabling 5Ghz WiFi on Android
To connect your android with a 5Ghz WiFi, you must ensure that your android support this feature. However, if your android has that feature, follow the steps below.
- Open your phone and look for the “Settings” app. You can also find settings from the notification bar.
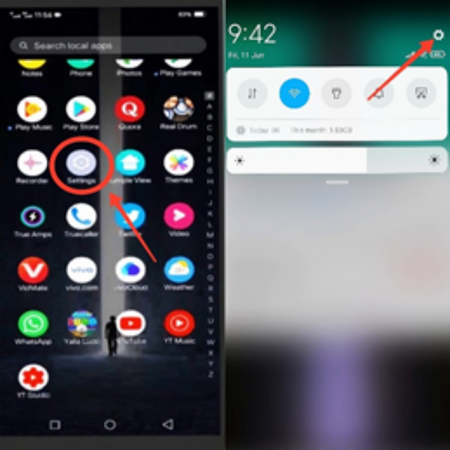
- Scroll down and tap on “WiFi”.

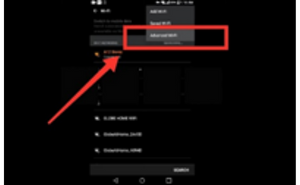
- Tap on the 3 horizontal dots and select “Advanced WiFi”.
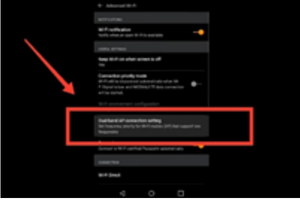
- Look for “Dual-band AP Connection Setting” and tap on it.
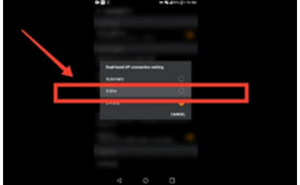
- Touch on “5Ghz” from the 3 options appearing on your screen.
WiFi Setting to Enable 5Ghz
Well, we have just reviewed how you can connect your android with 5Ghz WiFi. However, many times the 5Ghz option doesn’t work even after enabling it. If you are facing this too, here is how you can fix this.
- Please turn on your Pc and connect it with your WiFi network.
- Launch Google Chrome or any other browser you prefer.
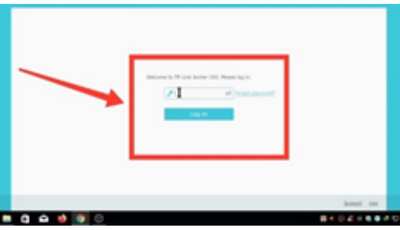
- Type “192.168.0.1” in the search bar and go with the result.

- Enter the password to log into your WiFi network.
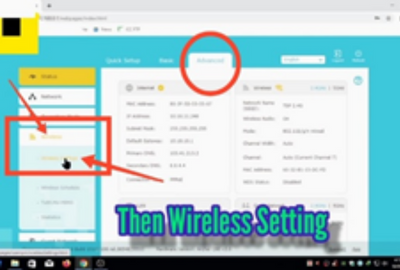
- Go to “Advanced” and click on “Wireless” from there.
- From “Wireless,” select “Wireless Settings”.
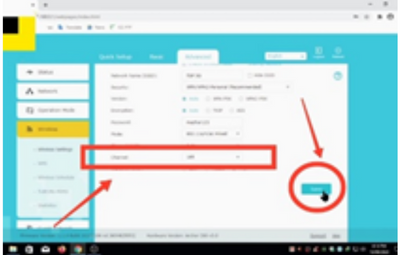
- Select the “5Ghz” option visible on the top right corner.

- Scroll down and click on “Channel”. Set it to “165” and save the change.
- Enable the 5Ghz option on your android following the method we have reviewed above. The WiFi network will work on 5Ghz frequency now.
Why the 5Ghz Option Not Showing on My Phone?
Sometimes, even after doing all settings accurately, the 5Ghz frequency doesn’t appear on the phone. If you are facing the same problem, here is the solution for you.
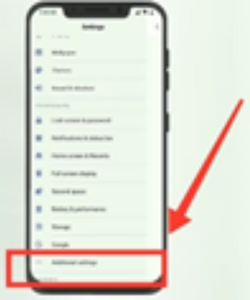
- Open your android and launch “Settings”.
- Scroll down and find “additional Settings”.
- Find “Regions” and select a region that allows 5Ghz WiFi. If your area allows that, choose your country name.
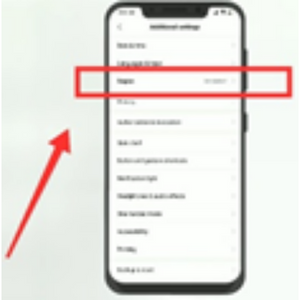
- Close “Settings” and go to your home screen. Turn off your WiFi and turn it on back. It will get connected to 5Ghz WiFi automatically.
How to know if My Android has 5Ghzs Enabling option?
Generally, Android devices that launched after 2018 have the 5Ghz enabling option. But if your device launched before that time, you have to check if your phone supports this feature. You can find numerous online websites that check this option for free. All you have to do is go to that website and search with your device name and model. It will show you if your android can enable 5GHz or not.
Summary: Enable 5Ghz WiFi on Android
- Turn on WiFi.
- Choose your WiFi network.
- Tap and hold on the WiFi connection name.
- Select Modify Network.
- Check Show password box, then type in the Password for your WiFi network.
- Press Save to reconnect your Android device to the 5GHz network.
In today's world, almost everyone is using the internet on their Android phones and tablets. The main issue for web users is the slow speed of the internet. When it comes to faster internet speed, people often think to convert the settings of their Android phone to 5 GHz WiFi.
 Enable 5GHz WiFi on Android
But the problem is that older phones and WiFi routers are not compatible with 5GHz.
If you have an Android phone and you want to enable 5GHz WiFi on it, then first make sure that your Android device has the option of WiFi 5GHz. If it lacks this option, unfortunately, you will not be able to connect to 5G. If your Android supports 5 GHz, check the WiFi router compatibility.
Note that some older versions of WiFi routers also lack this capacity, but all the new devices can support 5GHz.
Fortunately, your device and WiFi router both support 5GHz and still, you cannot connect to 5GHz, so you don't need to change your device.
Just follow these simple steps to change your settings, and you will enable 5GHz WiFi on your Android.
Enabling your Android device with 5GHz WiFi.
To enable 5GHz on your phone, all you have to do is change your band to 5GHz. Let's have a closer look. Note that the procedure is the same for almost all Android users.
- First, go to settings of mobile, and here click on the WiFi option.
- You see the two or three dots on the left or right side above the page. Just tap on them.
- It will open the drop-down list, locate the advance option on that list and click on it.
- In the Advance options menu, find the frequency band and click on it.
- In frequency band, there is an option of selecting 5GHz or 2.4 GHz. Select the 5GHz from here, and you will be able to connect to 5GHz.
After refreshing your WiFi, your Android will successfully be changed to 5GHz.
An almost similar procedure is used to enable your Macbook or laptop for 5GHz.
Connecting 5GHz WiFi to Router.
5GHz is an advanced technology with much lesser traffic than 2.4GHz. Therefore, the speed of 5GHz WiFi outclasses 2.4GHz WiFi speed.
Moreover, new Android devices are compatible with 5GHz, so the WiFi router you are using must be capable of it to enjoy high speed and a better experience.
If your WiFi router supports it, you can easily change your router settings to 5GHz. Simply, note down the points explained below.
- Sign up to User Account
All you have to do is to sign up to your user account, and then for logging in, provide the IP address, usually written on the backside or in the Router manual. Login to the Router page by entering a password.
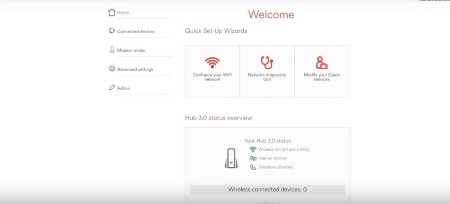
- Come to the Router page.
You will be headed towards the Router main page after logging in. Here, locate the advance option and click on it, further expanding the options list. In that options list, tap on the Wireless
- Change the WiFi settings
When you click on the wireless, the wireless signal option will appear. Click on it, and you will be directed to the new page. Bring some changes to this new page.
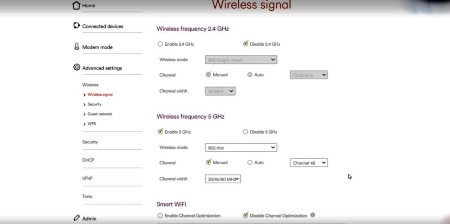
- Start with disabling the 2.4GHz and enabling 5GHz.
- Then you have to convert the wireless mode to 802.11 oc.
- After that, tap on the channel menu and click on the 20/40/80 MH2 channel width. For that purpose, disable the option of channel optimization. This option can be located below the choice of smart WiFi.
- Then you have to select the 48 channels and save the changes.
In this way, you will successfully enable 5GHz on the WiFi router.
Conclusion
The selection of 2.4 GHz or 5 GHz WiFi depends on one's own need at a time. 5GHz is preferred when you require fast-speed internet, but you should be aware that the range and transmission of 5GHz are less than 2GHz.
So, whichever WiFi network you want to use on your Android devices or other electronic devices, you can change the band through the procedure explained above.
