Microsoft has introduced a new feature in Windows 10 that automatically monitors the drivers and enables you to update them. It is called Auto Tuning and might help improve the performance of your Windows 10 PC. With this feature, Microsoft can also download driver updates automatically without requiring any user interaction. However, some users may not like this feature because it grows the number of updates downloaded from Windows Update and is not easy to use at all.

Internet connection problems might sometimes be caused by your internet service provider’s (ISP) network problems. For Windows 10 users who installed the anniversary update a few years ago, there still exists a possibility that their internet connection problems might be caused by the auto-tuning feature, one of the said update’s features.
In a few moments, we’ll talk about how to enable or disable Windows 10’s auto-tuning feature. But first, we need to determine whether this feature is already enabled on your Windows 10-operated PCs or laptops. Continue reading below to find out.
How to check the current status of the auto-tuning feature?
- Access the Command Prompt as administrator by typing “cmd” in the search box. You can then either:
Select the Command Prompt app from the list of search results presented on the left side, right-click on it, then select “Run as administrator” from the list of actions available; or
Click the “Run as administrator” option on the list of actions presented under the Command Prompt app icon, on the right side.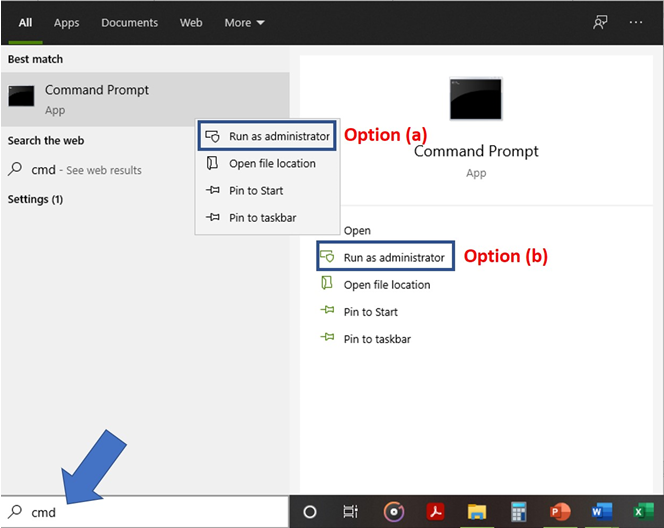
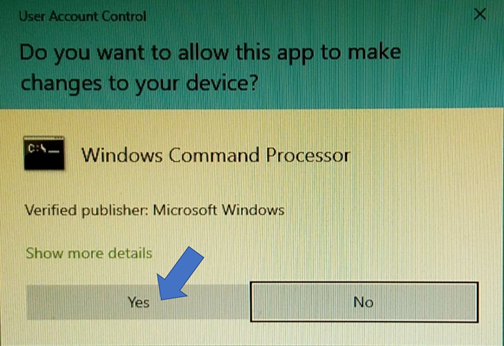
- When the User Account Control prompt appears, click “Yes.”
- In the Administrator: Command Prompt dialog box, input the command (remove the quotation marks): “netsh interface tcp show global” right after the line that says “C:WINDOWSsystem32>”. Press the Enter key afterward in order to run the said command.
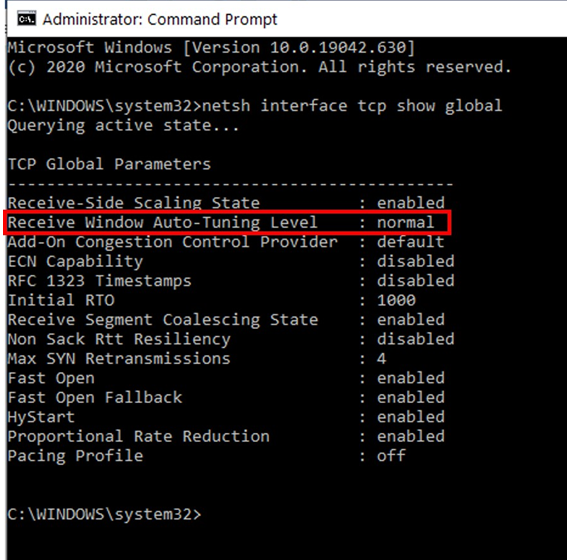
The auto-tuning feature is currently enabled in your PC if the “Receive Window Auto-Tuning Level” parameter shows “normal” as its output.
After learning how to check the current status of the auto-tuning feature in our Windows 10-operated PCs or laptops, keep on reading as we share with you a step-by-step guide on how to enable or disable this feature.
How to disable the auto-tuning feature?
- Access the Command Prompt as an administrator, then in the Administrator: Command Prompt dialog box, input the command (again, remove the quotation marks): “netsh int tcp set global autotuninglevel=disabled” right after the line that says “C:WINDOWSsystem32>”. Press the Enter key afterward.
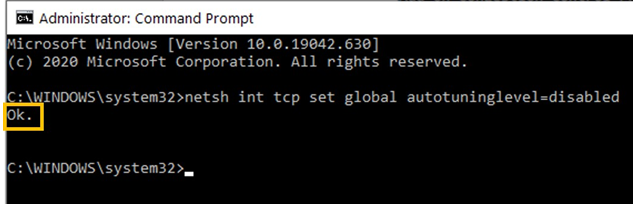 The word “Ok.” should appear, an indicator that the auto-tuning feature is already disabled.
 - To validate if the auto-tuning feature was already disabled, input the command (remove the quotation marks): “netsh interface tcp show global” right after the line that says “C:WINDOWSsystem32>”. As always, press the Enter key afterward.
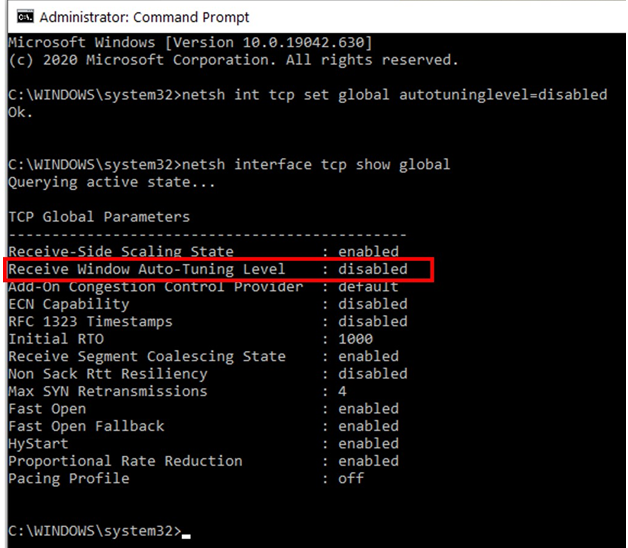
The auto-tuning feature is then confirmed to be disabled in your PC if the “Receive Window Auto-Tuning Level” parameter shows “disabled” as its output.
How to enable the auto-tuning feature?
- Access the Command Prompt again as an administrator, then in the Administrator: Command Prompt dialog box, input the command (as usual, remove the quotation marks): “netsh int tcp set global autotuninglevel=normal” right after the line that says “C:WINDOWSsystem32>”. Press the Enter key afterward.
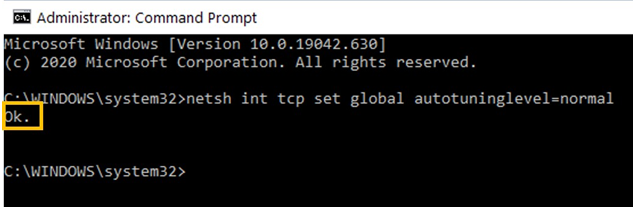 The word “Ok.” should appear, an indicator that the auto-tuning feature is already enabled.
 - To validate if the auto-tuning feature was already enabled, input the command (remove the quotation marks): “netsh interface tcp show global” right after the line that says “C:WINDOWSsystem32>”. Then, press the Enter key.
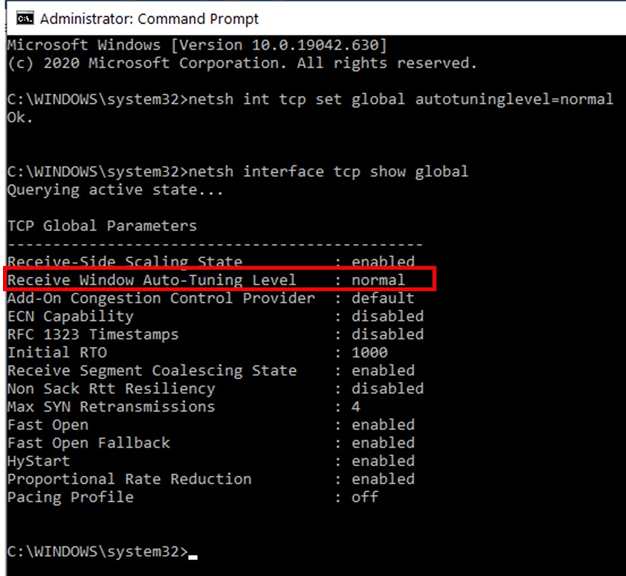
The auto-tuning feature is then confirmed to be enabled again in your PC if the “Receive Window Auto-Tuning Level” parameter shows “normal” as its output.
Summary: enable/disable auto tuning in Windows 10
- To enable or disable auto tuning in Windows 10, you need to do the following.
- Open an elevated command prompt.
- Run the following command from the Command Prompt to enable auto tuning.
- If you want to disable auto tuning on a specific network adapter, run the following command:
Conclusion
We hope you find the above guide about Windows 10’s auto-tuning feature useful. Microsoft already rejected the claims of this feature being the culprit behind the Windows 10 users’ internet connection problems.
However, it won’t hurt if you would explore around your PC or laptop settings to determine what really causes the internet connection problem and to remedy the situation by disabling this feature—before deciding to contact your ISP and raise concerns about it.
