Windows 10 is the newest OS from Microsoft, and My Passport for Windows is the easiest way to back up your Windows 10-enabled computer. The first time you connect to your PC after installing My Passport, you will be prompted to backup. But what if the device doesn't show up in the pop-up window? This guide will explain several of the common issues when backing up to My Passport for Windows and how to resolve them.
Suppose you are a videographer, photographer, or simply someone who has plenty of data. In that case, you know how important it is to have a reliable SSD or HDD portable external drive in your arsenal. Western Digital understands this, hence why they released several My Passport models.
WD My Passport drives can safely store documents, audios, videos, and pictures. However, before you can do that, you first need to format it to your operating system. You see, a WD My Passport drive formatted for MAC will not work on Windows 10 and vice versa. Although ex-FAT and MS-DOS FAT32 file work for MAC and Windows 10 OS, it is still more convenient to format your WD My passport to your operating system.
If you are wondering how to format your WD My Passport to Windows 10, then you are on the right page. In this article, you will learn about My Passport and how to format it for Windows 10.
What is WD My Passport?
My Passports are a series of solid-state drives (SSD) and portable external state drives produced by a company named Western Digital. There are currently six existing series: the Essential SE for MAC, Studio Edition, Essential for Mac, Elite Edition, Essential SE Edition, and Essential Edition.
Steps on How to Format My Passport for Windows 10
Steps on how to format your WD My Passport for Windows 10
- Connect your hard drive to your Windows 10 PC using the USB cable. This usually comes with the hard drive itself. The PC will detect the external hard drive so just wait for it. It will also automatically configure it as an expansion drive.
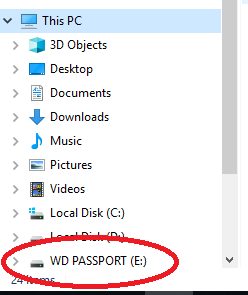
- A ‘Start’ button will appear, so click on that. Afterward, a brand new Windows Explorer window will appear. On its left side, you will notice the list of installed drives and their designated letters.
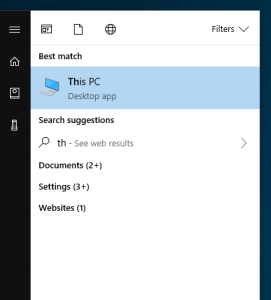
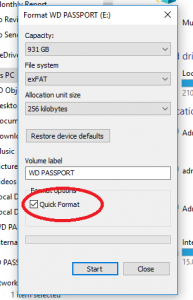
- Locate the designated letter assigned for the WD My Passport. Right-click on its icon and select ‘Format’ from the pop-up menu.
- Click the ‘File System’ that will appear from the drop-down menu and choose between ‘FAT32’ or ‘ex-FAT.’
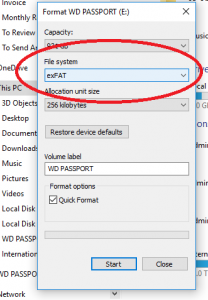
- Enter a name that you want to represent the drive every time it is connected to your PC in the ‘Volume Label’ field.
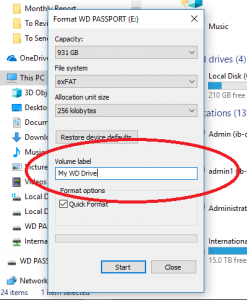
- After that, click the ‘Quick Format’ option again and select ‘Start.’ Wait for your drive to be reformatted. This might take a few minutes to complete. Once this is done, you can start transferring your files directly on your WD My Passport, like how you use other external drives.
Important Reminders
Here are some important reminders to ensure that your formatting goes smoothly and easy:
Format to ex-FAT or FAT32
If you want your WD My Passport drive to be able to transfer data from both Windows and Mac, choose ex-FAT or FAT32 formats. However, due to limitations on FAT32, it is not the ideal format for all users, so the safest option is ex-FAT.
Know the Risk
You must know that reformatting any type of drive has a risk of file corruption or data loss. If you do not want your important data to be lost, please make it a habit to have multiple backups. In case your data is deleted during the reformatting process, you may need to have a data recovery software that will enable you to rescue the data lost during the process from your HDD or SSD.
Final Words
Formatting your WD My Passport is not the easiest thing to do, especially if you are not techy. However, it is not an impossible feat, and it is only a one-time thing, so it is not much of a hassle. Hopefully, the steps, tips, and reminders mentioned above will make the process easier for you.
Summary: Format My Passport for Windows 10
- Open the Start menu and select "Computer."
- On the left side of the window, double-click on the drive associated with your My Passport (usually labeled "WD Passport").
- Right-click on your WD Passport drive in the center of the window, and select "Format..."
- Name the drive whatever you like in the "Volume label" field.
- If a dropdown menu is displayed next to File System, choose "exFAT." If exFAT is not available, choose NTFS. Click Start at the bottom of the window.
- Click OK to confirm that you want to format your drive. You will be prompted to confirm that you want to erase all data on your drive; click Yes.
- The format process should now begin. Once complete, your WD Passport will be ready for use with Windows 10!
