Zoho and Gmail are both popular email services among users. They have been in the market for some time now and have also introduced their new and updated versions. Some of you could be using your Zoho accounts as your primary mail accounts, while others might be using it only when needed on some important work. If you are an active user of Zoho mail services, then you must know how it works. There are not many users who want to switch over to another service such as Gmail. To help such users I would like to provide some information, so that they will not get confused while forwarding Zoho mail to Gmail account.
Zoho Mail stands as one reliable, cheap & secure way of getting your business email. Easy setup with simple management comes for the free tier. However, a recent upgrade in its policy may doom the new users for its use.
One particular benefit comes with the mail forwarding facility. But many Zoho users find it difficult to initiate the forwarding program. With step-by-step guidance, you can indeed brace yourself to activate the process.
You can enable creating a copy of every incoming email to another account. After setting up the company mail, you should immediately proceed with its forwarding. It lets you receive all the incoming emails directly in your Gmail inbox.
Forwarding Email – Verification
Before anything else, you’ll have to confirm the targeted Gmail account. Of course, it’ll primarily activate the forwarding action. For now, continue with the verification process.
- Log in to your Zoho Mail account.
- Check the upper side of the dashboard for settings (Gear icon).
- Click the icon for navigating the account settings. “Entering Zoho Account Settings”
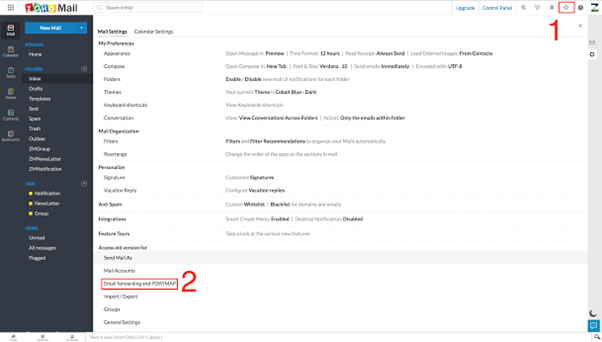
- Find ‘Manage Email Forwarding’ at the bottom.“Managing Email Forward Service”
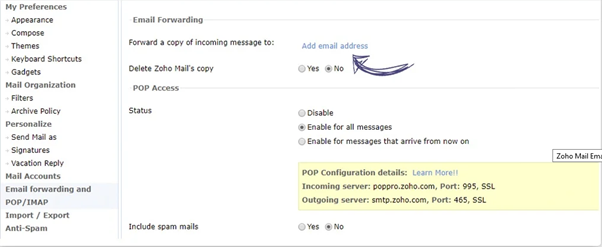
- Enter your active Gmail address to click the ‘Verify’ link.‘Providing Gmail Address for Verification’

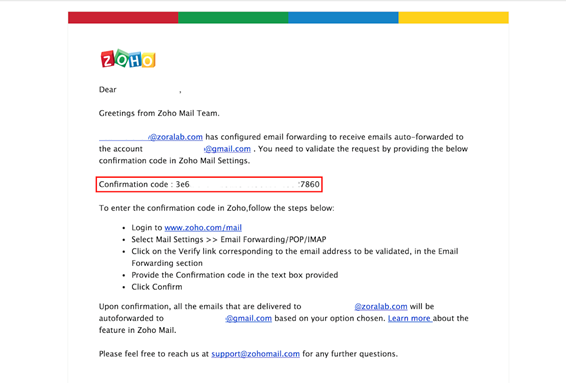
- Return to Gmail inbox to click on Zoho’s confirmation email.“Confirming Zoho Email Forwarding from Gmail”
The process to Enable Email Forwarding
- Get inside the setting to enter ‘Manage Email Forwarding’.
- Make confirmation for your integrated Gmail account.
- Check all the options, especially ‘Delete Original Email Copy’.
- Unchecked selection retains actual incoming mail in Zoho.
- Checking the box will immediately delete mails after forwarding.
Email Forwarding – Filtered Process
Not all the emails require forwarding. Therefore, you may think of implementing some restrictions. Zoho proudly lets you filter the incoming mails as per your preference. You can modify the forwarding process in terms of the sender, recipient, or email.
- Log in to your Zoho Mail account to navigate the settings.
- Click on the ‘Filters’ tag to open & select the ‘New Filters’ option.
- Specify all the definite conditions or rules for forwarding.
- For completion, you’re to click ‘Forward To’ for Gmail.
- The addition of new emails will call for confirmed verification.
Important Facts to Remember
There are different rules to notice with the upgraded Zoho policy. You’ll have to know the essential points before getting into action.
- Email forwarding service is no longer available for POP accounts.
- Filtered forwarding is not available for an already added Gmail account.
- Consecutive ten failures in forwarding make the service-disabled.
- No looping occurs over already forwarded mail upon its receiving.
Number of Mail Forwarding Gmail Address
You can’t do anything on your preference. Its Email Forwarding regulations will allow you to add a limited number of addresses. And the service remains functional under certain restrictions.
- Admin email forwarding service allows a maximum of 3 receiver accounts.
- Likewise, one particular user can receive three destination accounts.
- Total six addresses can occupy forwarding – three admins + three users.
Check out the complete Zoho guidelines on its current Email Forwarding Service.
Summary: Forward Zoho mail to Gmail
- Click on Settings from the left panel.
- Choose Email Forwarding from the Preferences tab.
- Click on Edit icon next to the email address you want to forward.
- Select Forward my mail to other addresses option and enter the complete email address of your Gmail account in the text field next to it.
- Click on Save button once you add the forwarding email address.
