You have to admit that the grid in Draw.io is kind of a big thing, huh? It's not all that easy to get rid of, but you can do it. I'll show you how.
Draw.io files are diagrams or shapefiles produced by Diagrams.net. It’s an open-source program that works both online and offline. Meaning, you can access and edit Draw.io files using a web browser such as Google Chrome, Edge, Safari, or, you can download the software on your Windows, Mac, Linux, or Android OS.

Any file with a Draw.io extension is a KML file. That means any software or tool associated with such a file type can open Draw.io files.
A brief reintroduction of Draw.io files
It’s the extension of an open-source diagram/flowchart making tool called Diagrams.net. With this free tool, you can create interactive charts, designs, project outline, team hierarchy, etc.
Besides designing, you can edit, revise, and share your designs with other users. Additionally, you can export your design into several common formats such as PDF, PNG, SVG, KML, etc to use on different platforms.
The default grid in Draw.io
Now, when you open a new document in Draw.io, you’ll come across a canvas with a default grid layout. Most design and diagram software provides a grid system to assist with your drawing. This means when you are generating a design by placing various shapes and lines, you’ll have a better idea about the placement and the alignment of the shapes.
Not everyone prefers a background grid though. Some like to work on a blank canvas, without the horizontal and vertical projection lines. Besides, if you’re preparing for a presentation, it’d look much more professional without the grids.
So let’s find out how to get rid of the gridlines in Draw.io.
Grid removal process
- Open a Draw.io file. You can access a Draw.io file from a web browser or via the Diagrams.net app.
- Either choose to create a new diagram or open an existing diagram. If you’re already working on a project, you can import/open that file. For now, I’m creating a new diagram.

- Choose to open a type of file from this menu. I’m opening a Blank document.

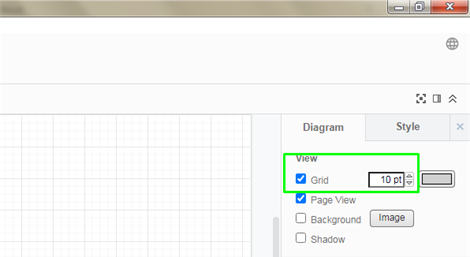
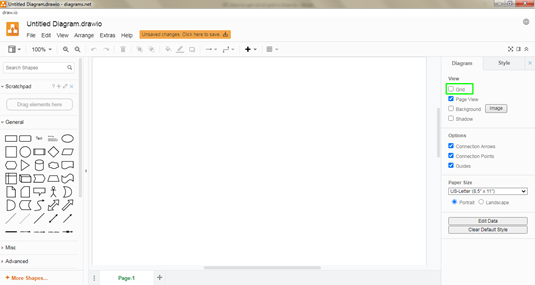
- Once the new file is open, take a look at the right-hand panel. Under the “Diagram” tab, you should see an option called “Grid”. By default, you’ll start with a 10 pt grid. But that’s not our concern at the moment. Uncheck the Grid option.
- Afterward, your canvas will look like this.
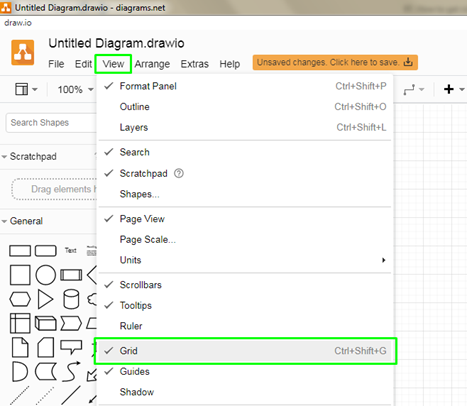
- If you don’t have the Diagrams and Styles tab enabled, don’t worry. There are other ways. Go to the “View” tab. Then navigate to the “Grid” option. Select it to disable the grid.
- You can always use the keyboard shortcut as well. Press “Ctrl + Shift + G” to enable/disable grid.
Additional Tips
Disabling the grid lets you freely place the shapes and objects. However, this may affect the alignment of your design. So instead of entirely getting rid of it, you can change the grid color to match the canvas background. That way, the grid will still be active, but invisible. You can also increase the grid spacing to adjust with your canvas.
Summary: Get rid of the grid in Draw.io
- Click on the Grid button.
- Check out the Grid and Ruler dropdown menu.
- Click Snap to Grid.
