Installing MongoDB on Mac can be easily done using homebrew. Even though I am assuming that you already have homebrew installed, I will briefly walk you through the installation process of a MacOS system.

To install the MongoDB application, you will need to first download the application from their official website and then extract the files from your “Terminal” command application to install it.
Downloading the file
To download the file of the MongoDB application:
- Open the web browser from your Mac OS.
- Search for “MongoDB” in your Search Bar.
- Click on the MongoDB official website to proceed.
- The developers change the interface design of their MongoDB web pages frequently. You need to look for the “Download” option on the right side of the MongoDB homepage. If you don’t find it there, then click on the “Try Free” option on the right side of the Home page.
- From the MongoDB downloads section, click on the “ON-premise” option to download the file for use in your system.
- Click on the “MongoDB Community Server” option for your Mac.
- There will be a list of the latest and older versions for you to download from the drop-down options. Select the “Mac OS” option for your installation platform choice. Click on the “Download” option to start downloading the file.
- The downloaded file will be a tgz file. Wait until the browser has downloaded your file. After the download has been completed, you need to extract the files to install the application.
Extracting and installing the file
After downloading the file, you will need to extract the files from it as it is a tgz file. To do so:
- Minimize your web browser after your browser has finished the download and go to the “Terminal” application of your Mac system.
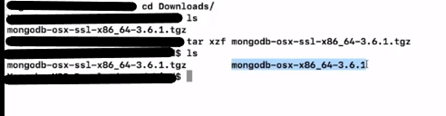
- Set your directory by executing the “cd” command to direct your actions to the downloads folder where you have downloaded the tgz file. Type “ls” and press “Enter” to list all of the contents.
- To extract the tgz file, type “tar xzf File Name” and press “Enter”. This command will start extracting files from your tgz file.
- After the command has been executed, type “ls” to see the list. You will see that there is a new folder for MongoDB which has been extracted from the tgz file.
- Move the folder to your local storage by typing the command “sudo mv File Name /usr/local/mongodb and press “Enter” to execute it.
- The system will ask you your Mac’s password. Provide your credentials and press “Enter”.
- After executing the command, you can test if the file has been moved or not. Type the list command and you will see that only the tgz file is there on your download path and the MongoDB folder has been moved.
- Change your command directory by typing “cd /usr/local/Mongodb” and seeing the content list by typing “ls”. You will see the contents of the MongoDB folder.

- Now create the /data/db folder. The MongoDB application stores the data in this directory by default. Type “sudo mkdir -p /data/db” to create the data storage directory. This command will create a directory structure.
- You can check if the directory has been made by going to the directory folder via command by typing “cd /data//db”.
- Change the permission of the folder by typing “sudo chown Username /data/db”. The username should be your Mac username.
- Now go to your Home directory and go to the user directory by typing “pwd” and pressing “Enter”.
- Type “ls -al” to find the .bash_profile among all the files shown. If the file is not in the directory then create one by typing “touch .batch_profile” and enter the command. Now open the file by tpying “open .bash_profile” and “Enter”.
- Add a new path in the bash profile by typing “export MONGO_PATH=/usr/local/mongodb” and “export PATH=$PATH:$MONGO_PATH/bin”. Save the directories in your bash profile. Close the directory after saving.
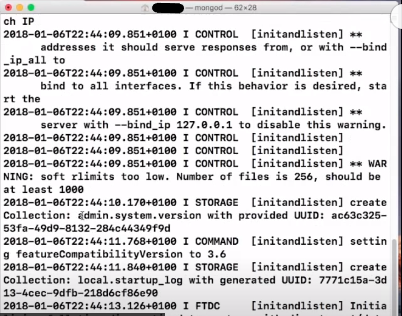
- Restart your “Terminal” application. Now to check if the application is installed, type “mongod” and press “Enter”. You will see that the app has been installed in your system.
Summary: Install MongoDB on Mac
- Download MongoDB
- Create the data folder
- Start the service
- Install MongoDB Compass
