Pandas library plays an important role in python for data analysis and manipulation. This tool is widely used for analyzing data with python.
If you are having trouble installing pandas on your Mac OS, you are in the right place. In this guide, you will get the idea of installing pandas on Mac step by step. So, let's get started.

How Pandas Library Works?
Pandas library is used for data analysis. It takes the data as a CSV File or SQL database and converts it into a data frame. Working with a data frame is quite easier than working with lists, dictionaries, or NumPy array in python.
It can also open text files like TSV, Excel, etc.
Installation of Pandas on Mac OS
There are several ways of installing pandas on Mac OS. Here I will recommend three ways of installing pandas. They are pip installation, MacPorts installation, and installation with Anaconda navigator.
Pip Installation
At first, make sure python is installed on your pc. You can simply download it from the python website. Now validate if python is installed properly by checking the version. For that write the command below;
- Python -- version
- Pip -- version
Now you can easily install pandas packages. For that;
- Go to the applications section.
- Open the terminal.
- Write the command “pip install pandas”.
If pip is not recognized by the command prompt you can write “pip3 install pandas”.
Mac Ports Installation
For Mac Ports installation, you will need the proper XCode command-line tools. Before installing X code, check your Mac OS version. You can easily install it from the app store. If X code is installed on Lion or mountain lion;
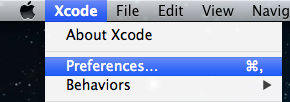
- Go to the menu and choose preferences.
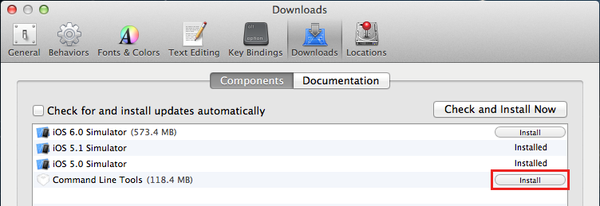
- Click the download button in the general panel. You can see the components option on the download window.
- Click on the component tab.
- Select the “Command-Line Tools” option.
- Click the install button next to it.
The above instructions will help you to install the necessary X code command-line tools for your platform.
If your Mac is compatible with Snow Leopard, your tools are already installed. After installing command-line tools for X code properly you will get compilers named clang and GCC. Without GCC you cannot install pandas correctly. So you must do this step. Now;
- Install Mac Ports. You need X code 3 or 4 to install Mac Ports.
- Remove your Mac Python. It always creates difficulties.
- Install pandas in Mac Ports simply with the command: Sudo port install py27-pandas
Installing python packages through Mac Ports will ease your task. It will take a little time.
Installing With Anaconda Navigator
For this method, you need to install the anaconda navigator. For installing the anaconda navigator;
- Visit the anaconda download page.
- Download the .pkg installer for macOS.
- Load the changes to your environment variable named ‘path’ in the current terminal session with the command below
a). $ cd ~
b). $ source .bashrc - Select the start menu and search for the anaconda navigator.
- Open it and click on the Environment tab to create a new pandas environment.
- Name the environment to pandas and click on it. It will activate after clicking
- Select all from the list of the packages to filter all the packages.

- Right-click on the given checkbox and go to mark for the version you need.
- Click apply to install the Pandas packages.
After installing all the packages open the Pandas environment. Now select the console and start your first Pandas programming.
Summary: Install Pandas on Mac
- Create a Virtual Environment.
- Let's run the virtual environment.
- Install Pandas.
