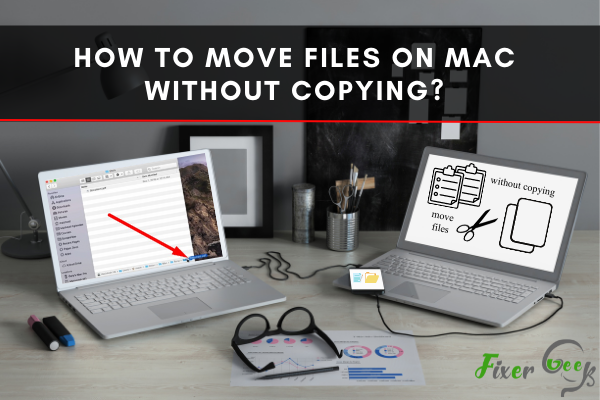
You might know how to move and copy files on Mac computers. But did you know you can also move files without copying? It's one of the lesser known yet really useful tips of Mac. In this guide, I'll explain how to move or copy files without actually copying them.
"You have a MacBook pro. And when you move a file or folder with the computer mouse from the computer desktop, the desired file or folder is copied to the new destination folder while the original file or folder stays in place."
Did this ever happen to you? If it did, then it must have been very frustrating for you.
This kind of problem arises when you have recently shifted from windows OS to macOS. There is a massive difference between them. As a result, newbies often find it difficult to do simple tasks like copying or moving.
That's why we came up with some practical and easy ways to deal with the file or folder moving problem.
5 Easy ways to move file on Mac without copying
So we have collected five simple and easy ways for you to get your job done. Let's get down to know those.
Drag and drop
So our first technique is called the drag and drop method. It is one of the easiest ways to deal with the file moving problem.
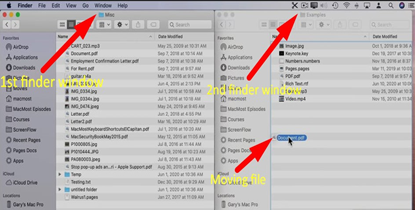
In this process, you will need two finder windows. In one window, open the file or folder that you want to move. In the other window, open the folder in which you want to move your file in. After that, press and hold the command key. Then drag your file to the destination folder with the help of the mouse. Now check if the file got moved without copying. If you have done everything accurately, your file will indeed move to the destination folder without copying.
Use desktop
Another way to move files without copying is the use of the desktop. You might not ever think of your desktop to be this useful, but a desktop is more valuable than you think.
So, if you have a clean desktop, you can drag files into it temporarily. And then you can move it to the folder you want, with the help of the mouse. After driving it to the desired folder, check the source folder. The file won't be there anymore.
Drag to dock folder
So, we named our third technique as the “drag to dock folder” technique.
If there is a folder in which you are moving files frequently, you can use this technique very easily. All you got to do is drag that folder to the right side of the dock. Once you have placed the destination folder in the dock, you can use it as a place to move your files.
Using extra tab
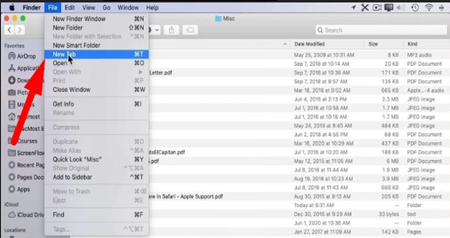
Another technique of moving files without copying is the use of a double tab.
In this method, you need to have at least two tabs. Opening a new tab is not so hard. At the up-left corner, you will see the file tab. Click on it, and you will find the new tab option.
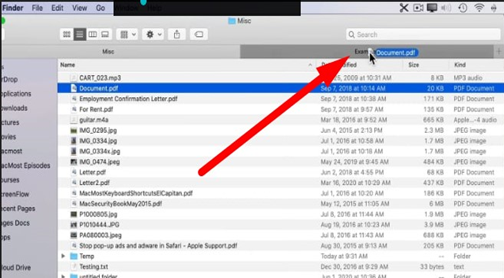
After creating two tabs, open the source folder or file in one tab. And in the other tab, open the destination folder. And now you are all set to go; take the file from the source folder and drop it to the second tab's destination folder.
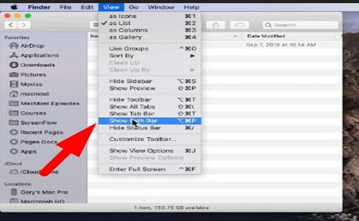
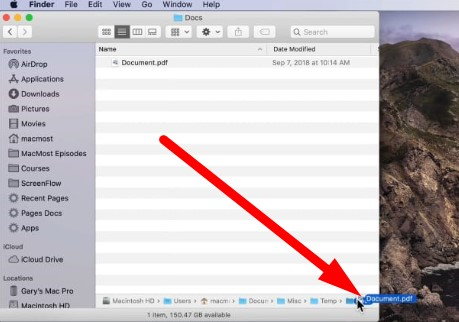
Using path bar
Imagine you are inside a folder and you want to move a file to any other folder from here.
Now, what will you do?
It's where the path bar method comes in handy. All you got to do is look for the "view" option from the upper left corner. Click on it, and you will see the " Show path bar" option. After clicking the "show path bar" option, you will see the full path bar below. And now, you can drag your file to the destination folder through the path bar.
Pro tips
- Keep the desktop organized to ease the moving process.
- You can use a fast keyboard command to move files quickly.
- It's wise to have more than one copy of any data. Because media can crash anytime.
Summary: Move files on Mac without copying
- If you want to move files on mac without "copying" and use them it is very simple.
- First open your finder window.
- Now you will see a section in the top that says "Preferences". Open that.
- You will see a popup of options for finder. Click "Advanced".
- Here you will see a checkbox that says "show all filename extensions". Check that box and close the popup window.
- Now you should have your finder window open again. Locate the file you wish to move.
- Right click the file and click rename or edit name.
- Delete everything after the dot in the filename, nothing before it just everything after it. Hit enter.
- The file will now still be there but it won't have an extension so OS X will not know how to open it anymore.
- Now you can move that file anywhere in your computer without having to copy it again saving lots of space.
- To get back your file just double click on it and OS X will know what program to open it with again.
