Are you looking for a way to password protect a Word document on Mac? Is there no option in the current version of Word, to hide a file's content like in previous versions? In this guide I'll show you how to password protect a Word document on Mac.

If you want to send to secret file to other people you can place a password to restrict your file to specific users. In this way, everyone will be able to download your file if you provide the file on a public server or website, but only the users to whom you have given the password will be able to access the file.
Encrypting a Mac disk-image
In the Mac system interface, you can encrypt the Word file and access it with a password. You will have to use Disk Utility to encrypt your Word file. Follow the steps to lock your Word file:
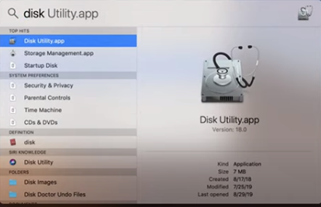
- Open the “Utilities” folder in your Mac OS and select the “Application” folder. Then launch the “Disk Utility” app from there.
- You can also use the “Search” option. Just search for the application in your Search Bar and select the app to launch.
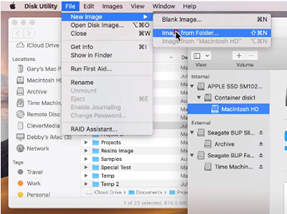
- Click on the “File” option and select “New Image> Blank Image”. The action will create a blank image where you can add your Word file later.
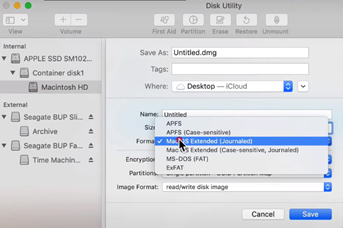
- There are also various options for you to make changes to the blank image.
- Name your blank image file for people to recognize. You can also set the name of the file before it is mounted. Define the file size, format, encryption, and add your file. If you use older versions of Mac, you will have to use the older APFS format.
This method may be a bit difficult as you need to know the size and format of your Word file. If you directly want to add the file, there is an easy way to do it:
- Put your Word file in a separate folder.
- Click on the “File” option in your “Disk Utility” app and select “Image from Folder”.
- Select the folder in which you kept your Word file from your local directory.
- Name your Image file and provide the directory in which you want to make the new file.
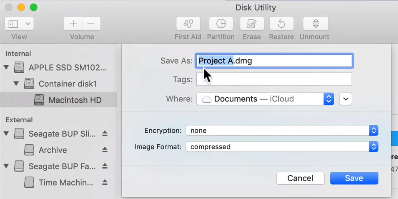
- In the encryption dropdown, select your choice of encryption (128 or 256 bits).
- Provide your password and repeat your password in the “Verify” section. Remember that, if you forget the password you provided, you won’t be able to access the files that are inside.
- Choose your Image format. If you choose the “Read Only” or “Compressed” option, the file will not permit you to change the Word file which is inside. You can only read or copy the Word file. Compressing the file will make your new file in a reduced size.
- After applying your changes, click on the “Save” option. The system will take some time to create your Image file.
- You can open the image file from your directory to check if the encryption is working properly. Just double-click on your Image file and you will see that the file is asking for a password.
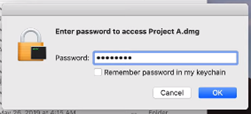
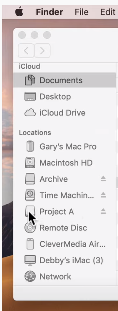
- Provide the password that you set. After giving your password, you will see that the folder will be visible in your local directory under “Locations”. Double-click on the folder and you will be able to access the Word file there.
Summary: Password protect a Word document on Mac
- Open the file that you want to password protect.
- Press “Command + S” to save the document.
- Click the small arrow next to the Save button and select “Save As.”
- Once you click on “Save as,” a window will pop-up for you to choose where you want to save your file. Just below that, select Tools and then Encrypt with Password. You will be prompted for a password for your newly encrypted file.
- Select a new folder or create a new one to store your password-protected document safely. If you use Dropbox or iCloud Drive, we recommend creating a new folder in either of those services so that you can access the files from other devices later.
