How to recover files from external hard drive using command prompt? You data loss is a common issue these days due to various reason. It might occur because of deleted files or there may be hardware failure. No matter how the data loss occurs it irks you down a lot.
The external hard drive helps make data transfer and storage easier. However, you can still lose your files when your desktop has been attacked by a virus or if you accidentally formatted them. Whatever the reason, don’t panic yet. There’s still a way for you to get back those files.
If your files have been deleted due to hardware damage, virus attack, corruption, or formatting, you can still recover them. You can do this by running the Command Prompt.
We know that navigating through the Command Prompt can be intimidating, that’s why we made this guide to help you through it. But before we go through the steps, let’s have a quick look at what the Command Prompt is.
What is the Command Prompt?
The Command Prompt is the computer’s command-line interpreter. It can be found in any Windows operating system. It lets you interact with the system directly through codes, or as they say it, commands.
It’s usually mentioned as CMD or cmd.exe.
You can do a lot of things using the Command Prompt. Here are some of them:
- Modify drive’s properties
- Solve problems with the disk
- Manage partition and disk space
- Delete folders and files
- Recover lost data
What to do Before Recovering Files from the Command Prompt
Before you head over to the Command Prompt, there’s something you need to do first. You’ll need to check the Recycle Bin just in case the files you need are there. The Recycle Bin often stores deleted files for some time before deleting them permanently.
There’s still a chance that you can recover them. To do that, you can click on the files and select Restore. You can also drag those files out from the Recycle Bin.
If you don’t see your files in the Recycle Bin, then that’s when you can try recovering them with the Command Prompt.
How to Recover Files using the Command Prompt
Steps:
- Depending on your Windows version, you can either press the Windows key with R. Then type CMD on the box. For Windows 10 users, you can simply type CMD on the search box next to the Window icon.
- Right-click on the Command Prompt and click on Run as administrator.
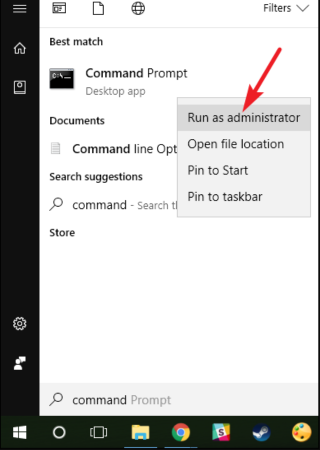
- Allow it to make changes.
- In Command Prompt, type chkdsk;/drive letter then press Enter.
Note: You should type chkdsk;/ + the letter of the drive where the deleted files were placed before. - Wait for it to complete the task.
- Type the drive’s letter again then press Enter
- Next, type this in the Command Prompt: [driver’s letter:/>attrib – h-r-s/s/d*.*]
- It should be able to recover the file.
- A different version of Windows may have different commands. If this doesn’t work for you, you can try using third-party applications to help you recover your files. There are free applications that you can download and install.
- When it's finished, there will be a new folder in the drive to store all the files you recovered. It should be in a .chk format. You can modify the format afterward and save them in another folder.
The Command Prompt is always the last resort of most people because it can be intimidating, especially if you don’t understand codes and commands. But even though it looks scary, it has many advantages when it comes to recovering your files.
If you’ve just recently updated, the Command Prompt can help you solve whatever you’re having trouble with. You can always ask for help if it's too confusing for you.
We hope we helped you recover your lost files through our guide. Now that you know how to do it, you no longer have to panic when you lose them again.
Summary: Recover files from external hard drive using command prompt
- Connect Your External Hard Drive to Your PC
- Click Start, Type "cmd" in the Search Box and Press Enter
- Type Chkdsk Command Line on Command Prompt Window
- Type Xcopy [Source] [Destination] /O/H/E
- Exit Command Prompt, here you will get your lost files back.
