DNS Unlocker ads can turn your computer into a “zombie”! That happens when the malicious program is installed on your system, and starts showing you different types of intrusive advertisements. But there's a solution! I'll show you step by step how to remove DNS Unlocker ads and how to remove it completely.
Have you been noticing intrusive push notifications or unwanted pop-up ads with a label that says "Ads by DNS Un locker"? If this is your case, there is a high chance that there's an adware program installed on your computer. These are developed by cybercriminals who want to gain access to your personal information.
Knowing that there is this adware on your computer might sound terrible. But, the good news is that there are several ways that allow you to remove the ads by DNS Un locker. To know exactly what these are, continue reading this article.
Understanding DNS Un locker
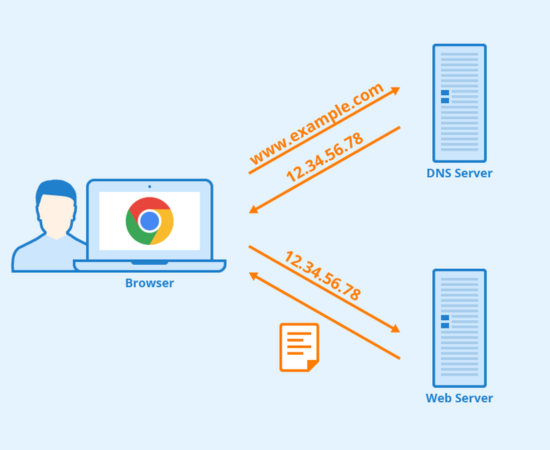
Before anything else, it's important that you have a good understanding of what DNS Un locker is to begin with. It's a type of adware program that takes over your browser to provide you with unwanted ads. These ads usually advertise unverified third-party products and software.
It's easy to identify if DNS Un locker causes the ads because the following labels are usually included:
- Ads powered by DNS Un locker
- Ads by DNS Un locker
- Brought to you by DNS Un locker
- Rocket Tab powered by DN S Un locker
On top of the annoying ads displayed on your browser, DNS un locker may also collect your personal data, including keyboard inputs, location, and IP address. In some cases, it also peaks at your browsing activities, including the sites you visit, your saved passwords, and many more. As a result, DNS Un locker can be a high online privacy threat for you.
If you are wondering how the adware slipped into your computer, there are several possible culprits. It's possible that it was included with other free programs that you recently installed or accidentally clicked a link that carries it.
Removing Ads by DNS Un locker
Here are the steps on how to remove ads by DNS Un locker:
Uninstall the DNS Un locker
The first thing that you have to do is to remove the DNS Un locker embedded in your computer. You can locate it using the control panel. To do this, simply click the Start menu then choose Control Panel. Click on Programs and Features, then Uninstall or change a program.
In the Programs and Features menu, a list of the installed programs of the computer will appear. Look for the one with the name DNS Un locker. Once you found that, go to programs, then click Install, which is found at the top. Step #2: Restore Web Browser Setting.
To fully remove the DNS Un locker ad from your computer, you will need to reset your internet browsers to their original settings. However, note that your add ons, extensions, history, and cookies will also be deleted by doing this.
Here are the steps on how to restore your internet browsers
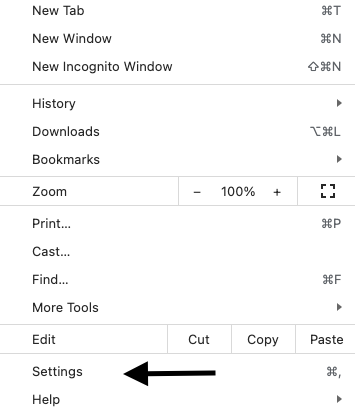
Google Chrome
- Click on the Chrome menu button found on the top right corner of the browser.
- Go to the bottom and click on Settings.
- Open Advanced settings.
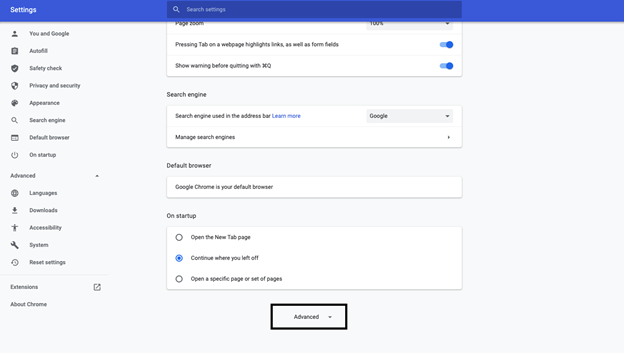
- Click on Restore settings to the original default found under the Reset Settings menu.

- Select Reset settings from the dialog box that will appear.
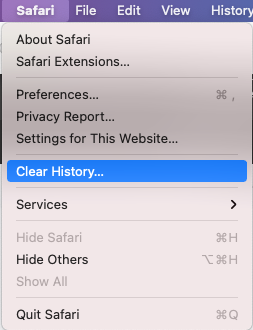
Safari
- Click on Safari.

- Select Clear History.
- A dialog box will then appear. From there, choose All history and click Clear History.
Final Words
Removing Ads by DNS Un locker is not rocket science, so make sure to address it as soon as you notice the problem. If not, you are putting yourself and your data at risk, and you can be a potential victim of cybercriminals.
Also, make sure to be vigilant with what you download on your computer next time. Only download from a reputable platform and always read the terms and conditions of every software.
Summary: Remove Ads by DNS Unlocker
- Click the Start button and click Control Panel.
- From the Control Panel window, select “Network and Internet”.
- On the left, select “Change adapter settings”.
- Right-click on your active internet connection and choose Properties.
- Select Internet Protocol Version 4(TCP/IPv4) from the list and then click the Properties button.
- Remove any of these DNS Unlocker server addresses from the Preferred DNS Server field and from the Alternate DNS Server field:
- Click OK to save your changes.
