How To Transfer Files From Olympus Digital Voice Recorder To Computer?
714 Views
You want to know how to transfer files from Olympus digital voice recorder to computer? It is very easy. Just follow the steps carefully and you will be able to transfer the recorded file from Olympus digital voice recorder to computer easily.
Olympus digital voice recorders are user friendly due to their portability and controls. You can just record easily as you go, transfer files to the computer through the USB connection and categorize the recorded information. In this article, we will be exploring how to transfer the recorded files from an Olympus digital voice recorder to a PC.
How To Transfer Files To a Computer?
If you want an Olympus device and use a PC, the commonly recommended recorders are Olympus WS100 RDV for Mono sound and Olympus DS-30 RDO for Stereo sound. For Mac users, the Sony RDS is mostly the go-to device.
Whatever Olympus device you are using, the modes of transferring files to the computer are generally the same. You can do the transferring in two ways: one, you can copy what you have recorded, and the other, you can record to the PC what you have played on the device.
Here are the steps for the two steps mentioned:
Method 1: Copying Recorded Files
- Connect the appropriate wire attachment from the Olympus digital voice recorder to the computer.
- Assuming that the Olympus digital voice recorder is already on and the computer is showing its desktop screen, wait for Windows or Macintosh to recognize the device. Once recognized, you are ready to access the files on the newly attached drive.
- Open the drive for Olympus digital voice recorder.
- Explore the files stored and select the audio files you want to copy. Take note that the file format will be in WMA and not in MP3. If you want them to be in MP3, you can convert them to another program after they are all copied to the computer.
- You can right-click and select 'Copy.' Paste the files wherever you wanted to as long as there is enough disk space. You can also perform the click-and-drag method of copying files.
- For future modifications, try to back up your files for the recording can be easily erased through the recorder's controls.
- To detach the Olympus digital voice recorder from the connected computer, remember to 'safely remove' the device.
Method 2: Recording The Playback From Device
- This method works on devices like Olympus DP-201, Olympus VN-7200, or Sony ICDB600. These devices do not have the usual USB interface. However, you can attach an appropriate adapter to the audio output to connect to the PC's microphone input port. Assuming you have an adapter, you also need a program like 'Audacity.'
- Connect the adapter in between the Olympus digital voice recorder and the computer.
- Assuming that your computer is on and Audacity is installed, launch the program.
- On the Audacity window, choose the appropriate microphone you need for recording. It will be based on the drivers and tools installed on your computer. You can test each option and see what fits your needs.
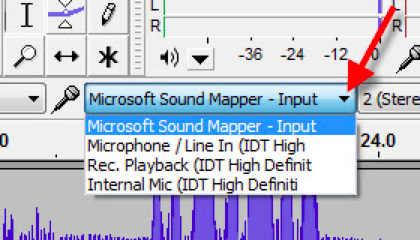
- After determining the microphone option, you can adjust the input level using the microphone input slider found at the top portion of the window.

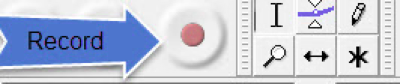
- After adjusting the input levels, you can now begin recording by clicking on the record icon. Once a waveform displays the corresponding sound made, the recording is enabled. Since the device is not yet played, the display will be a flat line initially.
- As the Audacity is ready for recording, you can start to play the recorded file on your Olympus digital voice recorder.
- After finishing playing the audio, you can stop Audacity's recording. You can manipulate the recorded audio afterward in Audacity. You can also save the recorded audio in MP3 format.
Summary: How To Transfer Files From Olympus Digital Voice Recorder To Computer?
- Here are the steps for transferring your digital voice recorder files to a computer:
- Connect the Olympus Digital Voice Recorder to your computer using the provided USB cable.
- Turn on the digital voice recorder.
- Wait for your computer to detect the device.
- Open “My Computer”. Select “Removable Disk” from the options listed under “Devices with Removable Storage” and double-click it.
- Select all the files you want by holding down the Ctrl key while clicking each file, or press Ctrl + A to select all files at once.
- Release the Ctrl key, right-click any of the highlighted files and click “Copy”.
- Open a folder you would like to copy these files into.
- Right-click inside that folder, then click “Paste”.
- Transferring your voice recordings from your digital voice recorder to your computer is simple and can be done in less than 30 seconds!
Conclusion
There are Olympus digital voice recorders that are plug-and-play types. The method of transferring files is the same as moving from one drive to the other. However, for Olympus digital voice recorders with no USB interface, you need a direct connection wherein the audio playback will be recorded to the computer via the microphone input port.
Once you transfer your recordings to a computer, make sure to protect it with Copy Protect. It prevents unauthorized copies of your work to any devices.
