How to Use Voice Recorder on Windows 10? Is your computer not giving certain sound? You can't hear sounds of your friend's voice chat with you while playing games on Xbox One or PS4? Don't worry! This article will show you the best way to configure audio settings to record sound.
Windows 10’s voice recorder is one of its most useful applications. The application makes interviews, lectures, conversations, podcasts, and music recording a lot easier because, with the use of a quality microphone, it can clearly record the user’s voice and automatically saves it on a particular folder in your personal computer. So, how to start using the voice recorder on Windows 10? Learn more here.
Install the voice recorder first
If you already have the voice recording app installed on your Windows 10 desktop, you may skip this step. However, if you still don’t have it installed, follow these simple steps:
- Access the Microsoft Store.
- Select the Get option.

- Select the Open option.
- Then, click Get again.
When you have already completed these steps, you may now launch the application from your Start menu to start recording audio on your tablet, laptop, or desktop.
How to use Voice Recorder on Windows 10?
The Voice Recorder application in Windows 10 is the simplest and least complicated to utilize when you want to record audio. The only equipment you will need is a functional microphone. Your microphone can be a built-in device on your tablet, laptop, webcam, headset, or headphones. The following instructions will tell you how to use the application from the recording, playing, and editing process.
How to record?
To effectively record audio in Windows 10, you have to ensure your microphone is functional and is connected to the device where your Voice Recorder is installed. After checking, follow these steps:
- Select Start.
- Find Video Recorder.
- Then, click the first result that appears on the start menu to open the application.
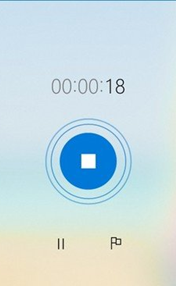
- Finally, click Record.
 You may also type the keyboard shortcut Ctrl + R as an alternative.
 - Although not really needed, you may select Flag, so you could add a recording marker.
This option does not interrupt your audio recording. However, while editing the audio, you may quickly skip into the essential parts of its track. - Another optional step is to click Pause to temporarily stop the recording. This does not terminate the entire recording session, but this can interrupt its flow. Don’t worry because, unlike Stop, pausing will only keep the entire track in one file.
- Click Stop if you want to finish or end the recording.
When you have completed all the steps, your recorded audio will automatically be saved in an mp4 format inside the sound recording folder in your Documents.
Also, if nobody in our family or no one in your office has opened the voice recording app on the computer you are using right now, a window, like shown below, would pop up.
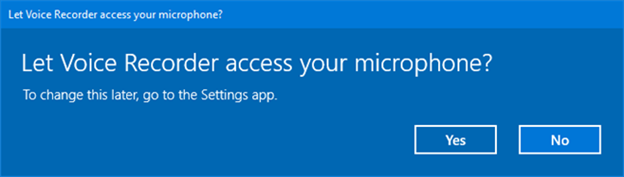
This also occurs when there are actually no previous audios saved on the computer. So, of course, you have to allow the app to access your microphone because if you deny access, the voice recorder will not work.
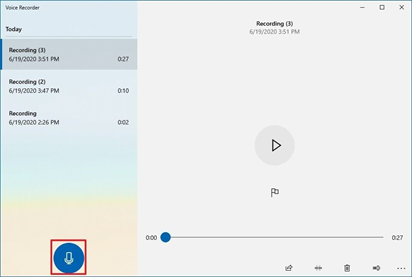
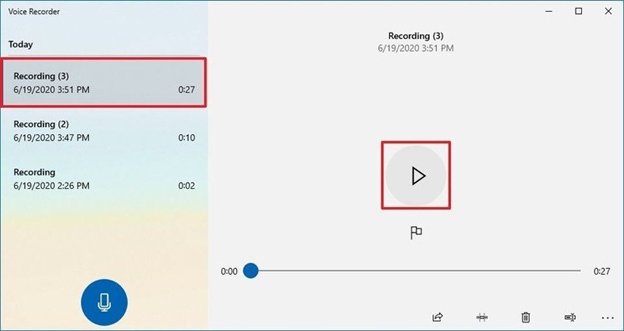
How to play?
- Click Start.
- Find Video Recorder in the Start menu and choose the first result to open the application.
- Choose the recording located in the left pane.
- Select Play so you could start listening to the audio recording.
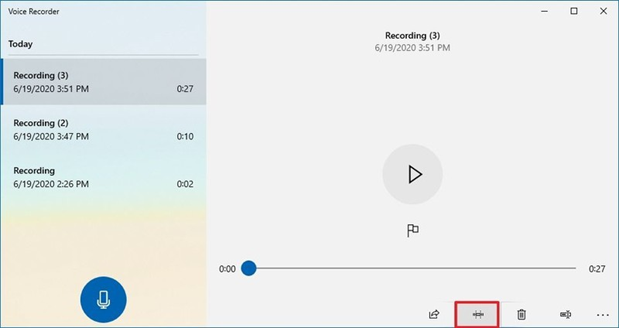
How to trim?
- Click Start.
- Find Video Recorder in the Start menu and choose the first result to open the application.
- Choose the recording located in the left pane.
- Click Trim. This button is located in the app’s bottom-right corner.
- Utilize the track’s pins so you could properly choose the recording’s beginning and endpoints.
- Click Save. You can find the Save button in the app’s bottom-right corner.
- It is highly recommended to choose to Save a Copy.
The above-mentioned steps are the basics of how to use the Voice Recorder app in Windows 10. I hope you can easily follow through and enjoy using more of its features along the process.
Summary: How to Use Voice Recorder on Windows 10?
- Voice Recorder app is a handy tool on Windows 10.
- This app allows you to record voice on Windows 10.
- Here’s how you can use Voice Recorder in Windows 10:
- Open the Microsoft Store and download the Voice Recorder.
- Once downloaded, find the app on the Start menu or desktop, launch it and click the Record button.
- To stop recording, click the Stop button and choose Save as.
- When you have saved your file, tap the Play button to play it back just to make sure it sounds right.
- If your recording is fine, click Done.
- The recording will now be automatically saved in the Documents > Sound recordings folder.
- Using Voice Recorder on Windows 10 is very easy.
